R miniBar RH 423 LDA RH 439LD RH 449LD Type: MB20-60 Free-standing and Built-in versions Version pose libre et version encastrable. Operating Instructions Mode d'emploi 2002714 207.5396.
GB Please read these operating instructions carefully before putting the refrigeration unit into operation. If you later sell or dispose of it, please ensure that the new owner receives these operating instructions. Please follow the installation details below carefully. Guarantee is valid for products installed as described only. (See chapter 4.1.) Thank you for choosing our appliance. We are sure it will provide you with trouble-free use.
GB CONTENTS 1. 2. 3. 4. 5. 6. 7. 8. 9. 10. 11. 12. 13. Unpacking View of the appliance Cleaning Positioning the appliance 4.1. Installation instruction 4.1.1. Built-in version 4.1.2. Free-standing version Using the appliance 5.1. Initial operation 5.2. Temperature regulation 5.3. Cooling unit control (CUC) Useful suggestions Defrosting, cleaning and maintenance 7.1. Automatic defrost function 7.2. Interior light 7.3.
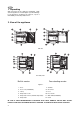
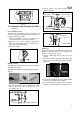
GB 1. Unpacking After removal from the cardboard packaging, make sure the appliance is not damaged. If you find damage to the appliance resulting from transport, report it immediately to the transportation firm. 2. View of the appliance RH 423 RH 439/449 Built-in version Free-standing version Figure 1. 1. 2. 3. 4. 5. 6. Door Door lock (if available) Lamp Evaporator cover Evaporator sensor (behind evaporator) Evaporator 7. 8. 9. 10. 11. 12.
GB 3. Cleaning Clean the refrigerator thoroughly at intervals, as necessary. Remove the shelves; these, parts, as well as the cabinet interior and the door should be washed with a warm solution of sodium bi-carbonate. Finally wipe over with a cloth rinsed in warm water only, and dry with a clean cloth. Do not wash any plastic parts in water that is more than hand warm, and do not expose them to dry heat. The outside of the cabinet should be wiped down regularly with a clean, damp cloth.
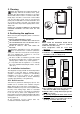
GB no sign of cooling there is a problem and you should then contact Dometic service. D C EntrŁe d’air 6. Useful suggestion min. 60 mm EntrŁe d’air Grille de ventilation miniCool miniBar miniBar miniCool Sortie d’air Sortie d’air Figure 4. During installation, please ensure the mains plug is accessible at all times. 4.1.2. Free-standing version This version is supposed to be used free-standing. Cooling unit covers protect the hot parts of the cooling units. Feet ensure sufficient ventilation.
GB 2. Drill the hole for the LED according to the Figures 10 and 11. 1 Place of LED B mm Door (inside) Dorr(inside mm mm A Figure 6. mm 7.3. Automatic Door Control LED (ADC) Side Wall Back of miniBar 1 (optional) Figure 10. mm mm Door front Door front mm Free-standing version: The LED (Fig. 7.A) mounted to the screw down foot lower door hinge indicated whether the miniBar door has been opened. If so then: 1.
GB 8. Reversing the door hang (Fig. 13.) Reversing is suggested to perform in the following way, in order to avoid breaking of the hinge bolt: Disconnect the mains Lay the appliance down carefully on its back 7 5 Insert the door on the upper hinge and place it. Mount the fixing feet (3) with hinge bolts (9) placed into the opposite side of the feet Mount the two foot-extension pieces (1) Check that the door closes easily and is sealed properly. 9. Replacing the decorative door panel (Fig. 13., 14.
GB 11. Putting into operation Technical data: Model Type Gross volume Mains operation Input Energy consumption Climate class Refrigerant RH 423LDA MB20-60 23 litres 120 V (AC) 75W 0,8 kWh/24h N 159g H2O+86g NH3 RH 439LD MB20-60 24,5 litres 120 V (AC) 65W 0,7 kWh/24h N 147g H2O+98g NH3 RH 449LD MB20-60 30 litres 120 V (AC) 65W 0.8 kWh/24h N 147g H2O+98g NH3 11.1. Connecting to electrical mains The appliance may only be operated from nominal voltage mains as shown on the data plate.
19
Printed by Océ Hungária Kft. Rev.: 2006. 10. 05.