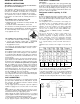
REFRIGERATOR FOR LP-GAS AND ELECTRIC OPERATION. RM2301 RM2401 RM2501 RM2601 RM2801 FOR YOUR SAFETY If you smell gas: 1. Open windows. 2. Don’t touch electrical switches. 3. Extinguish any open flame. 4. Immediately call your gas supplier.
INSTALLATION GENERAL INSTRUCTIONS This appliance is designed for storage of foods and storage of frozen foods and making ice. The refrigerators outlined hereon have been design certified under ANS Z21.19a- 1984 Refrigerators by the American Gas Association for installation in a mobile home or recreational vehicle and are approved by the Canadian Gas Association. The certifications are, however, contingent on the installation being made in accordance with the following instructions as applicable.
SPECIAL HINTS Note. Do not install the appliance directly on carpeting. Carpeting must be protected by a metal or wood panel beneath the appliance which extends at least full width and depth of the appliance. The refngerator must be installed in a substantial enclosure and must be level. A spirit level is supplied with each refrigerator and by placing it in the freezer compartment one can level the refrigerator both ways front to back and side to side.
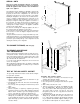
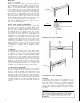
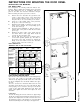
CERTIFIED INSTALLATION # Certified installations require one roof vent and one lower side vent or as optional one upper vent and one lower side vent The two alternatives are provided for by using the drfferent kits listed in the Appendix. For further information contact your dealer or distributor. METHODS OF INSTALLATION The methods of installation are shown in figures 10 a and 10 b.
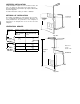
CLEARANCES Minimum clearances in inches to combustible materials are G: Top 0 K: Side 0 L: Bottom 0 M: Rear 1 N: See example below Clearance M between the rearmost part of the refrigerator and the wall behind the refrigerator Clearance N on top of the condenser is related to the minimum ventilation heiqht See Fig 11 and examples below Refrigerator model Installation dimensions Overall dimensions Height A RM 2301 inch 30 3/8 mm 771 Fig.
INSTRUCTIONS FOR USE HOW TO START THE REFRIGERATOR Leveling In the boiler ammonia vapor is distilled from an ammonia-water mixture and carried to the fined condenser, where it liquifies. The liqiud flows to the evaporator where it creates cold by evaporating into a circulating flow of hydrogen gas. If the evaporator coil is not level the liquid readily accumulates, forming pockets which can impair the gas circulation or even block it, in which case, of course, the cooling will stop.
Defrosting Shut off the refrigerator. tmpty the retrigerator leaving the drip tray under the finned evaporator and the cabinet and freezer doors open. If desired, defrosting may be speeded up by filling the ice tray with hot water and placing it in the freezer. When the frost on the tinned evaporator acti on has melted water will be collected in the drip tray. The drip tray should be emptied at regular intervals.
ELECTRIC EQUIPMENT Cartridge heater GAS EQUIPMENT Flue Top and Baffle The flue baffle is suspended from the top, and must be in position in the central tube of the cooling unit. The Flame Failure Safety Device The feeler of the thermo couple shall reach in over two slots of the burner. To replace the thermo couple proceed as follows: 1. 2. 3. 4. 5. 6. 7. Remove the cover. Unscrew plug and pull thermo-couple straight out. Remove spring. Pull out thermo-couple sideways from burner housing.
PERIODIC MAINTENANCE NOTE. Before working on the refrigerator make sure that 120 V A.C and optional 12 V D.C leads are disconnected. Shut off gas valve. The Burner and the Burner Jet The c o l o r of the flame shall be clear blue over the slots of the burner. Once or twice a year depending on use, it is necessary to clean and adjust the burner assembly. Proceed as follows: 1. 2. 3. 4. 5. 6. 7. Loosen screw and remove cover plate for burner housing. Disconnect lighter cable from the electrode.
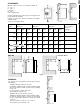
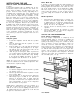
INSTRUCTIONS FOR MOUNTING THE DOOR PANEL INSTRUCTIONS FOR MOUNTING THE DOOR PANEL The refrigerator is normally delivered without door panel(s). Before starting the mounting work check that the panel dimensions are in compliance with those given in the table and read the instructions through. When mounting the panel, proceed as follows. A. B. C. D. E. F. Remove the door decoration list (2) with its two screws (1 j.