SERVI United States SALES OFFICES DOMETIC SALES CORP. INSTALLATION AND OPERATING INSTRUCTIONS 2320 Industrial Pkwy. Elkhart, IN 46515 Phone 219-295-5226 DOMETIC SALES CORP. 14441 Bonelli St. City of Industry, CA 91746 Phone 616-966-9431 DOMETIC SALES CORP. 1625-A Rock Mountain Blvd. Stone Mountain, GA 30083 Phone 404-493-6214 DOMETIC SALES CORP. 7695 S.W. Hunziker Rd. Portland, OR 97223 Phone 503-620-9510 DOMETIC SALES CORP. 2920 Avenue “E” East Arlington, TX 76011 Phone 617-277-7211 DOMETIC SALES CORP.
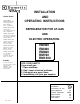
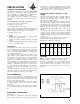
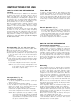
REFRIGERATORS WlTH PIEZ0 IGNITER Fig. la E DCB Fig.
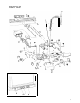
REFRIGERATORS WlTH AUTOMATIC IGNITION E CB A Fig. 4b.
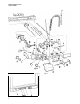
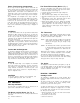
Fig. 5 Fig. 2 Clear blue colour of flame Fig. 3 - Gas equipment parts 1. Burner tube 2. Burner housing 3. Burner jet 4. Feeler point (thermocouple) 5. Flame failure safety device 6. Bypass screw 7. Gas/Electric thermostat 6. Pressure test gage connection 9. Capillary tube for thermostat 10. Shut-off valve 11. Piezo igniter (lighter) 12. Firing tip 24. Hexagon nut Electric equipment parts 13. Flexible cord 14. Change-over switch 15.5Terminal block, 12 V DC 16. Reigniter 17. Relay 22. Cover 23.
INSTALLATION GENERAL INSTRUCTIONS The refrigerators outlined hereon have been design certified under ANS i! 21.19 Refrigerators by the American Gas Association for installation in a mobile home or recreational vehicle and are approved by the Canadian Gas Association. The certifications are, however, contingent on the installation being made in accordance with the following instructions as applicable. The installation must in the USA conform with: 1. National Fuel Gas Code 2223.1-l 974 2. Mobile Homes Al 19.
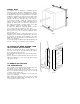
SPECIAL HINTS The refrigerator must be installed in a substantial enclosure and must be level. A spirit level is supplied with each refrigerator and by placing it in the freezer compartment one can level the refrigerator both ways front to back and side to side. When installing the refrigerator in the enclosure care should be taken to ensure a complete sealing between the front frame of the refrigerator and the top, sides and bottom of the enclosure.
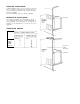
CERTIFIED INSTALLATION Certified installations require one roof vent and one lower side vent or as optional one upper vent and one lower side vent. The two alternatives are provided for by using the different kits listed in the Appendix. For further information contact your dealer or distributor. METHODS OF INSTALLATION Condenser The methods of installation are shown in figures 9 and 10.
CLEARANCES Minimum clearances in inches to combustible materials are G: Top 0 K: Side 0 L: Bottom 0 M: Rear 1 Clearance M between the rearmost part of the refngerator and the wall behind the refrigerator Clearance N on top of the condenser is related to the minimum’ventilation height See Fig 11 and examples below Fig.
INSTRUCTIONS FOR USE HOW TO START THE REFRIGERATOR Leveling In the boiler ammonia vapor is distilled from an ammonia-water mixture and carried to the finned condenser, where it liquifies. The liquid flows to the evaporator, where it creates cold by evaporating into a circulating flow of hydrogen gas. If the evaporator coil is not level the liquid readily accumulates, forming pockets which can impair the gas circulation or even block it, in which case, of course, the cooling will stop.
Frozen Food Storage Compartment The Flame Failure Safety Device (Fig. 3) The ice trays should be placed in direct contact with the freezer shelf for fastest ice making. Quick frozen soft fruits and ice cream should be placed in the coldest part of the compartment which is at the bottom of the aluminum liner or, in models with a shelf, on this or just below it. Frozen vegetables, on the other hand, may be stored in any part of the compartment.
4. With a pair of pliers unfold the lug holding the lid of the boiler casing and open the lid 5. Remove some insulation wool so that the heater is accessible. 6. Turn and lift the heater out of its pocket 7. Fit the new heater into the pocket and pull on the hose around the leads 8.. Connect the leads and put on the plastic cover 9. Reset the insulation and close the lid of the boiler casing The Switch The electric control also comprises an on-off switch operated by the selector knob at the front panel.
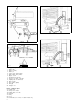
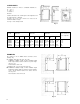
INSTRUCTIONS FOR MOUNTING THE DOOR PANEL The refrigerator is normally delivered without door panel(s). Before starting the mounting work check that the panel dimensions are in compliance with those given in the table and read the instructions through. When mounting the panel, proceed as follows. A. B. Remove the top decoration strip (2) with its two screws (1). Insert one of the vertical edges of the panel into the groove of the door frame (3). C.