TEC29EV-IO-AUS.book Seite 1 Montag, 6.
TEC29EV-IO-AUS.book Seite 2 Montag, 6.
TEC29EV-IO-AUS.book Seite 3 Montag, 6. März 2017 8:37 20 TEC29 EV AUS Please read this instruction manual carefully before installation and first use, and store it in a safe place. If you pass on the product to another person, hand over this instruction manual along with it. Table of contents 1 Explanation of symbols . . . . . . . . . . . . . . . . . . . . . . . . . . . . . . . . . . . . . . . . . . .4 2 Safety instructions . . . . . . . . . . . . . . . . . . . . . . . . . . . . . . . . . . . . . . . .
TEC29EV-IO-AUS.book Seite 4 Montag, 6. März 2017 8:37 20 Explanation of symbols 1 ! ! A I 2 TEC29 EV AUS Explanation of symbols WARNING! Safety instruction: Failure to observe this instruction can cause fatal or serious injury. CAUTION! Safety instruction: Failure to observe this instruction can lead to injury. NOTICE! Failure to observe this instruction can cause material damage and impair the function of the product. NOTE Supplementary information for operating the product.
TEC29EV-IO-AUS.book Seite 5 Montag, 6. März 2017 8:37 20 TEC29 EV AUS 2.1 General safety ! WARNING! Safety instructions • Electrical devices are not toys Keep electrical devices out of reach of children or infirm persons. Do not allow them to use electrical devices without supervision. • People (including children) whose physical, sensory or mental capacities prevent them from using this device safely may not be allowed to operate it without the supervision of a responsible adult.
TEC29EV-IO-AUS.book Seite 6 Montag, 6. März 2017 8:37 20 Safety instructions A NOTICE! 2.2 Mounting the device ! CAUTION! TEC29 EV AUS • Do not fill up the tank too full. Petrol must not be allowed to fill up to the neck of the tank. Check the lid is on properly. • Fire hazards Do not install the generator in a box or room without any openings, but in well-ventilated spaces instead. • Install the generator on a stable surface. • Do not tilt the generator more than 20° from the vertical position.
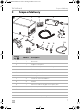
TEC29EV-IO-AUS.book Seite 7 Montag, 6. März 2017 8:37 20 TEC29 EV AUS 3 Scope of delivery Scope of delivery 1 1 3 2 5 4 6 7 9 12 10 11 8 Item in fig.
TEC29EV-IO-AUS.book Seite 8 Montag, 6. März 2017 8:37 20 Accessories 4 TEC29 EV AUS Accessories Available as accessories (not included in the scope of delivery): Part designation Ref.
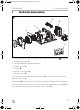
TEC29EV-IO-AUS.book Seite 9 Montag, 6. März 2017 8:37 20 TEC29 EV AUS 7 Technical description Technical description 2 3 4 1 2 5 6 The TEC29 EV AUS generator consists of the following main parts (fig. 2, page 9): • Combustion engine (1) • Alternator (2) with permanent magnets • Stepper motor (3) • Inverter (4) • Internal control panel (5) • Remote control (6) The combustion engine (1) drives the alternator (2) connected to it, which in turn generates AC voltage.
TEC29EV-IO-AUS.book Seite 10 Montag, 6. März 2017 8:37 20 Technical description TEC29 EV AUS The generator has the following features: • Automatic mode for charging the connected battery automatically (must be configured accordingly when installed, see chapter “Configuring the automatic mode” on page 25) Control elements in the control panel 3 1 The control panel is located on the generator behind the cover. Item in fig.
TEC29EV-IO-AUS.book Seite 11 Montag, 6. März 2017 8:37 20 TEC29 EV AUS Technical description Control elements in the digital control panel 4 6 7 8 9 10 5 1 2 3 4 The digital control panel is installed in the vehicle interior. Item in fig. 4, page 11 EN Description 1 Display Shows the status reports. 2 On/Off switch P Switches the digital control panel on and off if the main switch is at “I” or “1”. Stops the generator.
TEC29EV-IO-AUS.book Seite 12 Montag, 6. März 2017 8:37 20 Installation TEC29 EV AUS Displays Item in fig. 4, page 11 Description 6 AC supply Approximate voltage (±5 %) 7 Power output Power draw through connected load 8 Operating hours Time the generator is in operation 9 DC voltage Battery voltage 10 Messages Status reports of the generator (see chapter “Display messages” on page 32) 8 ! 8.
TEC29EV-IO-AUS.book Seite 13 Montag, 6. März 2017 8:37 20 TEC29 EV AUS 8.2 Installation Securing the generator Note on installation location • Make sure that no combustible objects are stored or installed near the air outlet or the ventilation slots. A distance of at least 50 cm should be kept.
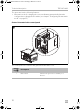
TEC29EV-IO-AUS.book Seite 14 Montag, 6. März 2017 8:37 20 Installation TEC29 EV AUS 6 2 1 310 30 295 23 360 20 35 104 548 • Internal installation (fig. 6): For internal installation, you need to prepare a sealed compartment against the vehicle interior which can also be insulated against sound. – Attach exhaust and air intake openings to the floor and in front of the generator cover. The air intake openings must have cross-section of at least 240 cm2.
TEC29EV-IO-AUS.book Seite 15 Montag, 6. März 2017 8:37 20 TEC29 EV AUS 8.3 Installation Securing the silencer 7 2 3 4 1 Observe the following instructions when installing the exhaust pipe: • Do not create any sharp bends which will inhibit the flow of exhaust fumes. • Align the manifold (fig. 7 1) along the housing to ensure greater damping of vibration. • Use the exhaust pipe extension to extent the exhaust pipe (fig. 7 2) (see chapter “Accessories” on page 8).
TEC29EV-IO-AUS.book Seite 16 Montag, 6.
TEC29EV-IO-AUS.book Seite 17 Montag, 6. März 2017 8:37 20 TEC29 EV AUS Installation a b ➤ Fix the exhaust pipe to the vehicle using flexible elements to reduce vibrations (e.g AG 163, available as accessory).
TEC29EV-IO-AUS.book Seite 18 Montag, 6. März 2017 8:37 20 Installation 8.4 TEC29 EV AUS Installing the tank and fuel supply line Please observe the following instructions for the installation location: • The tank bottom must be positioned at a maximum of 0.3 m below the bottom of the generator. • The top of the tank must not be higher than the top of the generator. c max. 0.3 m max. 2 m ➤ Lay the fuel line as straight as possible. ➤ Secure the tank, see fig.
TEC29EV-IO-AUS.book Seite 19 Montag, 6. März 2017 8:37 20 TEC29 EV AUS 8.5 Installation Mounting the digital control panel Please observe the following instructions for the installation location: • Observe the length of the extension cable from the digital control panel to the generator. d 126 1 105 10.5 22 5 2 38 76 30 ➤ Drill the holes as shown in fig. d. ➤ Insert the plug into the digital control panel. ➤ Screw on the digital control panel.
TEC29EV-IO-AUS.book Seite 20 Montag, 6. März 2017 8:37 20 Connecting the electrical power to the generator 9 D A I 9.1 TEC29 EV AUS Connecting the electrical power to the generator DANGER! Danger of electrocution Make sure there is no voltage at electrically operated components before carrying out work on them! NOTICE! Protect the system with an RCD breaker according to AS3001 regulation. NOTE Observe the applicable guidelines in the country of the consumer.
TEC29EV-IO-AUS.book Seite 21 Montag, 6. März 2017 8:37 20 TEC29 EV AUS 9.2 Connecting the electrical power to the generator Circuit diagrams The complete circuit diagram can be found in fig. e, page 22.
19 3 4 3 2 1 2 1 22 18 4 3 2 1 CN1 CN3 5 1 17 2 CN2 9 8 7 6 5 4 3 2 1 CN5 CN4 1 2 3 4 5 6 1 2 3 4 5 6 4 1 2 3 CN6 4 1 2 3 7 8 6 9 M 14 15 + + 86 30 85 87 86 85 16 11 10 Connecting the electrical power to the generator red 30 87 13 12 - e 9 1 2 3 4 phase neutral 4 TEC29EV-IO-AUS.book Seite 22 Montag, 6.
TEC29EV-IO-AUS.book Seite 23 Montag, 6. März 2017 8:37 20 TEC29 EV AUS Connecting the electrical power to the generator Control panel f 1 2 3 4 5 6 7 8 9 10 Item in fig.
TEC29EV-IO-AUS.book Seite 24 Montag, 6. März 2017 8:37 20 Connecting the electrical power to the generator 9.3 A TEC29 EV AUS Connecting 230 V NOTICE! • Connect a relay or a change over switch to the vehicle’s electrical system so that the generator is not damaged when the external mains is connected (according to AS3001 regulation). • The neutral conductor is internally linked to the PE conductor.
TEC29EV-IO-AUS.book Seite 25 Montag, 6. März 2017 8:37 20 TEC29 EV AUS Connecting the electrical power to the generator g 1 ➤ Connect the negative terminal of the battery using a cable with a suitable crosssection (see above) via the insert of the generator (fig. g 1). ➤ Connect the earth connection on the generator to the vehicle chassis. Remove any paint or rust from the chassis if necessary to ensure good contact. ➤ Protect the connections by applying lubrication. 9.
TEC29EV-IO-AUS.book Seite 26 Montag, 6. März 2017 8:37 20 Connecting the electrical power to the generator TEC29 EV AUS The generator switches off automatically once the battery has been fully charged. The circuit diagram for the automatic mode can be found in fig. h. h Remote switch (not included) Vehicle ignition key white ON black Switch 1 (not included) ➤ Connect the black wire to switch 1 (not included in the scope of delivery).
TEC29EV-IO-AUS.book Seite 27 Montag, 6. März 2017 8:37 20 TEC29 EV AUS 9.7 Connecting the electrical power to the generator Connecting the float ➤ Connect the float from the tank to the float connection (fig. f 9, page 23). 9.8 I Connecting two genarators in parallel NOTE Use only one starter battery to start both generators. When connecting the generators, note the following: • It is not possible to connect more than two generators in parallel.
TEC29EV-IO-AUS.book Seite 28 Montag, 6.
TEC29EV-IO-AUS.book Seite 29 Montag, 6. März 2017 8:37 20 TEC29 EV AUS 10 A I 10.1 ! Operating the generator Operating the generator NOTICE! Do not run the generator over 70 % of the maximum constant output for the first 50 operating hours (run-in phase). NOTE Run the generator at a maximum of approx. 75 % of the maximum continuous load after the run-in phase. By doing this you can prolong the service life of the generator and maximise its efficiency.
TEC29EV-IO-AUS.book Seite 30 Montag, 6. März 2017 8:37 20 Operating the generator 10.3 TEC29 EV AUS Switching the digital control panel on and off This switch (fig. 4 2, page 11) on the digital control panel is for switching the digital control panel on and off. ➤ Switch the digital control panel on with the on/off switch. ✓ The display shows: GEN OFF. The display switches off automatically after 5 minutes if the start button is not touched within this time.
TEC29EV-IO-AUS.book Seite 31 Montag, 6. März 2017 8:37 20 TEC29 EV AUS 10.6 I Operating the generator Operating two generators in parallel (optional) NOTE The maximum allowed load for the parallel system is 4800 W. You can independently turn each generator on and off. If the load is more than 2600 W, you can start both generators in parallel. If the parallel cable is connected, each control panel shows the status of the parallel system: • “GEN ON” (fig.
TEC29EV-IO-AUS.book Seite 32 Montag, 6. März 2017 8:37 20 Operating the generator 10.7 TEC29 EV AUS Display messages To reset the digital control panel when a message appears, press the on/off switch. Display message Description LOW BATTERY Generator behaviour Measures The generator does not start. Charge the battery. The generator continues to run. Change the oil (see chapter “Changing the oil” on page 39), then restart the generator by pressing and holding down the start button.
TEC29EV-IO-AUS.book Seite 33 Montag, 6. März 2017 8:37 20 TEC29 EV AUS Display message Operating the generator Generator behaviour Measures The generator is running but does not supply any voltage. Wait a moment. The generator is switched off. Wait until the message has disappeared then attempt ignition again. Normal mode – –GEN ON A second generator is in standby and can be started. – =GEN ON Two generators run in parallel. – GEN OFF The generator is in stand-by and can be started.
TEC29EV-IO-AUS.book Seite 34 Montag, 6. März 2017 8:37 20 Operating the generator 10.8 ! I TEC29 EV AUS Checking the oil level CAUTION! Hot oil can cause burns. Only check the oil level when the generator is switched off. NOTE The generator must be level. Always check the oil level before use. To do this, proceed as follows (fig. j): j 4 1 2 3 ➤ Open the generator front door. ➤ Switch the generator to no function with the main switch (1). ➤ Disconnect the positive terminal of the supply battery.
TEC29EV-IO-AUS.book Seite 35 Montag, 6. März 2017 8:37 20 TEC29 EV AUS Operating the generator ➤ Take the dipstick (2) out of the filler neck. ➤ Check that the oil level is between the notch (maximum filling level) and the tip of the dipstick (4). If not, top up with more oil. ➤ Put the dipstick (2) back into the filler neck (3). ➤ Check that the oil level is not above the maximum level. ➤ Connect the generator to the positive terminal of the supply battery.
TEC29EV-IO-AUS.book Seite 36 Montag, 6. März 2017 8:37 20 Cleaning the generator TEC29 EV AUS ➤ Press the start button within 15 seconds and hold it down for 4 seconds. ✓ The display shows: GEN AUTO. ➤ The automatic mode is switched on. 10.10 Switching off the automatic mode ➤ Switch off the automatic mode switch (if available). or ➤ Switch on the ignition. ✓ The display shows: GEN OFF. 11 A Cleaning the generator NOTICE! Beware of damage • Do not clean the generator with a high-pressure cleaner.
TEC29EV-IO-AUS.book Seite 37 Montag, 6. März 2017 8:37 20 TEC29 EV AUS 12 I 12.1 ! I Servicing the generator Servicing the generator NOTE Find your Dometic service partner on the internet: http://service-location.dometic.com Maintenance table WARNING! Only have maintenance work carried out by specialist personnel who are familiar with the relevant regulations. Inadequate maintenance may cause serious hazards.
TEC29EV-IO-AUS.book Seite 38 Montag, 6. März 2017 8:37 20 Servicing the generator 12.2 ! TEC29 EV AUS Preparing maintenance work CAUTION! Note the following for all maintenance work: • The generator must not be running. • All the parts must be cooled down. ➤ Switch the generator to the off position with the main switch (fig. j 1, page 34). ➤ Disconnect the positive terminal of the supply battery. ➤ Open the generator front door. For maintenance work, you can take the generator out (fig.
TEC29EV-IO-AUS.book Seite 39 Montag, 6. März 2017 8:37 20 TEC29 EV AUS 12.3 Servicing the generator Finishing maintenance work ➤ Connect the generator to the positive terminal of the supply battery. ➤ Switch the generator to standby with the main switch (fig. j 1, page 34). ➤ Close the generator front door. 12.4 ! A Changing the oil CAUTION! Hot oil can cause burns. NOTICE! Only dispose of used oil at a specialist recycling station and observe the local laws for environmental protection.
TEC29EV-IO-AUS.book Seite 40 Montag, 6. März 2017 8:37 20 Servicing the generator TEC29 EV AUS ➤ Allow the generator to run until warm so that the oil can drain off faster and completely. ➤ Place a suitable receptacle under the drain plug (1). ➤ Take out the drain plug (1). ✓ The oil drains off. ➤ Pour fresh oil into the nozzle. The amount of oil is: 0.6 l. 12.
TEC29EV-IO-AUS.book Seite 41 Montag, 6. März 2017 8:37 20 TEC29 EV AUS Servicing the generator Service the oil filter as follows (fig. m): m 4 3 2 1 ➤ Prepare the maintenance work and pull the generator out of the housing slightly: see chapter “Preparing maintenance work” on page 38. ➤ Remove the butterfly nut (1) and the filter cover (2). ➤ Remove the butterfly nut (3). ➤ Take out the air filter (4). The air filter consists of two parts: a sponge filter and a paper filter.
TEC29EV-IO-AUS.book Seite 42 Montag, 6. März 2017 8:37 20 Servicing the generator TEC29 EV AUS Cleaning the paper filter ➤ Knock the dirt off the paper by banging it lightly on a hard surface or use compressed air to blow through the filter. Do not brush the paper as this will push the dirt into the fibres of the paper filter. ➤ Change the paper filter if it is heavily soiled. 12.6 A Servicing the spark plugs NOTICE! • Screw the spark plugs in carefully.
TEC29EV-IO-AUS.book Seite 43 Montag, 6. März 2017 8:37 20 TEC29 EV AUS Troubleshooting ➤ Measure the distance between the electrodes with a thickness gauge (fig. n, page 42). It must be 0.7 – 0.8 mm and can be corrected by bending the electrode if necessary. ➤ Check whether the spark plug seal is intact. ➤ If so, screw in the spark plugs by hand to avoid damaging the thread. ➤ Tighten the spark plugs using a spark plug wrench so that the washer is pressed together.
TEC29EV-IO-AUS.book Seite 44 Montag, 6. März 2017 8:37 20 Troubleshooting TEC29 EV AUS Fault Cause Remedy The starter turns but the generator does not start. Not enough fuel in the fuel pipe or fuel tank is empty. ➤ Fill up with petrol. Spark plug is not receiving any power. ➤ Check the electric connections. Carburettor is not receiving any petrol. ➤ Clean the carburettor. Air intake is blocked. ➤ Check the air filter (see chapter “Servicing the air filter” on page 40). Inverter is damaged.
TEC29EV-IO-AUS.book Seite 45 Montag, 6. März 2017 8:37 20 TEC29 EV AUS 14 Warranty Warranty The statutory warranty period applies. If the product is defective, please contact the service partner in your country (addresses on the back on the instruction manual). Our experts will be happy to help you and will discuss the warranty process with you in more detail. 15 Disposal ➤ Place the packaging material in the appropriate recycling waste bins wherever possible.
TEC29EV-IO-AUS.book Seite 46 Montag, 6. März 2017 8:37 20 Technical data 16 TEC29 EV AUS Technical data Dometic TEC29 EV AUS Ref. no.: 9102900291 Rated output voltage: 230 Vw / 50 Hz Max. constant output (at 25 °C at sea level): 2600 W Derating altitude: Derating temperature: Battery charger output voltage: Battery charger max. output current: Operating temperature range: Distortion factor: Fuel: Average consumption: Motor output: Sound level at distance of 7 m: Dimensions: Weight: 3.
TEC29EV-IO-AUS.book Seite 47 Montag, 6.
TEC29EV-IO-AUS.book Seite 48 Montag, 6. März 2017 8:37 20 AUSTRIA Dometic Austria GmbH Neudorferstraße 108 A-2353 Guntramsdorf +43 2236 908070 +43 2236 90807060 Mail: info@dometic.at BENELUX Dometic Branch Office Belgium Zincstraat 3 B-1500 Halle +32 2 3598040 +32 2 3598050 Mail: info@dometic.be BRAZIL Dometic DO Brasil LTDA Avenida Paulista 1754, conj. 111 SP 01310-920 Sao Paulo +55 11 3251 3352 +55 11 3251 3362 Mail: info@dometic.com.