Awnings Tents Rooftop TRT140M, TRT120E , TCA100, TMA100 Dometic Rooftop Tents and Awnings Operating Manual
Operating Manual 4 Safety.......................................................................................... 4 Scope of delivery.......................................................................... 4 Important information.................................................................... 5 Product Overview......................................................................... 5 Intended use................................................................................
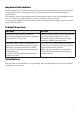
Operating Manual Safety • Before installing your roof tent check your vehicle and roof rack manufacturer’s instructions to ensure sufficient load capacity including both the tent and intended occupants. • We recommend that you DO NOT transport your roof tent over 110 km/h and always keep to the speed limits. • At the beginning of each trip and at regular intervals during each trip, check that your roof tent is firmly attached to your roof racks and that all soft belts are securely fastened.
Important information The manufacturer is not liable for damage or accidents resulting from non-observance of these operating instructions, changes to parts, or the use of parts other than the manufacturer’s original parts. The warnings, cautions and instructions in this document cannot cover every imaginable situation, so it is the user’s responsibility to exercise common sense and caution.
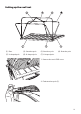
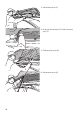
Installing the roof tent (1) Rack (2) Rail (3) Base frame (4) U-shape bracket 1. You must have roof racks correctly fitted to your vehicle before installing the roof tent. 2. Ensure when placing the rooftop tent on your car roof that you share the load across both racks.
3. Adjust the tent to the roof’s centre, ensuring the rear door can be opened/closed. 4. Slide the M8X50 hexagon bolt into the rails from both sides, ensuring you have positioned 8 in total (see Picture 1). Replace the plastic covers of your roof racks (see Picture 2). 5. Use the plastic nut, flat, and split washer to fix the M8X50 hexagon blot and U-shaped bracket in place to all 4 corners (see Picture 3).
TRT140M Installation material Plastic nuts M8X50 Hexagon bolt M8 flat washer / M8 split washer Rail cap U-shape bracket 8
Setting up the roof tent (1) Base (2) Stretcher pole (3) Stretcher pole (5) U-shaped pole (6) U-shaped pole (7) U-shaped pole (4) Stretcher pole 1. Remove the tent’s PVC cover. 2. Find stretcher pole (3).
3. Lift stretcher pole (3). 4. Connect stretcher pole (3) with u-shaped pole (5). 5. Find stretcher pole (4). 6. Lift stretcher pole (4).
7. Connect stretcher pole (4) with the base. 8. Take out stretcher pole (2), which is located in front of the u-shaped pole (6). 9. Connect it with u-shaped pole (6). The tent is set up and ready now. 10. Reverse operation to fold down the tent. Important information If your roof tent will not open, check the following: • Check the stretcher poles are stucked by fabric or not. • Check the joints or connect parts are damaged or not, if yes, replace it damaged part.
TRT120E Installation material Plastic nuts M8X50 Hexagon bolt M8 flat washer / M8 split washer Rail cap U-shape bracket 12
(1) Base frame (2) Pole support system (1) Motor (2) Push rod (3) Motorized pushing rod Operation 1. 2. 3. 4. 5. 6. Remove the tent cover. Insert power cable into cigarette lighter. Make sure power is available. Press the “UP” button to set up the tent. Make sure no other objects are in the tent. Press the “DOWN” button to fold down the tent. Press the “STOP” button to stop. Make sure the tent is folded completely. Then attach the cover.
Technical performance and characteristics of the motor • • • • Rated voltage: 12 VDC Power: 20 W Wireless remote control The erection and dismantling of the tent takes about 50 seconds. Motors equipped with overheat protection. Tips and tricks • • • • Always ensure the tent is dry before packing away. Keep the rail of base clean. Ensure ladder is always locked into place and angled away from vehicle. Pack the tent down well when driving.
Notice • Keep the side window open, when you set up or fold down the tent. • Make sure there is no other object inside the tent, when you set up or fold down the tent, such as a sleeping bag, pillow etc. • Do not press the pole when the tent is folded down. This will damage the pole. • When installing the tent onto the roof of the vehicle. Inspect that all bolts are sufficiently secure. • Make sure the tent is folded down and covered, when you drive.
Tools Tool bag (1) Remote control (2) Two L-shaped hexagonal wrenches (3) Screws and washers Ladder Fit the ladder to the tent frame. Use the strap to tie down ladder for storage. Power cable The power cable can be placed in the pocket beside the door for storage.
Disassembly of the rooftop tent 1. 2. 3. 4. 5. Remove all objects from the roof tent (sleeping bag, pillow, etc.). Loosen the stretcher poles. Open the side windows. Fold up the roof tent. Press the tent walls inwards carefully. Attach the tent cover.
Awnings Select the orientation of the vehicle so that the entrance of the roof tent and the assembly of the awning are positioned from the side facing away from the wind. TCA100 The awning is attached to the poles of the roof tent with loops. After the awning has been fastened and aligned, it is secured to the ground with pegs. TMA100 The awning is attached to the poles of the roof tent with clips. After the awning has been fastened and aligned, it is secured to the ground with pegs.
Set up 1. Take the awning out of the carry bag. 2. Clip the awning onto the pole of the roof tent from the middle to the two sides. • Adjust the length of the adjustable buckles. 3. Clip the awning onto the u-shaped pole on the front. • Adjust the length of the adjustable buckles. 4. Use pegs to tie down awning.
5. The awning can be rolled up from the middle and two sides, and clipped onto the roof. 6. Put the guy-line on. 7. Set up the awning as a canopy. Disassembly 1. Take down the poles and the guy-line. 2. Unclip the awning.
3. Make sure all accessories are together. 4. Place the awning and accessories into the carry bag. Storage Do not store the tent and awning damp or wet. Store the tent and awning in a dry place when not in use.
Warranty If the product does not work as it should, please contact your retailer or the manufacturer’s branch in your country (see dometic.com/dealer). The warranty applicable to your product is 1 year. For repair and warranty processing, please include the following documents when you send in the device: • A copy of the receipt with purchasing date • A reason for the claim or description of the fault Australia only Our goods come with guarantees that cannot be excluded under the Australian Consumer Law.
01/2020 dometic.com YOUR LOCAL SUPPORT YOUR LOCAL SALES OFFICE dometic.com/dealer dometic.com/contact dometic.