INSTALLATION & OPERATING INSTRUCTIONS REVISION E 16138100A 13262 10/16 ©2013 Dometic @2016 DometicCorporation Corporation LaGrange, IN 46761 Elkhart, IN 46514 WASHER / DRYER COMBO VENTLESS MODEL WDCVL(XX) This product is designed solely for use in recreational vehicles or other mobile equipment. Read these instructions carefully. These instructions MUST stay with this product. solely for use in USAThis product is designed CANADA recreational vehicles or other mobile equipment.
INTRODUCTION These instructions apply to the washer/dryer combo (hereinafter referred to as the “appliance”). The appliance is designed and intended for installation and use in a recreational vehicle or other mobile applications. These instructions will ensure a properly installed and properly functioning appliance. Dometic Corporation reserves the right to modify appliance appearances and specifications without notice. TABLE OF CONTENTS INTRODUCTION ........................................................
IMPORTANT SAFETY INSTRUCTIONS This manual has safety information and instructions to help you eliminate or reduce the risk of accidents and injuries. A. The safety precautions provided in this manual cannot cover all possible conditions that may occur. Common sense and caution MUST be exercised when installing, maintaining, and operating this appliance.
IMPORTANT SAFETY INSTRUCTIONS ● This appliance MUST be grounded. In the event of a malfunction or breakdown, grounding will reduce the risk of electrical shock by providing a path of least resistance for the electric current. This appliance is equipped with a cord that has an equipment-grounding conductor and a grounding plug. The plug MUST be plugged into an appropriate outlet that is properly installed and grounded in accordance with all local and national codes and ordinances.
IMPORTANT SAFETY INSTRUCTIONS Failure to obey the following instructions could result in premature wear, water damage, or other damage to the appliance or its surroundings. G. Maintenance, Service, and Disposal Precautions Failure to obey the following instructions could result in death or serious injury due to electrical shock, fire, or suffocation. ● Before operating this appliance, all packing materials and transport bolts MUST be removed.
INSTALLATION REQUIREMENTS B. Risk of serious injury or death due to electrical shock. Selecting the proper location for your appliance improves performance, minimizes noise and possible appliance movement. Your appliance can be installed under a custom counter, closet, or recessed area. See “Drain System Options” (Page 8). Proper installation is the qualified installer's responsibility. The appliance MUST be properly grounded.
INSTALLATION REQUIREMENTS D. Electrical Requirements FIG. 2 Risk of serious injury or death due to electrical shock, fire, or explosion if the following instructions are NOT followed. ● A 120V/60Hz, AC only, 15 or 20 amp fused electrical supply is required. A time-delay fuse or a circuit breaker serving only this appliance MUST be provided. ● This appliance is equipped with a power supply cord that has a 3-prong grounding plug. Do NOT remove the ground plug. ● Do NOT use an adapter.
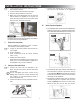
INSTALLATION INSTRUCTIONS 3. Connect the opposite end of the hose to the inlet valve on the backside of the appliance. L oosen all bolts with a wrench and then remove them and their sleeves. 2. Cover the holes with transport hole plugs. 3. Keep the transport bolts for future use. 4. Make sure the small triangle foam is removed with the bottom one together. If not, lay the unit down with side surface, then remove the small foam from the unit bottom manually. FIG. 5 K.
INSTALLATION INSTRUCTIONS ● The floor drain system (Fig. 9) requires an air gap and siphon break that MUST be purchased separately. The siphon break MUST be a minimum of 23.6 inches (60 cm) from the bottom of the appliance. Additional hoses may be needed. b. After positioning the appliance, ensure that it is stable by pressing on the four corners of the appliance. If the appliance shifts, the leg underneath must be adjusted. FIG. 11 FIG. 9 L. c.
OPERATING INSTRUCTIONS A. ● Some clothes such as fleece and corduroy should be turned inside-out before laundering to reduce fiber loss. ALWAYS check the care label before laundering. Laundering Recommendations ● Review, understand, and follow all Safety and Operation instructions when operating the appliance. ● Thoroughly review all operating instructions before using the appliance. Any incline of the RV contributes to the angle of the appliance.
OPERATING INSTRUCTIONS ● Zippers should be zipped closed and buttons or hooks should be secured. B. ● NOTE: Any type of garment with hook or wire inserts should be washed within an enclosed mesh bag. It is suggested to wash bras in a pillow slip to prevent the steel wire from protruding from the bra and potentially damaging the appliance. Other delicate fabric, such as stockings or handkerchiefs, should also be washed within an enclosed mesh bag. View of Control Panel and Functions 1. 2. FIG. 15 3. 4.
Notes: 1. The control panel line chart is for reference only. 2. The control panel could be changed without written notice. 3. The program cycle with icon indicates that the Dry cycle option is available as an add on. FIG.
OPERATING INSTRUCTIONS ● My Cycle: Press "Spin" for 3 seconds to load the cycle and options you are currently using to the "my cycle" program. Selecting this program in the future will load the cycle for quick use. ● Heavy Duty: The Heavy Duty wash is for heavy material and has the option of Wash+Dry, . ● Bulky/Large: The Bulky/Large wash is for materials that are bulky with the cycle running approximately 1 hour and 30 minutes. C. ● Duvet: The Duvet wash is designed for washing duvet.
OPERATING INSTRUCTIONS D. ● Pour liquid pre-detergent into Case I (when necessary). ● Pour liquid detergent into Case II. 2. Pour laundering additives, such as fabric softeners, into Case when necessary). 3. Close the drawer securely. Reference Symbols Displayed on the Panel NOTICE: Dilute liquid detergents or additives with water before pouring it into the detergent dispenser to prevent the inlet from being blocked and overflowing while filling with water. F.
OPERATING INSTRUCTIONS TABLE OF WASH and Dry Selections TABLE 2 Program Light Soil Level Med Heavy Highest High Spin Speed Med Low No Spin None Dry Normal / Cotton Heavy Duty Sports Bulky Duvet Quick Delicate Wool Under Ware YD Y Y Y YD YD Y YD YD N Y Y Y Y Y Y Y Y Y N YD N Y N Y YD Y N N Sanitize Y YD YD YD Y Y Y YD Y Y Y Y YD Y YD YD Y YD Y Y YD Y Y Y Y YD Y YD YD Y N Y Y Y Y Y Y Y Y Y N Y N Y N Y N Y N Y N Y N N Y Y
CARE AND CLEANING C. Failure to obey the following instructions could result in death or serious injury due to fire or explosion. Cleaning the Detergent Dispenser and Grooves R emove the drawer. 1.1 Pull out drawer. 1.2 Press lever down. 1.3 Remove drawer. 1.2 FIG. 19 ● Read and understand all safety instructions. ● Before attempting maintenance, disconnect the power and shut the water valves off.
CARE AND CLEANING F. 6. When water no longer spills out, unscrew the pump cover and remove it. Always keep a rag nearby to dry up any spillage of water when removing the cover. 7. Remove any objects. 8. Fully screw the pump cover in. 9. Close the service panel. Washing the Filter in the Appliance U nscrew the inlet hose from the backside of the machine. 2. Pull out the filter with long-nose pliers, and reinstall it after cleaning (see Fig. 21). 3. Reconnect the inlet hose. 4.
TROUBLESHOOTING Problem Reason Solution Appliance does not start up Check that the door is closed tightly. Check that the power plug is inserted properly. Check that the electric supply fuse/breaker is not tripped. Check that the water supply taps are open. Ensure the inlet hose filters are unobstructed. Check if the “Power” button is pressed. Check if the “Start/Pause” button is pressed. Door does not open Water remains in the drum. Internal temperature is too high. Water temperature is too high.
DISPLAY DIAGNOSTIC CODES Diagnostic Service Codes Description Appliance Action User Corrections E10 Water fill time exceeds 7 minutes. Unit will close valves and stop. Tap is not open. Check inlet hose and filters. E11 There is excessive water left in the unit during unit standby or end of cycle. Unit will start pump with Check outlet hose for folddoor locked, valve closed, ing, clogs and grey water tank and motor stopped. level. Run spin cycle to drain water.
APPENDIX A. Fabric Care Label References B. Technical Specifications Power Supply 120V / 60Hz Dimension (W*D*H) 23.44”*23.06”*33.44” (595MM*565MM*850MM) Weight 174lbs (79kg) Laundering/Dry Capacity 15lbs (6.8kg)/ 7.5lbs (3.4kg) Rated Current 12A Standard Water Pressure 7.3-145 psi (0.05MPa-1MPa) Max.
NOTES: 21