
User Manual


18
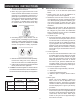
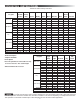
TROUBLESHOOTING
Problem Reason Solution
Appliance does not
start up
Check that the door is closed tightly. Check that the
power plug is inserted properly. Check that the elec-
tric supply fuse/breaker is not tripped. Check that the
water supply taps are open. Ensure the inlet hose
fi lters are unobstructed. Check if the “Power” button is
pressed. Check if the “Start/Pause” button is pressed.
Door does not open Water remains in the drum.
Internal temperature is too high.
Water temperature is too high.
The machine’s safety design protections are work-
ing. Disconnect the power. Reconnect the power after
allowing the machine to cool. Continue original cycle.
Run spin cycle if necessary.
Water does not get
warm or hot
The temperature sensor is damaged. Normal laundering can continue, but without hot water.
Contact the service center promptly.
Water leakage The supply hose gasket is missing or
damaged.
The connection between inlet hose
or outlet hose and tap or laundering
machine is not tight. Drain pipe in the
room is blocked.
Check and fasten the water hoses. Clean up the outlet
hose and ask a specialized technician to repair it when
necessary.
Water is overfl owing
from the bottom of the
machine
The inlet hose is damaged or not con-
nected fi rmly.
Outlet hose has water leakage.
The pump service plug is not tight.
Fix the inlet hose. Tighten the pump service plug. Re-
place the drain pipe.
Indicator or display
does not light
Power is disconnected. The PC board
has problems.
Loose wiring connections.
Check if the power breaker/fuse is shut down and
power plug is connected correctly. Contact a qualifi ed
service technician.
Detergent residue in
the dispenser
Powdered detergent was used or liq-
uid detergents were not diluted.
Clean and wipe the dispenser. Use liquid HE deter-
gents or laundry pods per the instructions.
Laundering effects are
not satisfactory
The clothes are too dirty, insuffi cient
detergent was used, or the wrong
cycle was chosen.
Do not wash heavily soiled fabrics. Select a proper
cycle. Add the proper detergent quantity according to
the instructions on the detergent package.
Abnormal noise or
vibration
Check if the transport bolts have been removed, and
that the cabinet is installed on a solid level fl oor. Check
if there are any heavy or metal articles inside the drum.
Check if the legs in the laundering machine are prop-
erly leveled.
Frozen appliance/
drain pipe/hose(s)
Appliance was located in a location
where freezing temperatures were
present and water was left in the drain
pipe and/or hose(s).
Verify the vehicle's supply water pipes are not dam-
aged. Disconnect the power supply for the appliance.
Wash the tap with warm water to loosen the inlet hose.
Remove the inlet hose and immerse it in warm water.
Pour warm water into the laundering drum and wait
10 minutes. Reconnect the inlet hose to the tap, and
check that the inlet and outlet are working normally.
Timer display on
same # for extended
period of time.
Large drying loads require extended
time to dry completely. Internal drum
sensor communicates to "pause" the
countdown to ensure maximum drying
level is achieved.
Note: The unit is still functioning properly even if the
timer display is paused. To avoid this "pause" on the
display, dry load size should be less than 7.5lbs.