DC-B8CB1N-PS(VE3.0) 04.3.23 5:1 AM 페이지1 CAUTION RISK OF ELECTRIC SHOCK DO NOT OPEN CAUTION: TO REDUCE THE RISK OF ELECTRIC SHOCK, DO NOT REMOVE COVER (OR BACK). NO USER-SERVICEABLE PARTS INSIDE. REFER SERVICING TO QUALIFIED SERVICE PERSONNEL.
DC-B8CB1N-PS(VE3.0) 04.3.23 5:1 AM 페이지2 IMPORTANT SAFEGUARDS This set has been designed and manufactured to assure personal safety. Improper use can result in electric shock or fire hazard. The safeguards incorporated in this unit will protect you if you observe the following procedures for installation, use and servicing. This unit is fully transistorized and does not contain any parts that can be repaired by the user.
DC-B8CB1N-PS(VE3.0) 04.3.23 5:1 AM 페이지3 810 of the National Electrical Code, ANSI/NFPA No. 70-1984 (Section 54 of Canadian Electrical Code, Part 1) provides information with respect to proper grounding of the mast and supporting structure, grounding of the lead-in wire to an antennadischarge unit, connection to grounding electrodes, and requirements for the grounding electrode. See example as shown.
DC-B8CB1N-PS(VE3.0) 04.3.23 5:1 AM 페이지4 FEATURES...
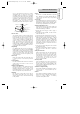
DC-B8CB1N-PS(VE3.0) 04.3.23 5:1 AM 페이지5 Please read carefully before using this DVD player. Placement and handling • The picture and sound of a nearby TV, VCR, or radio may be distorted during playback. In this case, position the unit away from the TV, VCR, or radio, or turn off the unit after removing the disc. • Do not use volatile liquids, such as insecticide spray, near the unit. Do not leave rubber or plastic products in contact with the unit for a long period of time.
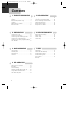
DC-B8CB1N-PS(VE3.0) 04.3.23 5:1 AM 페이지6 CONTENTS 1. PRODUCT INFORMATION Important Safeguards ................................ 1 Features... ................................................. 4 Read Carefully Before Using ..................... 5 Contents ................................................... 6 Identification of Controls .......................... 7 Remote Control ...................................... 10 2. INSTALLATION Connecting to a TV ..................................
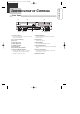
DC-B8CB1N-PS(VE3.0) 04.3.23 5:1 AM 페이지7 PRODUCT INFORMATION IDENTIFICATION OF CONTROLS Front Panel ! $ % @ ^& * # ( ! √ Power button Use to power the device on/off if AC power supply is connected. @ Use to insert videotape # Disc tray $ Video input jack % Audio input jacks ^ VCR Eject button & Record button * Channel Up/Down buttons ( Operation Display Window Displays the status of device. For more information, see “Operation Display Window” on the next page.
DC-B8CB1N-PS(VE3.0) 04.3.
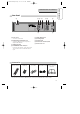
DC-B8CB1N-PS(VE3.0) 04.3.23 5:1 AM 페이지9 OF CONTROLS Rear Panel ! #$ % ^& DVD + VCR DVD ONLY AUDIO OUT * COMPONENT VIDEO OUT Y VIDEO VIDEO 1 OUT IN IN (FROM ANT.) R R AUDIO Pr L RF S-VIDEO OUT COAXIAL L DIGITAL AUDIO OUT VIDEO @ ! Power Cord OUT (TO TV) Pb ( % S-Video Output Jack ^ A/V Output Jack & A/V Input Jack * Connection to Antenna/Cable ( Connection to TV Connect to wall outlet.
DC-B8CB1N-PS(VE3.0) 04.3.23 5:1 AM 페이지10 REMOTE CONTROL Switches the DVD+VCR on or off. [DVD] Opens/closes the disc tray, [VCR] Ejects a tape Changes to VCR mode. Changes to DVD mode. Selects the devices connected to the Audio/Video sockets (AV1, AV2, VCR, DVD). [VCR] Manually reduces of streaks or picture "jitter". Number entry [DVD] Activates Progressive Scan, [VCR] Number 100 Navigate through the menus., [VCR] Channel Up/Down button Confirms a menu selection.
DC-B8CB1N-PS(VE3.0) 04.3.23 5:1 AM 페이지11 Starts playing a disc or a tape. Pauses playback or recording modes. Starts fast reverse, reverses accelerated play or reverses slow motion Starts fast forward, forward accelerated play or forward slow motion Stops play, accelerated search, slow motion or recording. [VCR] Starts record mode on tapes with the safety tab intact. Press this repeatedly to set a recording duration for OTR. [VCR] Overrides the default recording speed (either SP or SLP).
DC-B8CB1N-PS(VE3.0) 04.3.23 5:1 AM 페이지12 CONNECTING TO A TV ■ The default RF Output channel is CH3. If Channel 3 is used by a TV station, you must change it to Channel 4. See "To Set Output Channel" on page 23. Various methods of connecting your TV Rear Panel of DVD+VCR DVD + VCR DVD ONLY AUDIO OUT COMPONENT VIDEO OUT Y CAUTION RISK OF ELECTRIC SHOCK DO NOT OPEN IN IN (FROM ANT.
DC-B8CB1N-PS(VE3.0) 04.3.23 5:1 AM 페이지13 CONNECTING A CABLE BOX How to connect Cable Box Rear Panel of DVD+VCR Rear Panel of TV INSTALLATION INPUT 1 INPUT 2 DVD + VCR IN VIDEO VIDEO 1 OUT IN IN (FROM ANT.) R AUDIO RF OUT L OUT ANT IN (TO TV) A/B Switch RF Cable VIDEO RF Cable AUDIO/VIDEO Cable Splitter (Not supplied) RF Cable OUT If your cable system provides all your channels IN OUT RF Cable Cable Outlet (i.e.
DC-B8CB1N-PS(VE3.0) 04.3.23 5:1 AM 페이지14 CONNECTING OTHER VIDEO EQUIPMENT ■ You can connect a wide variety of audio/video equipment to your DVD+VCR, including an additional VCR, Laser Disc Player, DVD Player, Camcorder, Satellite Receiver, or Video Game. Because these devices use all of connections, they are described together.
DC-B8CB1N-PS(VE3.0) 04.3.23 5:1 AM 페이지15 CONNECTING TO A STEREO RECEIVER How to Connect COMPONENT VIDEO OUT Y VIDEO VIDEO 1 OUT IN INSTALLATION DVD + VCR DVD ONLY AUDIO OUT IN (FROM ANT.) R R AUDIO Pr L RF S-VIDEO OUT COAXIAL L OUT (TO TV) Pb DIGITAL AUDIO OUT VIDEO ANT INPUT CAUTION RISK OF ELECTRIC SHOCK DO NOT OPEN CAUTION: TO REDUCE THE RISK OF ELECTRIC SHOCK. DO NOT REMOVE COVER (OR BACK). NO USER SERVICEABLE PARTS INSIDE. REFER SERVICING TO QUALIFIED SERVICE PRESONNEL.
DC-B8CB1N-PS(VE3.0) 04.3.23 5:1 AM 페이지16 CONNECTING TO A DOLBY DIGITAL DECODER OR DTS DECODER How to Connect DVD + VCR DVD ONLY AUDIO OUT COMPONENT VIDEO OUT Y VIDEO 1 IN IN (FROM ANT.) AUDIO Pr L RF S-VIDEO OUT COAXIAL DIGITAL AUDIO OUT VIDEO OUT R R L OUT (TO TV) Pb VIDEO ANT INPUT CAUTION RISK OF ELECTRIC SHOCK DO NOT OPEN CAUTION: TO REDUCE THE RISK OF ELECTRIC SHOCK. DO NOT REMOVE COVER (OR BACK). NO USER SERVICEABLE PARTS INSIDE. REFER SERVICING TO QUALIFIED SERVICE PRESONNEL.
DC-B8CB1N-PS(VE3.0) 04.3.23 5:1 AM 페이지17 OUTPUT SELECT To Select DVD Press the [DVD] button. INSTALLATION "DVD" lights on the operation display window and all remote control buttons control the DVD player. To Select VCR Press the [VCR] button. BASIC OPERATION "VCR" lights on the operation display window and all remote control buttons control the VCR. To Watch TV or External Input Press the [TV VIEW] button. The unit will cycle through VCR PLAYBACK ➝ BROADCASTING RECEPTION ➝ EXTERNAL INPUT.
DC-B8CB1N-PS(VE3.0) 04.3.23 5:2 AM 페이지18 DVD PLAYBACK •If you do not close the tray, it will be closed automatically in 5 minutes to protect it from damage. •Some CD-R, CD-RW (MP3, AUDIO CD) may not play due to disparities in producing medium (PC, CD-Recorder), media type, and/or disc format. 1 2 3 Press [√] to turn on the unit. 4 5 Press [OPEN/CLOSE] to close the tray. 6 7 8 To stop playback, press [ ]. Press [DVD] to select DVD mode. Press [OPEN/CLOSE] to open the disc tray.
DC-B8CB1N-PS(VE3.0) 04.3.23 5:2 AM 페이지19 DVD PLAYBACK Selecting an audio language ■ You may select an audio language if a disc includes multiple languages. Certain discs may not support audio selection. Keep pressing [AUDIO] until your preferred language appears in playback mode. ENG 01/03 If the DVD disc includes audio information, every time you press [AUDIO], English (ENG), French (FRE), Spanish (SPA), etc. appear one by one.
DC-B8CB1N-PS(VE3.0) 04.3.23 5:2 AM 페이지20 VCR PLAYBACK 1 2 3 4 Press [√] to turn on the DVD/VCR. 5 Press [VCR EJECT] on the unit or [OPEN/CLOSE] on the remote control to eject the tape. Press [VCR] to select VCR mode. Insert the desired tape. To start playback, press [PLAY]. If the picture is flickering or poor quality, adjust it with the [TRACKING +/–] buttons. To stop playback, press [ ]. To pause playback, press [PLAY]. Press [PLAY] again to resume playback.
DC-B8CB1N-PS(VE3.0) 04.3.23 5:2 AM 페이지21 CLOCK SET Press [VCR] on the remote control to select VCR mode . Press [SETUP]. Press [ENTER] to select “CLOCK SET”. “Time and Date Set” is already selected. Press [ENTER]to set the time and date. SETUP CLOCK SET TIMER RECORDINGS CHANNEL SET FUNCTIONS LANGUAGE SELECT Move: End: SETUP BASIC OPERATION 1 2 3 Set the TV to CH 3 (or 4).
DC-B8CB1N-PS(VE3.0) 04.3.23 5:2 AM 페이지22 MEMORIZING TV CHANNELS To Automatically Memorize Channels ■ Memorizing channels allows you to use the CH+/- button without seeing empty channels. You can manually delete channels you do not want to watch. 1 Press [VCR], then press [SETUP]. 2 Select “Auto Channel Search”. Press [v] to move the to “CHANNEL SET”, and then press [ENTER]. Press [ENTER] to select “AUTO CHANNEL SEARCH”. Select “Detect Automatically”.
DC-B8CB1N-PS(VE3.0) 04.3.23 5:2 AM 페이지23 MEMORIZING TV CHANNELS To Delete Channels Manually ■ To delete memorized channels: 1 Press [VCR], then press [SETUP] and select ADD/REMOVE CHANNELS “CHANNEL SET”. Select “Add/Remove Channels”. Channel 02 is now REMOVED. 2 Select the desired channel and delete it. Use the [0-9] buttons to select the desired channel to delete. When [<] is pressed, “ADDED” under the channel number changes to “REMOVED”.
DC-B8CB1N-PS(VE3.0) 04.3.23 5:2 AM 페이지24 RECORDING To Record With VCR 1 Press [√] to turn on the DVD/VCR. 2 3 4 5 6 7 Insert a recordable tape. • Press [VCR] to select VCR mode. • Turn on the TV and select Ch 3, or press [INPUT] on your TV to select External Input mode. Insert a tape with recording tab. With [CHANNEL], [0-9] and [TV VIEW] buttons, select the desired channel or external input to record. Select the desired speed (SP or SLP) with the [SPEED] button. Press the [REC] button.
DC-B8CB1N-PS(VE3.0) 04.3.23 5:2 AM 페이지25 RECORDING To Record From DVD To Videotape during DVD playback 1 Press [DVD] to select DVD mode. Insert the desired DVD disc. You cannot record copy-protected DVD discs. Insert a recordable tape into the VCR. 2 Press [PLAY] to start the DVD playback and press [REC] to start the VCR recording. 3 To exit copy, press [ ]. Recording stops automatically when DVD playback is finished or recorded tape reaches the end.
DC-B8CB1N-PS(VE3.0) 04.3.23 5:2 AM 페이지26 TIMER RECORDING Timer Recording 1 2 3 4 5 Turn on the TV. Make sure the current time is set correctly (see page 21 for instructions on setting the clock). Insert a recordable tape with recording tab. Press [VCR] to select VCR mode. Press [SETUP] and select “TIMER RECORDINGS”. Move to “TIMER RECORDINGS” with [v] and press [ENTER]. SETUP CLOCK SET TIMER RECORDINGS CHANNEL SET FUNCTIONS LANGUAGE SELECT Move: End: SETUP 6 Select “Make a New Program”.
DC-B8CB1N-PS(VE3.0) 04.3.23 5:2 AM 페이지27 TIMER RECORDING 9 Set Date and Time to Record. Select the date, start time and end time to record using [0-9]. PROGRAM1 (ONE TIME) Channel Start Date Start Time End Time Tape Speed Move: Video: TVview 10 11 Select either SP, SLP or Auto with [v] or [^]. For more information on recording speed, see “Using video cassette” on page 28. Press [SETUP] to complete the Timer Recording. “Program # has been saved. For program recording, insert a cassette....
DC-B8CB1N-PS(VE3.0) 04.3.23 5:2 AM 페이지28 TIMER RECORDING Timer Program Setting Press [PROGRAM] in VCR mode. This is a shortcut to view the Timer Recording menu. Before setting a Timer Recording, the clock should be set correctly and VCR mode should be selected. Types of Timer Recordings One Time: A single Timer Recording on a specific date and time. Daily : A Timer Recording that will record at the same time every day. Weekday : A Timer Recording that will record at the same time Monday through Friday.
DC-B8CB1N-PS(VE3.0) 04.3.23 5:2 AM 페이지29 WATCHING AND RECORDING CABLE TV To Watch and Record Cable TV ■ Because of the nature of converter boxes, you cannot watch one Cable TV channel and record another at the same time. 1 Turn on the cable box and then set a channel to watch or to record. Turn on the DVD+VCR and then set the DVD+VCR channel connected to the converter (CH03/04/EXTERNAL INPUT). Power on TV and then set the channel connected to the DVD+VCR (CH03/04/VCR).
DC-B8CB1N-PS(VE3.0) 04.3.23 5:2 AM 페이지30 USING ADVANCED VCR FEATURES Auto Playback ■ With Auto Play turned on (the factory default setting), the DVD+VCR player automatically starts playback when you insert a tape with its safety tab removed. 1 SETUP Press [SETUP] and select “FUNCTIONS”. CLOCK SET TIMER RECORDINGS CHANNEL SET FUNCTIONS LANGUAGE SELECT Move to “FUNCTIONS” with [v] and press [ENTER]. Move: End: SETUP 2 FUNCTIONS Press [ENTER] to switch between ON and OFF.
DC-B8CB1N-PS(VE3.0) 04.3.23 5:2 AM 페이지31 USING ADVANCED VCR FEATURES Searching a cassette tape for programs (indexing) ■ When you record a program, the VCR places an index mark at the start of the recording. To search for an index mark: FUNCTIONS 1 Press [SETUP] and select “FUNCTIONS”. 2 INDEX SEARCH If you want to scan through a certain number Press REW or FF of index marks, use the number buttons to to begin searching enter the number of marks you want to or Enter a specific search.
DC-B8CB1N-PS(VE3.0) 04.3.23 5:2 AM 페이지32 USING ADVANCED VCR FEATURES Set Auto Repeat ■ You can set the DVD/VCR to play the same segment of a tape over and over in a repeating loop. 1 Press [SETUP] and select “FUNCTIONS”. 2 The Set Auto Repeat menu will ask for a loop end time to be specified. To turn off Set Auto Repeat,press the [CLEAR] button. Select “Set Auto Repeat”.
DC-B8CB1N-PS(VE3.0) 04.3.23 5:2 AM 페이지33 USING ADVANCED VCR FEATURES Marking a tape for zero search 1 Use PLAY, REW, or FF to locate the point on the tape you would like to mark as 0:00:00. Pause the tape at this point. 2 Press [DISPLAY] to display the tape counter on the screen. 3 Press [CLEAR] to reset the tape counter to 0:00:00. 4 You can continue to play the tape or perform other functions with the VCR. On-Screen Display (O.S.
DC-B8CB1N-PS(VE3.0) 04.3.23 5:2 AM 페이지34 HI-FI STEREO PLAYBACK Playing a tape in Hi-Fi high-quality • “Hi-Fi” appears at the top of the screen. • Pressing [AUDIO] changes the audio track as follows: Hi-Fi LINEAR MIX If there is noise in the recording, please select “Linear” to reduce it. Forced Mono • In some cases reception is poor when receiving stereo or SAP (Secondary Audio Program) audio signals. Press [AUDIO] to improve this poor audio quality by changing to mono sound.
DC-B8CB1N-PS(VE3.0) 04.3.23 5:2 AM 페이지35 PLAYING A DESIRED SCENE To skip scenes on a disc DVD, VCD, VCD2.0, CD, MP3 To skip to the next chapter (or track), press [ √√❚ ]. The current chapter (or track) skips to the next chapter (or track). To skip to the previous chapter (or track), press [❚œœ ]. The current scene skips to the previous chapter (or track) or to the first scene of the current chapter (or track). Jumping directly to a desired title DVD ■ Some movie discs contain multiple titles.
DC-B8CB1N-PS(VE3.0) 04.3.23 5:2 AM 페이지36 PLAYING A Repeating chapters, titles, and tracks DESIRED SCENE DVD, VCD, CD, MP3 In playback mode, pressing [REPEAT] more than once changes the repeat action as follows: - VCD TRACK ➝ ➝ DISC ➝ OFF REPEAT ALL ➝ ➝ OFF REPEAT ONE ➝ ➝ TITLE - CD/MP3 ➝ CHAPTER ➝ - DVD - RANDOM ➝ • CHAPTER : Current chapter will play repeatedly. • TITLE : Current title will play repeatedly. • TRACK : Current track will play repeatedly.
DC-B8CB1N-PS(VE3.0) 04.3.23 5:2 AM 페이지37 PLAYING A DESIRED SCENE Searching a DVD by Title, Chapter or Time The current and total number of chapters are displayed. Use the [0-9] buttons to enter the desired chapter number. 4 When finished, press [ENTER]. ➟ current chapter 001/023 total chapter 01:03:20 ➟ 3 If you want to search for a time, press [SEARCH] three times. total title ➟ If you want to search for a chapter number, press [SEARCH] twice.
DC-B8CB1N-PS(VE3.0) 04.3.23 5:2 AM 페이지38 PLAYING A DESIRED SCENE Storing bookmarks in memory to be viewed (listened to) again DVD ■ Storing a bookmark in the DVD memory is similar to marking your page in a book. It allows you to quickly return to any point on the disc. Marks are not permanent. They are erased from the DVD memory when you eject the disc or power off the DVD. 38 1 Storing a marker in the memory.
DC-B8CB1N-PS(VE3.0) 04.3.23 5:2 AM 페이지39 CONFIRMING CURRENT PLAY MODE Confirming the current disc mode While in Play mode, press [DISPLAY]. The current disc mode is displayed. If you want to change the mode, select the item with [^] or [v] and enter the new settings with the [0-9], [<] or [>] buttons.. When finished with each change, press [ENTER]. To exit Display mode, press [DISPLAY] again.
DC-B8CB1N-PS(VE3.0) 04.3.23 5:2 AM 페이지40 ZOOM, MULTI ANGLE AND 3D AUDIO Using the zoom function DVD, VCD ■ You can enlarge the current screen 2 or 4 times. In the case of SVCD and VCD, only 2 times Zoom is available. Keep pressing [ZOOM] until the preferred level of magnification appears. Each you press [ZOOM], the zoom magnification changes 2 times (X2) ➝ 4 times (X4) ➝ OFF ➝ 2 times (X2) ➝ ... The default zoom position is the center of the screen. You can move this point using [ < > ^ v ].
DC-B8CB1N-PS(VE3.0) 04.3.23 5:2 AM 페이지41 ABOUT MP3, JPEG DISCS Playing a disc containing MP3 files MP3 ■ This unit will play MP3 files recorded on CD-R and CD-RW discs. 1 Press [OPEN/CLOSE] to open the disc tray. Place a disc with MP3 files on the disc tray with the label side up. Press [OPEN/CLOSE] to close the disc tray. The DVD+VCR will load the disc and display the directory structure. 2 The following screen appears.
DC-B8CB1N-PS(VE3.0) 04.3.23 5:2 AM 페이지42 ABOUT MP3, JPEG 6 You can program playback. Select the file or folder in LIST folder. Then press [PROGRAM]. The selected file or folder will go into PROGRAM folder. Press [PLAY] in PROGRAM folder. To move all the files selected in LIST folder to PROGRAM folder, select and press [ENTER]. MUSIC > MP3 √ 001/018 0:00:34 / 0:03:59 LIST __ 1. 01(musicfamily.i 2. 02(musicfamily.i 3. 03(musicfamily.i 4. 04(musicfamily.i 5. 05(musicfamily.i 6. 06(musicfamily.i 7.
DC-B8CB1N-PS(VE3.0) 04.3.23 5:2 AM 페이지43 ABOUT MP3, JPEG DISCS Playing a disc containing JPEG (PHOTO) files JPEG ■ This unit will play JPEG files recorded on CD-R and CD-RW discs. It will also play JPEG files recorded on DVD, DVD-R, DVD-RW, and DVD+RW. 1 Select the desired folder. PICTURE > JPG ■ 000/000 0:00:00 / 0:00:00 Move the cursor to the desired folder by pressing [^ v] and press [ENTER] to confirm. LIST DESKTOP PHOTO TEMPORAR TRASH PREVIEW \ 2 Slideshow Delay Time set.
DC-B8CB1N-PS(VE3.0) 04.3.23 5:2 AM 페이지44 DISPLAYING DISC MENUS To display disc menus 1 DVD, VCD2.0 Press [TITLE] or [MENU]. • The disc menu is displayed. These menus vary by disc. (“Return” will appear on the OSD with VCD2.0.) • If it is a VCD2.0, select PBC ON mode by pressing [TITLE]. * CD and VCD1.1 do not have menus. 2 Move the cursor to the desired menu item with [ < > ^ v ] and select with [ENTER] or [PLAY]. PROGRESSIVE SCAN MODE Selecting SCAN MODE While DISC STOP, press [P.SCAN].
DC-B8CB1N-PS(VE3.0) 04.3.23 5:2 AM 페이지45 DVD LANGUAGE SETUP ■ You can set your preferred language for disc menus, audio soundtracks and subtitles. If a disc does not include language information, the selected language will not appear. 1 While in Stop mode, press [SETUP]. 2 Selecting an OSD language. 3 Selecting an AUDIO language. Select a OSD language to be displayed on DVD menus with [ENTER]. Set your preferred audio language with [ENTER].
DC-B8CB1N-PS(VE3.0) 04.3.23 5:2 AM 페이지46 DVD LANGUAGE SETUP 5 Selecting a DISC MENU language. Set your preferred DISC MENU language with [ENTER]. If the DISC MENU language is set and recorded on the DISC, it is automatically played in the set language every time it is played. OTHERS - - - - : Another language can be selected. You can input 4-digit language code.
DC-B8CB1N-PS(VE3.0) 04.3.23 5:2 AM 페이지47 VIDEO SETUP ■ To set the DVD+VCR to match the capabilities of your TV: 1 While in Stop mode, press [SETUP]. TV ASPECT VIDEO OUT SCAN MODE 4:3 LB COMPONENT INTERLACED 2 Selecting TV ASPECT. TV ASPECT 4:3 LB 3 Selecting VIDEO OUT. ✓ VIDEO OUT 4:3 PS If you select “4:3 LB”, you can watch the SCAN MODE 16:9 WIDE original widescreen movie, but black bars will appear above and below the picture.
DC-B8CB1N-PS(VE3.0) 04.3.23 5:2 AM 페이지48 AUDIO SETUP ■ To set the DVD+VCR to match the capabilities of your audio system: 48 1 While in Stop mode, press [SETUP]. DIGITAL OUT DYNAMIC RANGE 2 Selecting DIGITAL OUT. DIGITAL OUT BITSTREAM DYNAMIC RANGE LPCM 3 Select a Dynamic Range BITSTREAM OFF ✓ Set audio output to coaxial or optical. You can set the outgoing digital signal to BITSTREAM or LPCM: • BITSTREAM : The raw audio signal recorded on the disc goes to the digital audio output.
DC-B8CB1N-PS(VE3.0) 04.3.23 5:2 AM 페이지49 OTHERS SETUP 2 Selecting OSD. 3 Selecting SCREEN SAVER. 4 Selecting Autoplay. 5 Restoring DEFAULTS. Select "ON" to have the OSD (On Screen Displays) shown on the screen. To protect your TV from possible damage from bright scenes over long periods of time, you can turn on the built-in screensaver. When set to "ON", the screensaver functions automatically whenever the unit is left in Stop for 5 minutes. It skips ads and trailers and starts the movie.
DC-B8CB1N-PS(VE3.0) 04.3.23 5:2 AM 페이지50 OTHERS SETUP 6 Selecting PARENTAL. Press [>] when the cursor highlights PARENTAL. When “INPUT PASSWORD” appears on the screen, enter your password. And confirm with [OK]. Change Parental Rating level. After you have entered the correct password, you can change the PARENTAL rating by pressing [^ v]. Confirm your choice by pressing [ENTER]. These 8 levels of parental control protect children from watching violence, sexual scenes and other objectionable material.
DC-B8CB1N-PS(VE3.0) 04.3.23 5:2 AM 페이지51 ABOUT DVD Playable Discs • DVD, Video CD (Version 1.1, 2.0), S-VCD and Audio CD Disc type Playable DVD Video CD Yes Yes Region number 1 or Region number All Version 1.0/1.1/2.
DC-B8CB1N-PS(VE3.0) 04.3.23 5:2 AM 페이지52 ABOUT DVD CHAPTER Information recorded on a DVD. A title on a DVD is divided into many tracks, each of which are referred to as chapters. Each chapter is numbered and can be searched using its number. TITLE Information recorded on a DVD. A DVD can be divided into may titles. TRACK Information recorded on a video CD or audio CD. A disc consists of many tracks. Each track is numbered and can be searched using its number. dts Digital Theatre System is a 5.
DC-B8CB1N-PS(VE3.0) 04.3.23 5:2 AM 페이지53 ABOUT VCR AND VIDEOTAPE VCR Terms AFT Automatic fine tuning, a circuit that automatically adjusts TV reception to optimum condition. CABLE Cable television. Index Search A feature of this VCR that automatically records an index mark each time recording begins. It helps you locate a particular segment of the tape quickly and easily.
DC-B8CB1N-PS(VE3.0) 04.3.23 5:2 AM 페이지54 TROUBLESHOOTING (DVD) Symptom 54 Checks • The player does not play. ➤ If a DVD is from overseas, it may not play. Make sure the DVD’s region code is 1 or All. ➤ Make sure the DVD is inserted in the right direction. ➤ If it is a CD-ROM for a PC or DVD-ROM, it will not play. • No sound. ➤ Play mode may be slow or paused. (In variable speed play, no sound comes through) ➤ Check audio connections. ➤ Make sure TV and amplifier are working correctly.
DC-B8CB1N-PS(VE3.0) 04.3.23 5:2 AM 페이지55 TROUBLESHOOTING (VCR) Symptom Checks ➤ Make sure the power plug is inserted in an electric outlet. • Unit does not work even in “Power On”. ➤ Make sure a videotape is inserted. ➤ Press [VCR] on the remote control or press DVD/VCR on the front panel of the unit. ➤ Unplug the unit and plug it in again. • A videotape will not insert. ➤ Make sure a power plug is inserted in an electric outlet. ➤ Make sure a videotape is not already inserted.
DC-B8CB1N-PS(VE3.0) 04.3.23 5:2 AM 페이지56 TROUBLESHOOTING (VCR) Symptom 56 Checks • A screen in Pause mode is shaking or slow playback is not clear. ➤ Try using a head-cleaner. ➤ Try using the [TRACKING+/–] buttons. • The unit will not record a TV program. ➤ Check whether the desired channel is visible on the screen. If not, press [TV VIEW] to view the TV. ➤ Check whether the timer recording settings are right.
DC-B8CB1N-PS(VE3.0) 04.3.23 5:2 AM 페이지57 SPECIFICATIONS Power requirement AC 120V, 60Hz Power consumption 24W (supplementary 4W) Weight 9.9 lbs (4.5kg) Dimensions (WxHxD) 17.1" x 3.7" x 10.0" (435mm x 93mm x 255mm) Operating temperature 41°F~95°F (5°C~35°C) Installation conditions Horizontal / Relative humidity under 80% Channel coverage VHF: 2-13 CH / UHF: 14-69 CH / Cable: 1-125 Signal type NTSC COLOR Antenna Input/output U/V-mixed: 75Ω unbalanced VIDEO input 1.
DC-B8CB1N-PS(VE3.0) 04.3.