
User's Manual

6
4. Instruction manual
Initial mounting and setup
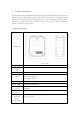
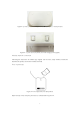
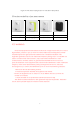
First, plug in the power adapter, which is shown in figure 4-1
Figure 4-1. Power adapter of the pet treat camera
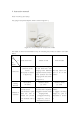
The detail of three recommendation ways of mounting the product is listed in the table
below:
Mount
ing
w
ay
detail
Stand on the floor
Mount on wall
Place on table
How to fix
Anti-slip silicon foot
pad to fix on flat
surface
(foot pads are shown
in figure 4-2)
Latch structure designed
on the back and a wall
hanging hook delivered
together with the product
(latch structure and wall
hanging hook are shown
in figure 4-3)
Anti-slip silicon foot
pad to fix on flat
surface
Pet treats
tossing
distance
Short (about
30-50cm)
medium(about
1.2-1.5m)
medium(about
1.2-1.5m)
Matters of
attention
1.Place on flat and
smooth surface
2.recommand to place
aside the wall to
prevent the product
from knocked over by
pets
1.Ensure latches on the
back has been completely
plugged in the slot of wall
hanging hooks.
2.Suggest mounting
height of 1-1.5m, as
described in section 3.
1.Place on flat table
surface
2. Suggest mounting
height of 1-1.5m, as
described in section
3.