User Manual 3-Way Smart Switch Contents Part 1: General................................................................................. 2 1.1. Specification ........................................................ 2 1.2. Main Features ..................................................... 2 Part 2: Installation and Wire Connection.......................................... 3 Part 3: Connect the Smart Switch to Wi-Fi ....................................... 5 Part 3: Connect the Switch to Alexa ........
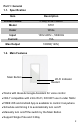
Part 1: General 1.1. Specification Item Description Product Name 3-Way Smart Switch Model ST01 Color White Input 100V-240V~, 50/60Hz Current 15A Max Output 1800W(120V) 1.2. Main Features Main Button Wi-Fi Indicator Restart Button Works with Alexa & Google Assistant for voice control ONLY compatible with 2.
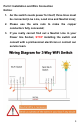
Part 2: Installation and Wire Connection Notice: 1. As the switch needs power for itself, three lines must be connected (Live Line, Load Line and Neutral Line); 2. Please use the wire nuts to make the copper conductors fully concealed; 3. If you really cannot find out a Neutral Line in your Power line Socket, STOP installing the switch and consult with a professional electrician or contact our service team.
Step 1: Turn off power at the circuit breaker that controls the light switch. Use voltage tester to confirm no voltage is present. Step 2: Remove existing faceplate and light switch, then identify Live/Load, Neutral and Ground lines.
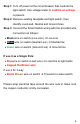
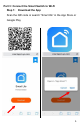
Part 3: Connect the Smart Switch to Wi-Fi Step 1: Download the App Scan the QR code or search “Smart life” in the App Store or Google Play 5
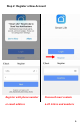
Step 2: Register a New Account Register with phone number Password must contain or email address 6-20 letters and numbers 6
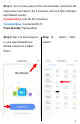
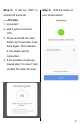
Step 3: Turn on the power at the circuit breaker and press the main button and hold it for 5 seconds, then the WiFi Indicator light flashes quickly. Constant Red: Lost Wi-Fi Connection Constant Blue: Connected Wi-Fi Flash Quickly: Paring Mode Step 4: Tap + to Add a device Step in your App (Smartphone switch” 5: Select “Wall should connect to 2.4GHz Wi-Fi).
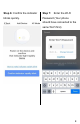
Step 6: Confirm the indicator Step 7: blinks quickly.
Step 8: It will be 100% in around 20 seconds. Step 9: Edit the name of your smart switch -----If it fails, 1. reconnect 2. wait it goes to around 10%, 3. Press and hold the main button for 5 seconds, it will blink again. Then release it, the switch will be connected. 4. If the problem continues, repeat step 3 to step 7 and contact the seller for help.
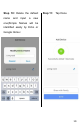
Step 10: Delete the default name and input a Step 11: Tap Done new one(Simple Names will be identified easily by Echo or Google Home) 10
Step 12: The switch is Congratulations! Now you can can turn on/off the smart control it by this App. If you switch via App on your need voice control, please smartphone. connected and you refer to Part 3 for Alexa, Part 4 for Google Assistant. FQA: 1. Cannot download the right App. A: Please come back to step 2. Cannot discover the smart switch by App. A: Make sure that your Wi-Fi 1 and download by scanning router is 2.4GHz; the QR code.
Part 3: Connect the Switch to Alexa Part 2 must be completed before doing this part 3 Step 1: Log in your Alexa Step 2: Search “Smart Life” and account on a smartphone select the right one according or a computer, then tap the blue logo (same with App) Home Skills 12
Step 3: Enable the skill Step 4: Login the account you registered on the App in Part 2, then click “Link Now” The account and password should be the same that you registered in the smart life app 13
Step 5: The Account is linked Step successfully, and then tap Alexa Devices (Echo) can Authorize to Complete. control the Switch ON/OFF. 6: Congratulations! To add or delete switches, please delete or add them in the Smart Life App (see Part 2), and then the Alexa will synchronize automatically. If you cannot see the name of switches in the Devices List in Alexa Page, you can click “Discover” in Alexa Page, it will synchronize from the Smart Life App.
Part 4: Connect the Switch to Google Home Part 2 must be completed before doing this part 4 Step 1: Find "Home Control" in the hamburger menu on the Google Home app’s home page ->Home Control -> tap "+".
Step 2: Find "Smart Life" in Step 3: Input your Smart the list. Life account and password you registered in Part 2, then tap "Link Now".
Step 4: After you assign rooms for the switch, your switch will be listed in the Home Control page. Step 5: Control your smart switch through Google Home Now you can control your smart switch through Google Home. If you set the name as “bedroom light”, the supported voice commands are as below: Ok Google, turn on bedroom light. (Name as “bedroom light”) Ok Google, turn off the living room.
Warning: Please install it by a professional electrician If there is radio frequency interference, it might affect the operation Indoor use only Do not use in bathroom and other damp locations Please keep the device out of the reach of children to avoid danger.
FCC Warning This device complies with Part 15 of the FCC Rules. Operation is subject to the following two conditions: (1) This device may not cause harmful interference, and (2) this device must accept any interference received, including interference that may cause undesired operation. NOTE 1: This equipment has been tested and found to comply with the limits for a Class B digital device, pursuant to part 15 of the FCC Rules.
-Consult the dealer or an experienced radio/TV technician for help. NOTE 2: Any changes or modifications to this unit not expressly approved by the party responsible for compliance could void the user's authority to operate the equipment. FCC Radiation Exposure Statement: This equipment complies with FCC radiation exposure limits set forth for an uncontrolled environment. This equipment should be installed and operated with minimum distance 20cm between the radiator & your body.