
Instructions

10
INSTALLATION
All steps below should be carried out carefully by a competent adult, taking
into consideration any applicable safety regulations. Should you have any
questions, please contact us or a competent specialist directly. Please ensure
that all wires used for the installation are undamaged along their entire
length and approved for this type of use.
Network speed and network components
Please ensure that the upload speed of your Internet connection is at least
0.5 Mbps. You can also carry out a speed test at any time via the DoorBird
app. The user experience is only as good as your network speed, network sta-
bility and quality of your network components, such as your Internet router
and WiFi access points or WiFi repeaters. Please also make sure that your net-
work components are no older than two years old, have been manufactured
by a well-known manufacturer, and have the latest firmware installed.
Should these requirements not be fulfilled, it may happen, for example that
the performance of audio and video is poor or push notifications are delayed
or do not arrive on your smartphone or tablet at all.
High-speed Internet (via landline): DSL, cable or optical fibre
Network: 802.11b/g/n 2.4 GHz or Ethernet, with DHCP
STEP 1: SWITCHING OFF POWER
Switch off the power to all wires leading to the assembly location, i.e. the
door chime, electric door opener, power supply unit for the video door
station etc..
STEP 2: DISMANTLING THE EXISTING DOORBELL
Should there already be a doorbell on the exterior wall of the house, please
dismantle it.
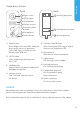
STEP 3: DETERMINING THE ASSEMBLY LOCATION
The video door station uses an ultra wide-angle hemispheric lens so that
even when the person is a minimum distance of 50 cm (19.68 inches) away
from the video door station, a low installation height is sufficient. The lens is
therefore not mechanically adjustable. The camera lens should be located
at an altitude of at least 145 cm (57 inches). You may check this prior to the
final mounting. Press the mounting plate against the wall at the desired
installation site and mark the boreholes with a pencil. Remove the mounting
plate again. Ensure that no cables are to be found in the wall behind
the boreholes.