
User Manual


3
Follow these instructions to operate your Two-Way Intercom Monitor. Reference the illustrations provided on page 3 for the location
of all features described in these instructions.
Baby’s Unit:
For best results, place the Baby's Unit on a table near the crib or bed. It should be facing the baby’s head as close to the crib
as possible, but out of baby’s reach.
STEP 1 Remove the battery cover door by pushing downward in the direction of the arrow.
STEP 2 Insert a 9-volt battery into the battery compartment by snapping the battery contacts into the corresponding connectors on
the battery clip in the unit.
Note: The low battery indicator illuminates when the batteries need to be replaced.
STEP 3 Replace the battery cover door by sliding in place.
STEP 4 Plug the adapter into an electrical outlet, then plug the round end of the adapter into the Baby's Unit.
STEP 5 Set the Baby's unit to setting "A". If you experience static or noise interference, switch both units to setting "B".
STEP 6 Turn the Unit on using the Volume/OFF rotary switch. The green LED power light should be illuminated.
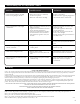
Operating Your Tw o Way Interco m M onit or
Baby’s U nit
(Transmitter)
AC Adapter
The AC Adapter is a low voltage power source that allows you to use your household
electricity to run the Baby and Parent's Unit. It connects to the AC Adapter Jack in the
Parent's Unit and in the Baby's Unit, and plugs into any standard electrical outlet in your
home.
CAUTION: These adapters were made with a specific design for Safety 1st Two-Way
Intercom Monitor. They cannot be used with any other appliance. Never use a different
type of adapter with this monitor.
AC Adapter
Features and Co m ponents
Channel Switch
Volume/Off Rotary Switch
Power On/Low Battery Indicator
Two Way On Indicator
1
2
3
4
5
6
7
9
10
11
8
3
2
1
11
10
1
5
6
9
7
4
8
Intercom Mode Button
Speaker
Microphone
Flexible Antenna
AC Adapter Jack
Battery Compartment
Plastic Belt Clip