NIGHTSTAND Model Number: DA1011-7 UPC Code: 0-65857-17181-5 Color: Walnut Congratulations on your latest furniture purchase! Dorel Living furniture has been developed with quality, convenience and style in mind. We trust it will provide you with many years of exceptional comfort and service. Before beginning assembly, we encourage you to familiarize yourself with your new furniture piece by taking a few minutes to go through this booklet.
CUSTOMER SERVICE If you have any questions about this product, contact our customer service representative first! CALL 1-800-295-1980 You can also order parts by writing to the address listed below. Please include the product model number, color and a detailed description of the part. Customer Service Department No. 413 12345 Albert-Hudon Boulevard, Suite 100 Montreal, Quebec Canada H1G 3L1 E-MAIL: das@dorel.com NOTES: * * * * * * * Ensure all parts and components are present before beginning assembly.
NIGHTSTAND DA1011-7 HARDWARE LIST 1 2 3 Ø6 * 37 mm Ø8 * 32 mm Ø13 * 10 mm LARGE CAM BOLT 18 PCS WOOD DOWEL 18 PCS SMALL CAM LOCK 8 PCS 4 5 6 Ø15 * 12 mm Ø6 * 36 mm Ø4 * 25 mm LARGE CAM LOCK 18 PCS SMALL CAM BOLT 8 PCS SCREW 12 PCS 7 8 9 Ø3.
NIGHTSTAND DA1011-7 PARTS LIST A B TOP PANEL 1 PC D C LEFT SIDE FRAME 1 PC E BOTTOM PANEL 1 PC G F BACK RAIL 2 PCS H FRONT RAIL 2 PCS RIGHT SIDE FRAME 1 PC BACK PANEL 1 PC I LEG 4 PCS DRAWER BOTTOM 2 PCS
NIGHTSTAND DA1011-7 PARTS LIST J K LARGE RIGHT DRAWER SIDE 1 PC LARGE LEFT DRAWER SIDE 1 PC L LARGE DRAWER BACK 1 PC M N DRAWER SUPPORT RAIL 2 PCS LARGE DRAWER FRONT 1 PC SMALL RIGHT DRAWER SIDE 1 PC P Q R SMALL LEFT DRAWER SIDE 1 PC S TOP BACK RAIL 1 PC SMALL DRAWER BACK 1 PC O SMALL DRAWER FRONT 1 PC
NIGHTSTAND DA1011-7 STEP 1 Insert large cam bolts (1) into the left side frame (B) and right side frame (C) as shown. Attach legs (H) to the side frames (B & C) by rotating the legs clockwise.
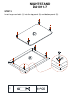
NIGHTSTAND DA1011-7 STEP 2 Insert large cam locks (4) into the rails (E, S & G). Insert wood dowels (2) into the left side frame (B) and right side frame (C). Secure rails (E, S & G) to the left side frame (B) and right side frame (C) by rotating the large cam locks (4) 1/2 turn clockwise using a Phillips head screwdriver (not included).
NIGHTSTAND DA1011-7 STEP 3 Insert large cam bolts (1) into the top panel (A) and bottom panel (D).
NIGHTSTAND DA1011-7 STEP 4 Insert wood dowels (2) and large cam locks (4) into the left side frame (B) and right side frame (C). Fasten top panel (A) and bottom panel (D) to the assembled unit by rotating large cam locks (4) 1/2-turn clockwise using a Phillips head screwdriver (not included). Secure top panel (A) with screws (10) using a Phillips head screwdriver (not included).
NIGHTSTAND DA1011-7 STEP 5 Attach back panel (F) to the assembled unit with screws (7). Use a Phillips head screwdriver (not included) to tighten the screws.
NIGHTSTAND DA1011-7 STEP 6 Insert small cam bolts (5) and wood dowels (11) into the large drawer front (N). Insert small cam locks (3) into the large left drawer side (K) and large right drawer side (J). Attach large drawer sides (J & K) to the large drawer front (N). Secure the large drawer sides (J & K) by rotating small cam locks (3) 1/2-turn clockwise using a Phillips head screwdriver (not included). Slide the drawer bottom (I) into the grooves of large drawer sides (J & K) and large drawer front (N).
NIGHTSTAND DA1011-7 STEP 7 Insert wood dowels (11) into the drawer support rail (M). Attach large drawer back (L) to the large drawer sides (J & K) and drawer support rail (M) with screws (6) using a Phillips head screwdriver (not included). Attach handle (9) to the large drawer front (N) with bolts (8) using a Phillips head screwdriver (not included).
NIGHTSTAND DA1011-7 STEP 8 Insert small cam bolts (5) into the small drawer front (R). Insert small cam locks (3) into the small left drawer side (P) and small right drawer side (O). Attach small drawer sides (P & O) to the small drawer front (R). Secure the small drawer sides (P & O) by rotating small cam locks (3) 1/2-turn clockwise using a Phillips head screwdriver (not included). Slide the drawer bottom (I) into the grooves of small drawer sides (P & O) and front drawer panel (R).
NIGHTSTAND DA1011-7 STEP 9 Insert wood dowels (11) into the drawer support rail (M). Attach small drawer back (Q) to the small drawer sides (P & O) and drawer support rail (M) with screws (6). Use a Phillips head screwdriver (not included) to tighten the screws.
NIGHTSTAND DA1011-7 STEP 10 Insert the drawers into the nightstand.
NIGHTSTAND DA1011-7 CAUTION: This unit is intended for use only with the products and/or maximum weights indicated. Use with other products and/or products heavier than the maximum weights indicated may result in instability or cause possible injury. Top panel maximum weight 25 LBS Small drawer maximum weight 10 LBS Large drawer maximum weight 15 LBS That's it! You've finished assembling your nightstand. DO NOT RETURN PRODUCT TO THE STORE.
MODEL #: DA1011-7 Customer Service PLEASE DO NOT RETURN THIS PRODUCT TO THE STORE PLEASE CONTACT CUSTOMER SERVICE REPRESENTATIVES AT THE FOLLOWING NUMBERS SHOULD THERE BE ANY MISSING OR DEFECTIVE PART(S). Customer Service Phone Number 1-800-295-1980 Customer Service Fax Number 514-353-7819 Email: das@dorel.
MESA DE LUZ Modelo No: DA1011-7 CODIGO UPC: 0-65857-17181-5 Color: Nogal ¡Felicitaciones por su nueva compra de un mueble! Los muebles de la línea Dorel Living han sido diseñados con la calidad, la comodidad y el estilo en mente. Estamos seguros de que este mueble le servirá por muchos años con su comodidad excepcional. Le recomendamos que antes de comenzar a armarlo se familiarice con su nueva compra y tome unos minutos de su tiempo para leer este manual.
SERVICIO A LA CLIENTELA Si faltan piezas o tiene alguna pregunta sobre este producto, ¡primero contacte nuestro representante de servicio a la clientela! LLAME AL 1-800-295-1980 También puede pedir piezas escribiendo a la dirección indicada abajo. Por favor incluya el número de modelo, color y una descripción detallada de la pieza. Departamento de Servicio a la Clientela No. 413 12345 Albert-Hudon Boulevard, Suite 100 Montreal, Quebec Canadá H1G 3L1 Correo electrónico: das@dorel.
MESA DE LUZ DA1011-7 LISTA DE ACCESORIOS 1 2 3 Ø6 * 37 mm Ø8 * 32 mm Ø13 * 10 mm PERNO DE LEVA GRANDE 18 PZAS CLAVIJA DE MADERA 18 PZAS SEGURO DE LEVA PEQUEÑO 8 PZAS 4 5 6 Ø15 * 12 mm Ø6 * 36 mm Ø4 * 25 mm SEGURO DE LEVA GRANDE 18 PZAS PERNO DE LEVA PEQUEÑO 8 PZAS TORNILLO 12 PZAS 7 8 9 Ø3.
MESA DE LUZ DA1011-7 LISTA DE PIEZAS A B PANEL LATERAL IZQUIERDO 1 PZA PANEL SUPERIOR 1 PZA D C E PANEL INFERIOR 1 PZA G F BARA POSTERIOR 2 PZAS H BARA ANTERIOR 2 PZAS PANEL LATERAL DERECHO 1 PZA PANEL POSTERIOR 1 PZA I PATA 4 PZAS FONDO DEL CAJÓN 2 PZAS
MESA DE LUZ DA1011-7 LISTA DE PIEZAS J K LADO DERECHO CAJÓN GRANDE 1 PZA LADO IZQUIERDO CAJÓN LADO POSTERIOR CAJÓN GRANDE GRANDE 1 PZA 1 PZA M N O FRENTE CAJÓN GRANDE 1 PZA LADO DERECHO CAJÓN PEQUEÑO 1 PZA Q R BARRA DE SOPORTE CAJÓN 2 PZAS P LADO IZQUIERDO CAJÓN LADO POSTERIOR CAJÓN PEQUEÑO PEQUEÑO 1 PZA 1 PZA S BARA POSTERIOR SUPERIOR 1 PZA L FRENTE CAJÓN PEQUEÑO 1 PZA
MESA DE LUZ DA1011-7 ETAPA 1 Inserte pernos de leva grandes (1) en el panel lateral izquierdo (B) y en el panel lateral derecho (C) como ilustrado. Coloque las patas (H) a paneles laterales (B y C) de las agujas del reloj giratorio.
MESA DE LUZ DA1011-7 ETAPA 2 Inserte seguros de leva grandes (4) en los barras (E, G y S). Inserte clavijas de madera (2) en el panel lateral izquierdo (B) y en el panel lateral derecho (C). Una los barras (E, G y S) con el panel lateral izquierdo (B) y el panel lateral derecho (C) girando los seguros de leva grandes (4) 1/2 vuelta en sentido horario con un destornillador Phillips (no incluido).
MESA DE LUZ DA1011-7 ETAPA 3 Inserte pernos de leva grandes (1) en el panel superior (A) y panel inferior (D).
MESA DE LUZ DA1011-7 ETAPA 4 Inserte clavijas de madera (2) y seguros de leva grandes (4) en el panel lateral izquierdo (B) y el panel lateral derecho (C). Coloque el panel superior (A) y panel inferior (D) sobre la unidad ya armada girando los seguros de leva grandes (4) 1/2 vuelta en sentido horario utilizando un destornillador Phillips (no incluido). Fije más firmemente el panel superior (A) con tornillos (10) utilizando un destornillador Phillips (no incluido).
MESA DE LUZ DA1011-7 ETAPA 5 Una el panel posterior (F) al marco ya armado con tornillos (7). Utilice un destornillador Phillips (no incluido) para ajustar los tornillos.
MESA DE LUZ DA1011-7 ETAPA 6 Inserte pernos de leva pequeños (5) y clavijas de madera (11) en el frente cajón grande (N). Inserte seguros de leva pequeños (3) en el lado izquierdo del cajón grande (K) y el lado derecho del cajón grande (J). Una los lados del cajón grandes (K y J) con el frente cajón grande (N). Fije los lados del cajón grandes (K y J) girando los seguros de leva pequeños (3) 1/2 vuelta en sentido horario con un destornillador Phillips (no incluido).
MESA DE LUZ DA1011-7 ETAPA 7 Inserte clavijas de madera (11) en la barra de soporte cajón (M). Una el lado posterior cajón grande (L) con los lados del cajón grande (K y J) y barra de soporte cajón (M) utilizando tornillos (6) y destornillador Phillips (no incluido). Instale una manija (9) en el frente cajón grande (N) con pernos (8) utilizando destornillador Phillips (no incluido).
MESA DE LUZ DA1011-7 ETAPA 8 Inserte pernos de leva pequeños (5) en el frente cajón pequeño (R). Inserte seguros de leva pequeños (3) en el lado izquierdo del cajón pequeño (P) y el lado derecho del cajón pequeño (O). Una los lados del cajón pequeños (P y O) con el frente cajón pequeño (R). Fije los lados del cajón pequeños (P y O) girando los seguros de leva pequeños (3) 1/2 vuelta en sentido horario con un destornillador Phillips (no incluido).
MESA DE LUZ DA1011-7 ETAPA 9 Inserte clavijas de madera (11) en la barra de soporte cajón (M). Una el lado posterior cajón pequeños (Q) con los lados del cajón pequeños (P y O) y barra de soporte cajón (M) utilizando tornillos (6). Utilice un destornillador Phillips (no incluido) para ajustar los tornillos.
MESA DE LUZ DA1011-7 ETAPA 10 Inserte todos los cajones en la mesa de luz.
MESA DE LUZ DA1011-7 PRECAUCIÓN: Esta unidad está prevista únicamente para ser usada con los productos y el peso máximo indicados. El usarla con otros productos más pesados que el peso máximo indicado puede provocar inestabilidad y causar heridas. PESO MÁXIMO SOBRE LA MESA 25 LBS PESO MÁXIMO POR CAJÓN PEQUEÑO 10 LBS PESO MÁXIMO POR CAJÓN GRANDE 15 LBS ¡Listo! ¡Ya ha terminado de ensamblar su mesa de luz. NO DEVUELVA EL PRODUCTO A LA TIENDA.
MODELO #: DA1011-7 Servicio a la Clientela POR FAVOR, NO DEVUELVA ESTE PRODUCTO A LA TIENDA POR FAVOR, CONTACTE LOS REPRESENTANTES DEL SERVICIO A LA CLIENTELA A LOS SIGUIENTES NÚMEROS SI FALTA UNA PIEZA O ESTÁ DEFECTUOSA. Número de teléfono del Servicio a la Clientela 1-800-295-1980 Número de fax del Servicio a la Clientela 514-353-7819 Email: das@dorel.
TABLE DE NUIT Modèle No: DA1011-7 CODE CUP: 0-65857-17181-5 Couleur: Noyer Félicitations pour votre dernier achat d’un meuble ! Les meubles de la ligne Dorel Living ont été conçus ayant en tête la qualité, la commodité et le style. Nous sommes convaincus que ce meuble vous servira durant de nombreuses années avec un confort exceptionnel.
SERVICE À LA CLIENTÈLE Si une pièce est manquante, ou pour toute question concernant ce produit, veuillez d'abord communiquer avec notre représentant de service à la clientèle! APPELEZ AU 1-800-295-1980 Vous pouvez aussi commander des pièces en écrivant à l'adresse indiquée ci-dessous. Veuillez inclure le numéro de modèle du produit, la couleur et une description détaillée de la pièce. Service à la clientèle No.
TABLE DE NUIT DA1011-7 LISTE DE QUINCAILLERIE 1 2 3 Ø6 * 37 mm Ø8 * 32 mm Ø13 * 10 mm BOULON À CAME GRAND 18 PCES GOUJON DE BOIS 18 PCES VERROUILLAGE À CAME PETIT 8 PCES 4 5 6 Ø15 * 12 mm Ø6 * 36 mm Ø4 * 25 mm VERROUILLAGE À CAME GRAND 18 PCES BOULON À CAME PETIT 8 PCES VIS 12 PCES 7 8 9 Ø3.
TABLE DE NUIT DA1011-7 LISTE DE PIÈCES A B PANNEAU LATÉRAL GAUCHE 1 PCE PANNEAU DU DESSUS 1 PCE D C E PANNEAU INFÉRIEUR 1 PCE G F BARRE ARRIÈRE 2 PCES H BARRE AVANT 2 PCES PANNEAU LATÉRAL DROIT 1 PCE PANNEAU POSTÉRIEUR 1 PCE I PATTE 4 PCES FOND DU TIROIR 2 PCES
TABLE DE NUIT DA1011-7 LISTE DE PIÈCES J K CÔTÉ TIROIR DROIT GRAND 1 PCE M CÔTÉ TIROIR GAUCHE GRAND 1 PCE N BARRE DE SUPPORT TIROIR 2 PCES P L O DEVANT TIROIR GRAND 1 PCE Q CÔTÉ TIROIR GAUCHE PETIT 1 PCE S BARRE POSTÉRIEUR SUPÉRIEUR 1 PCE CÔTÉ ARRIÉRÉ TIROIR GRAND 1 PCE CÔTÉ ARRIÉRÉ TIROIR PETIT 1 PCE CÔTÉ TIROIR DROIT PETIT 1 PCE R DEVANT TIROIR PETIT 1 PCE
TABLE DE NUIT DA1011-7 ÉTAPE 1 Insérez des boulons à came grands (1) dans le panneau latéral gauche (B) et le panneau latéral droit (C) comme illustré. Attachez les pattes (H) aux panneaux latéral (B et C) en tournant dans le sens des aiguilles d'une montre.
TABLE DE NUIT DA1011-7 ÉTAPE 2 Insérez verrouillages à came grands (4) dans les barres (E, G et S). Insérez des goujons de bois (2) dans le panneau latéral gauche (B) et dans le panneau latéral droit (C). Fixez les barres (E, G et S) au panneau latéral gauche (B) et au panneau latéral droit (C) en tournant les verrouillages à came grands (4) 1/2 tour dans le sens des aiguilles d'une montre avec un tournevis cruciforme (non compris).
TABLE DE NUIT DA1011-7 ÉTAPE 3 Insérez des boulons à came grands (1) dans le panneau du dessus (A) et panneau inférieur (D).
TABLE DE NUIT DA1011-7 ÉTAPE 4 Insérez des goujons de bois (2) et verrouillages à came grands (4) dans le panneau latéral gauche (B) et dans le panneau latéral droit (C). Placez le panneau du dessus (A) et panneau inférieur (D) sur l'unité déjà assemblée en tournant les verrouillages à came grands (4) 1/2 tour dans le sens des aiguilles d'une montre en utilisant le tournevis cruciforme (non compris). Fixez le panneau du dessus (A) avec des vis (10) en utilisant le tournevis cruciforme (non compris).
TABLE DE NUIT DA1011-7 ÉTAPE 5 Fixez le panneau postérieur (F) au cadre déjà assemblé avec des vis (7). Utilisez un tournevis cruciforme (non compris) pour serrer les vis.
TABLE DE NUIT DA1011-7 ÉTAPE 6 Insérez des boulons à came petits (5) et goujons de bois (11) dans le devant tiroir grand (N). Insérez des verrouillages à came petits (3) dans le côté tiroir gauche grand (K) et le côté tiroir droit grand (J). Attachez les côtés du tiroir grands (K et J) au devant tiroir gauche grand (N). Fixez les côtés du tiroir grands (K et J) en tournant les verrouillages à came petits (3) 1/2 tour dans le sens des aiguilles d'une montre à l'aide d'un tournevis cruciforme (non compris).
TABLE DE NUIT DA1011-7 ÉTAPE 7 Insérez des goujons de bois (11) dans la barre de support tiroir (M). Attachez le côté arriéré tiroir grand (L) aux côtés du tiroir grands (K et J) et barre de support tiroir (M) avec des vis (6) en utilisant le tournevis cruciforme (non compris). Attachez une poignée (9) au devant tiroir grand (N) avec des boulons (8) à l'aide d'un tournevis cruciforme (non compris).
TABLE DE NUIT DA1011-7 ÉTAPE 8 Insérez des boulons à came petits (5) dans le devant tiroir petit (R). Insérez des verrouillages à came petits (3) dans le côté tiroir gauche petit (P) et le côté tiroir droit petit (O). Attachez les côtés du tiroir petits (P et O) au devant tiroir petit (R). Fixez les côtés du tiroir petits (P et O) en tournant les verrouillages à came petits (3) 1/2 tour dans le sens des aiguilles d'une montre à l'aide d'un tournevis cruciforme (non compris).
TABLE DE NUIT DA1011-7 ÉTAPE 9 Insérez des goujons de bois (11) dans la barre de support tiroir (M). Attachez le côté arriéré tiroir petit (Q) aux côtés du tiroir petits (P et O) et barre de support tiroir (M) avec des vis (6). Utilisez un tournevis cruciforme (non compris) pour serrer les vis.
TABLE DE NUIT DA1011-7 ÉTAPE 10 Insérez tous les tiroirs dans la table de nuit.
TABLE DE NUIT DA1011-7 ATTENTION: Cette unité est conçue pour être utilisée seulement avec les produits et/ou les poids maximum indiqués. L'utilisation avec d'autres produits et/ou des produits plus lourds que les poids maximum indiqués peut entraîner de l'instabilité et causer des blessures. Poids maximum sur le dessus 25 lbs Poids maximum pour tiroir petit 10 lbs Poids maximum pour tiroir grand 15 lbs Voilà! Vous avez terminé d'assembler votre table de nuit. NE PAS RETOURNER LE PRODUIT AU MAGASIN.
MODÈLE #: DA1011-7 Service à la Clientèle S.V.P. NE PAS RETOURNER CE PRODUIT AU MAGASIN S.V.P. CONTACTEZ NOS REPRÉSENTANTS DU SERVICE À LA CLIENTÈLE AUX NUMÉROS SUIVANTS SI VOUS AVEZ DES PIÈCES MANQUANTES OU DÉFECTUEUSES. No. de téléphone du Service à la clientèle: 1-800-295-1980 No. du télécopieur du Service à la clientèle: 514-353-7819 Courriel: das@dorel.com Date de la demande : Nom : Adresse de livraison : Numéro & Rue : Ville & Province : Code Postal : No.