Manual doro 313C
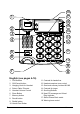
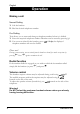
18 17 16 15 14 1 2 3 4 13 12 11 5 6 10 9 8 7 English (see pages 4-16) 1 2 3 4 5 6 7 8 9 10 2 Call Number OK/Cancel button Hanging Hook for Handset Select Caller ID mode Handset Volume Control Store Button Memory button Recall button Redial button Hands Free Button 11 Controls for hands free 12 Handset earpiece tone control 13 One-touch memory buttons M1/M2 14 Controls for ringer 15 Scrolling Buttons 16 New CID message and Visual Ring Indicator 17 Select Phone Book mode 18 Warning tone control www
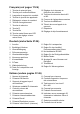
Français (voir pages 17-26) 1 2 3 4 5 6 7 8 9 10 Touche de prise de ligne Touche pour confirmer/effacer Languette de support du combiné Touche du journal des appelants Réglage du volume du combiné Touche d’enregistrement Touche de mémoire Touche R Touche Bis Touche mains-libres avec LED 12 Réglage de la réponse en fréquence du combiné 13 Touches de mémoire directe M1 et M2 14 Curseur de réglage des sonneries 15 Touches de défilement 16 Témoin de nouvel appel et de sonnerie 17 Répertoire 18 Réglage du bip
English Installation Important! Please note when programming all references to press = to press once and then immediately release the button. The earpiece of the handset may attract small ferromagnetic objects such as staples and pins, care should be taken when placing the handset near these items. Connection/Basic setting 1. Connect the curly cord to the handset and to the socket marked Q on the side of the telephone. 2.
Installation English Batteries Four good quality AA alkaline batteries can be installed to protect the memory during prolonged power failure. When the batteries are running low will be displayed. 1. Disconnect the telephone line cord. 2. On the underside of the telephone carefully remove the battery cover. 3. Insert the backup batteries ensuring correct battery polarity is observed. 4. Replace the battery cover. 5. Reconnect the telephone line cord.
English Operation Making a call Normal Dialling 1. Lift the handset. 2. Dial the desired telephone number. Pre-Dialling This allows you to enter and change a telephone number before it is dialled. 1. Enter the required telephone number. Mistakes can be erased by pressing 0. 2. You can now either lift the handset, press OR s, the displayed telephone number will now be dialled. Please note! During a conversation, you can switch from the handset to hands free mode at any time by pressing s.
Operation English Timer Immediately after dialling a telephone number a call timer will be shown on the display. The timer is a simple way to help you keep track of how long the call lasts. Hands free function 1. Press s. The speaker will be activated and the Hands free indicator light will illuminate. 2. Dial the required telephone number. The speaker volume can be adjusted using located on the side of the telephone. 3. Speak towards the microphone located on the front edge of the telephone. 4.
English Phone Book Using the Phone Book The Phone Book will store 32 telephone numbers (22 digits max)and their associated names (16 characters max) with entries arranged alphabetically. A stored phone number can be dialled using fewer keystrokes than if dialled manually. If you subscribe to a Caller ID service, the name/number of the caller will be shown when you receive an incoming call (only for those numbers stored in the Phone Book or M1/M2 memories).
Phone Book English Dialling from the Phone Book 1. Press b . 2. Scroll to the required memory location using v /V. To quick-search in the Phone Book press the corresponding number button one or more times for the first letter (refer to the table on the previous page). 3. Press to dial the displayed number. If you do nothing the phone will return to standby mode. Please note! During a conversation, you can switch from the handset to hands free mode at any time by pressing s.
English Phone Book Memory The telephone also has 2 one-touch and 10 two-touch memories for frequently dialled telephone numbers. When a number is stored into memory you only press one or two buttons dependent on location to make a call. The one-touch memories are M1-M2, the two-touch memories are accessed using the telephone keypad digits 0-9. Storing One-touch Memories 1. Press P. 2. Enter the telephone number to be stored (up to 22 digits). Press P. 3. Enter the name (up to 16 characters).
Caller Identification English Explanation of Caller ID Caller ID allows you to see who is calling before you answer a call and to see who has called in your absence. If the number is stored in the Phone Book, the callers name will be shown instead. Received calls are stored chronologically with the sequential number shown in the top right hand side of the display. When the Caller ID log is full, the oldest number will be deleted automatically as the new call is logged.
English Caller Identification Deleting Numbers 1. Scroll to the telephone number you wish to erase using v /V. 2. Press 0: DELETE? will be displayed, alternatively press and hold 0 until the display shows DELETE ALL? 3. Press and hold 0 until the number disappears. Transferring Numbers to the Phone Book 1. Scroll to the telephone number you wish to copy using v /V. 2. Press P. 3. Press P again. 4. Name can later be added according to the chapter Changing phone numbers/names on page 9.
Other English Recall Time (Australia and New Zealand only) Access to additional network services such as “Call Waiting” can be gained by using the recall button R . Example: when the call waiting tones are heard, press R , listen for the dial tone, then press 2. Please note that some networks require only the R button to be pressed, contact your network operator for more services information.
English Other UK If you cannot resolve the fault using the faultfinder section, technical support is available on the Premium Rate Number: 0906 302 0114. Calls cost 50 pence per minute (prices correct at the time of going to press), and is operational between 9AM - 5PM Monday-Friday excluding Bank Holidays. Alternatively, E-mail on: tech@doro-uk.com You can contact us in writing: Consumer Support Group, Doro UK Ltd.
Other English Australia and New Zealand Products permitted for connection to the telephone network are marked with in New Zealand. These marks indicate the in Australia and products comply with the regulations and can be used without concern in the country of purchase. If you believe this product is malfunctioning, please refer to the relevant section and/or consult the troubleshooting guide in this manual to ensure that you have followed the instructions carefully.
English Technical information REN (RN for New Zealand) The REN (Ringer Equivalence Number) or (RN) is of significance only if you wish to connect more than 1 telephone to your telephone line. A standard telephone line has a maximum REN capacity of 3 (RN of 5). It is possible to connect 3 devices with a REN of 1 (RN of 1) with no degradation to the product’s performance. Exceeding this limit may cause the volume of the ringer in any phone to decrease or not ring at all.
Installation Français Raccordement/Réglages de base 1. Reliez le cordon spiralé au combiné et au connecteur du téléphone marqué Q. 2. Reliez le bloc d’alimentation à la prise du téléphone marquée 9V 200mA et à la prise de courant. 3. FRANCAIS clignote sur l’afficheur. Sinon, appuyez pendant environ 4 secondes sur la touche v. 4. Atteignez la langue désirée avec les touches v /V. Appuyez sur 0. 5. Atteignez le contraste désiré(3=normal) avec les touches v /V. Appuyez sur 0. 6.
Français Installation Position murale 1. Installez le support mural en l’insérant sous le téléphone et faites le glisser vers le haut. 2. Montez deux vis espacées verticalement de 83 mm d’entre-axe. 3. Encastrez les têtes des deux vis dans les trous correspondants et faites-le glisser le vers le bas pour le mettre en place. 4. Retirez la languette de support du combiné située à côté de la pédale de raccroché en la tirant vers le haut. 5.
Utilisation Français Appeler Appel normal 1. Prenez le combiné. 2. Composez le numéro désiré. Appeler en utilisant la pré-numérotation La pré-numérotation s’effectue avec le combiné raccroché. Son intérêt est de pouvoir corriger le numéro. 1. Composez le numéro de votre correspondant. En cas d’erreur, effacez avec la touche 0. 2. Prenez le combiné OU appuyez sur OU appuyez sur s, pour appeler votre correspondant. En cours de conversation vous pouvez alterner entre les modes combiné et mains-libres.
Français Utilisation Chronométrage des appels Lorsque la communication est établie, un chronomètre s’affiche. Ce chronomètre vous permet de contrôler la durée des appels. Fonction Mains-libres 1. Appuyez sur s. Le haut-parleur est activé et la LED s ’allume. 2. Composez le numéro de téléphone. Réglez éventuellement le volume à l’aide du bouton situé sur le côté du téléphone. 3. Parlez face au téléphone. 4. Appuyez sur s pour mettre fin à la communication.
Répertoire Français Utilisation du répertoire Le répertoire permet d’enregistrer les noms et numéros de téléphone. Il est plus rapide d’appeler un numéro en mémoire que de le composer manuellement. Si vous êtes abonné à la présentation du numéro, le nom/numéro du correspondant s’affiche à la réception d’un l’appel provenant d’un numéro enregistré dans le répertoire ou en mémoire). Le répertoire enregistre 32 jeux de noms et numéros de téléphone. Le répertoire est présenté par ordre alphabétique.
Français Répertoire Appeler un numéro du répertoire 1. Appuyez sur b . 2. Faites défiler les noms/numéros avec les touches v /V. Vous pouvez aussi faire une recherche rapide en appuyant une ou plusieurs fois sur la touche numérotée correspondant à la première lettre du nom recherché (voir le tableau de la page précédente). 3. Appuyez sur pour appeler le numéro ou attendez pour repasser en veille. En cours de conversation vous pouvez alterner entre les modes combiné et mains-libres.
Répertoire Français Mémoires Le téléphone est doté de 2 touches de mémoire directe et 10 touches de mémoire abrégée pour les numéros que vous appelez le plus souvent. Une fois un numéro de téléphone enregistré, vous le composez en pressant simplement une ou deux touches. Les touches de mémoire directe sont M1 et M2 ; vous enregistrez les touches de mémoire abrégée avec les touches 0-9 du téléphone. Enregistrer des numéros en mémoire directe 1. Appuyez sur P. 2.
Français Présentation du numéro/nom Que signifie ’Présentation du numéro/nom’ ? Présentation du numéro/nom vous permet de voir qui vous appelle avant de répondre ou qui a appelé en votre absence. Si le nom/numéro du correspondant est déjà dans votre répertoire, et que vous n’êtes pas abonné à un service de présentation du nom, son nom est affiché. Les appels entrants sont enregistrés et affichés par ordre chronologique. L’ordre est affiché en bas à gauche.
Autres Français Numérotation fréquences vocales/décimales (Pologne et France uniquement) Sélectionnez le réglage désiré, fréquences vocales (♫) ou numérotation décimale (...) à l ’aide du curseur ♫/... situé derrière le téléphone. En cas de pannes Vérifiez que le câble téléphonique soit en bon état et qu’il soit branché correctement. Débranchez tout autre matériel, rallonges et téléphones. Si l’appareil fonctionne alors normalement, la panne est causée par le matériel additionnel.
Français Autres Garantie et S.A.V. Cet appareil est garanti un an à partir de sa date d’achat, la facture faisant foi. La réparation dans le cadre de cette garantie sera effectuée gratuitement. La garantie est valable pour un usage normal de l’appareil tel qu’il est défini dans la notice d’utilisation. Les fournitures utilisées avec l’appareil ne sont pas couvertes par la garantie. Sont exclues de cette garantie les détériorations dues à une cause étrangère à l’appareil.
Installation Deutsch Anschluss/Grundeinstellung 1. Schliessen Sie das Spiralkabel an den Hörer und an den Anschluss q am Telefon an. 2. Legen Sie den Hörer auf. 3. Schliessen Sie den Netzadapter an die Steckdose, und an den Anschluss DC 9V am Telefon an. 4. Auf dem Display blinkt ENGLISH. Wenn dies nicht angezeigt wird, halten Sie v ca. 4 Sekunden gedrückt. 5. Blättern Sie mit v /V bis zur gewünschten Sprache. Drücken Sie 0. 6. Blättern Sie mit v /V bis zur gewünschten Kontrasteinstellung (3=normal).
Deutsch Installation Wandmontage 1. Montieren Sie die Wandbefestigung an der Unterseite des Telefons sowie zwei Schrauben waagerecht mit 83 mm Abstand. 2. Platzieren Sie das Telefon über den Schrauben und drücken sie es herunter. 3. Nehmen Sie die Höreraufhängung an der Gabel ab, indem sie diese nach oben führen. 4. Drehen Sie die Aufhängung eine halbe Umdrehung und setzen sie diese wieder ein. Das Display Im Standby-Modus werden Datum und Zeit angezeigt.
Bedienung Deutsch Anrufen Normaler Anruf 1. Heben Sie den Hörer ab. 2. Geben Sie die gewünschte Telefonnummer ein. Anruf mit Korrekturfunktion Bevor Sie den Anruf tätigen, kann die Telefonnummer bei Bedarf geändert werden. 1. Geben Sie die gewünschte Telefonnummer ein. Eine fehlerhafte Eingabe kann mit 0 gelöscht werden. 2. Heben Sie den Hörer ab ODER drücken Sie ODER drücken Sie s. Die Nummer wird gewählt. Während des Gesprächs können Sie zwischen Hörer und Freisprecheinrichtung wechseln.
Deutsch Bedienung Timer Kurz nach Beginn eines Gesprächs wird ein Timer im Display angezeigt. Hier können Sie sehen, wie lange das Gespräch andauert. Lautsprecherfunktion 1. Drücken Sie s. Der Lautsprecher wird eingeschaltet und der Indikator an der Taste leuchtet. 2. Wählen Sie die gewünschte Telefonnummer. Stellen Sie die Lautstärke mit den Reglern an der Seite ein. 3. Sprechen Sie in das Mikrofon an der Vorderseite des Telefons. 4. Drücken Sie s um das Gespräch zu beenden.
Telefonbuch Deutsch Benutzung des Telefonbuchs Im Telefonbuch können Namen und Telefonnummern gespeichert werden. Wenn eine Telefonnummer gespeichert ist, kann der Anruf mit wenigen Tasten getätigt werden. Wenn der Dienst „Rufnummeranzeige” möglich ist, wird der Name des Teilnehmers bei ankommenden Anrufen angezeigt, wenn die Nummer im Telefonbuch oder im Speicher gespeichert ist. Im Telefonbuch können 32 Namen mit Telefonnummer gespeichert werden. Das Telefonbuch wird alphabetisch sortiert.
Deutsch Telefonbuch Anruf mit Telefonbuch 1. Drücken Sie b . 2. Blättern Sie zwischen den Positionen mit v /V. Sie können den ersten Buchstaben auch eingeben, indem Sie ein- oder mehrere Male die entsprechende Zifferntaste drücken. Siehe Tabelle auf der vorhergehenden Seite. 3. Drücken Sie . Die Nummer wird angerufen. Oder warten Sie, bis der Apparat wieder in den Standby-Modus zurückgeht. Während des Gesprächs können Sie zwischen Hörer und Freisprecheinrichtung wechseln. Telefonnummer/Name ändern 1.
Telefonbuch Deutsch Speicher Im Telefon können 2 Schnellwahltasten und 10 Kurzwahlnummern gespeichert werden. Wenn eine Telefonnummer gespeichert ist, kann Sie einfach mit einer bzw. Tasten angerufen werden. Die Schnellwahltasten haben die Bezeichnung M1-M2. Die Kurzwahlnummern werden mit 0-9 nummeriert. Schnellwahl speichern 1. Drücken Sie P. 2. Geben Sie die Telefonnummer mit den Zifferntasten ein (max. 22 Zeichen). Drücken Sie P. 3. Geben Sie den Namen ein.
Deutsch Deutsch Rufnummeranzeige So funktioniert die Rufnummeranzeige Sie können auf dem Display sehen wer anruft, bevor Sie den Anruf annehmen oder sehen, wer angerufen hat, wenn Sie nicht zu Hause sind. Wenn die Nummer im Telefonbuch gespeichert ist, wird der Name angezeigt. Die Anrufe werden nach Uhrzeit gespeichert, die Reihenfolge wird rechts oben angezeigt. Wenn der Speicher voll ist, ersetzt jeder neue Anruf die älteste Telefonnummer im Speicher.
Allgemeines Deutsch Wenn das Telefon nicht funktioniert Vergewissern Sie sich, dass das Telefonkabel unbeschädigt und korrekt eingesteckt ist. Entfernen Sie eventuelle Zusatzausrüstung, Verlängerungskabel und andere Telefone. Wenn das Gerät jetzt funktioniert, liegt der Fehler woanders. Versuchen Sie, das Telefon z.B. bei einem Nachbarn anzuschließen. Wenn das Gerät dort funktioniert, ist Ihr Telefonanschluss vielleicht gestört. Rufen Sie die Störungsstelle an.
Deutsch Allgemeines Garantie Dieses Gerät hat die Warengarantiezeit von einem Jahr. Bei eventuellen Reklamationen wenden Sie sich bitte an Ihren Händler. Der Garantieservice wird nur mit gültiger Kaufquittung bzw. Rechnungskopie ausgeführt. Die Garantie gilt nicht, wenn der Fehler aufgrund eines Unglücks oder ähnlichem entstanden ist. Weiterhin gilt die Garantie nicht bei Gewaltanwendung, eingedrungenen Flüssigkeiten, schlechter Wartung, Missbrauch oder anderer Fehler des Käufers.
Installazione Italiano Importante! Ai fini della programmazione, l’uso della parola “premere” si riferisce all’azione di “premere il pulsante una volta e rilasciarlo immediatamente”. L’auricolare del microtelefono può attrarre piccoli oggetti ferromagnetici come punti metallici e spilli; prestare attenzione al posizionamento del microtelefono vicino a tali elementi. Impostazioni di base/Connessione 1. Collegare il cavo spiralato al microtelefono e alla presa contrassegnata con Q sul lato del telefono. 2.
Italiano Installazione Batterie Per proteggere la memoria da periodi prolungati di mancanza di corrente, installare quattro batterie alcaline tipo AA di buona qualità. Quando le batterie si stanno scaricando, verrà visualizzato il simbolo . 1. Scollegare il cavo della linea telefonica. 2. Sul lato inferiore del telefono, rimuovere con attenzione il coperchio della batteria. 3. Inserire le batterie di backup, facendo attenzione alla polarità corretta delle batterie. 4.
Funzionamento Italiano Esecuzione di una chiamata Composizione normale 1. Sollevare il microtelefono. 2. Comporre il numero telefonico desiderato. Preselezione Consente di digitare un numero telefonico e modificarlo prima della composizione. 1. Digitare il numero telefonico desiderato. È possibile eliminare gli errori utilizzando 0. 2. Sollevare il microtelefono, premere o s. Verrà composto il numero telefonico visualizzato.
Italiano Funzionamento Timer Subito dopo aver composto un numero, viene visualizzato un timer sul display. Il timer vi permette di conoscere la durata della chiamata. Funzione vivavoce 1. Premere s. Verrà attivato il vivavoce e il relativo indicatore si accenderà. 2. Comporre il numero telefonico richiesto. Il volume del vivavoce è regolabile utilizzando situato sul lato del telefono. 3. Parlare nel microfono posto sul bordo anteriore del telefono. 4. Premere s per concludere la chiamata.
Rubrica telefonica Italiano Utilizzo della rubrica telefonica La rubrica può contenere fino a 32 numeri telefonici (max. 22 cifre) e i rispettivi nomi (max. 16 caratteri), con voci organizzate in ordine alfabetico. I numeri telefonici memorizzati possono essere richiamati premendo meno tasti di quelli richiesti per la composizione manuale.
Italiano Rubrica telefonica Composizione di un numero dalla rubrica telefonica 1. Premere b . 2. Utilizzando i pulsanti v /V. scorrere l’elenco fino alla posizione di memoria desiderata. Per effettuare una ricerca veloce, premere una o più volte il tasto numerico corrispondente alla prima lettera del nome (vedere la tabella riportata alla pagina precedente). 3. Premere per comporre il numero visualizzato. Se non si preme alcun tasto, il telefono tornerà in modalità standby.
Rubrica telefonica Italiano Memoria Il telefono è dotato di 2 memorie one-touch e 10 memorie two-touch da associare ai numeri telefonici chiamati con maggiore frequenza. Quando il numero è memorizzato, è sufficiente premere rispettivamente uno o due pulsanti per eseguire la chiamata. Le memorie one-touch corrispondono ai tasti M1 ed M2, mentre le memorie twotouch utilizzano le cifre da 0 a 9 sulla tastiera del telefono. Memorizzazione dei numeri one-touch 1. Premere P. 2.
Italiano Identificazione chiamante Descrizione della funzione ID chiamante L’ID chiamante consente di visualizzare il nome del chiamante prima di rispondere, nonché di visualizzare i nomi di coloro che hanno chiamato in vostra assenza. Se il numero è memorizzato nella rubrica telefonica, verrà visualizzato il nome corrispondente e non il numero telefonico. Le chiamate ricevute verranno memorizzate in ordine cronologico con il numero sequenziale indicato in alto a destra sul display.
Identificazione chiamante Italiano Cancellazione dei numeri 1. Scorrere l’elenco fino al numero telefonico che si desidera cancellare utilizzando v /V. 2. Premere 0: Verrà visualizzato DELETE? , in alternativa tenere premuto 0 fino a quando sul display compare DELETE ALL? 3. Tenere premuto 0 finché il numero sul display scompare. Trasferimento dei numeri alla rubrica telefonica 1. Scorrere l’elenco fino al numero telefonico che si desidera copiare utilizzando v /V. 2. Premere P. 3. Premere nuovamente P.
Italiano Varie Nessun numero visualizzato sul display quando l’apparecchio squilla - Perché questa funzione sia attiva, è necessario sottoscrivere il servizio ID Chiamante presso il proprio operatore di rete. - Se sul display viene visualizzato un messaggio di testo, può trattarsi di una chiamata internazionale (nessun dato ricevuto), oppure di un numero privato o nascosto. - Se il telefono è collegato ad un centralino, potrebbe non essere possibile ricevere informazioni sull’ID chiamante.
English French German Italian Version 1.