English Doro PhoneEasy ® 332gsm
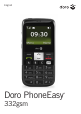
23 24 English . 2 . 3 . 4 . 5 . 6 . 7 . 8 . 9 . 0 . . 2 . Key lock Side key (volume) Torch key Display Left soft key Call key Speed dial keys 1 / Voice mail Numeric keypad # / Change profile SMS shortcut End call / Power on/off 3 . Arrow keys 4 . Right soft key 5 . Charging contacts (for use with charging stand) 6 . Emergency call key 7 . Battery cover 8 . Charging socket 9 . Headset socket 20 . Torch 2 . Loudspeaker 22 . Microphone 23 . Lanyard 24 .
English Contents Installation . . . . . . . . . . . . . . . . . . . . Installing the SIM card and battery. . Charging . . . . . . . . . . . . . . . . . . . . Operation. . . . . . . . . . . . . . . . . . . . . . Activating the phone. . . . . . . . . . . . Making a call. . . . . . . . . . . . . . . . . Making a call from the Phonebook . . Receiving a call . . . . . . . . . . . . . . . Volume control. . . . . .
English Settings. . . . . . . . . . . . . . . . . . . . . . . . Time and date. . . . . . . . . . . . . . . . . . Tone settings (rings & tones) . . . . . . . User setup. . . . . . . . . . . . . . . . . . . . Silent. . . . . . . . . . . . . . . . . . . . . . . . Block function . . . . . . . . . . . . . . . . . Emergency. . . . . . . . . . . . . . . . . . . . Voice mail . . . . . . . . .
English Installation Warning! Turn off the phone and disconnect the charger before removing the battery cover. Installing the SIM card and battery The SIM card holder is located behind the battery. 1 . Remove the battery cover and the battery if it is already installed. 2 . Insert the SIM card by carefully sliding it into the holder. Make sure that the SIM card’s contacts are facing inwards and that the cut-off corner is pointing upwards. Take care not to scratch or bend the contacts on the SIM card. 3 .
English Charging Warning! Only use batteries, charger and accessories that have been approved for use with this particular model. . Connecting other accessories may be dangerous and may invalidate the phone’s type approval and guarantee. When the battery is running low, is displayed and a warning signal is heard. To charge the battery, connect the mains adapter to the wall socket and to the charging socket y. is displayed briefly when the charger is connected to the phone, and when it is disconnected.
English Operation Activating the phone Press and hold the red button on the phone to turn it on/ off. The following messages may be displayed: SIM card missing or incorrectly inserted. SIM card damaged or not valid. If the SIM card is valid but protected with a PIN code (Personal Identification Number), PIN: is displayed. Enter the PIN code and press OK ( upper left of keypad). Delete with Clear ( upper right of keypad).
English Making a call 1 . Enter the phone number including the area code. Delete with Clear. 2 . Press to dial. Press Abort to cancel dialling. 3 . Press to end the call. Note! When making international calls, press * twice for the international prefix +. Always ����������� use + before the country code (instead of 00 or similar) for best operation. Making a call from the Phonebook 1 . Press Name to open the phonebook. 2 .
English Entering text Text is entered by pressing the numerical keys repeatedly to select characters. Press the key repeatedly until the desired character is shown. Wait a few seconds before entering the next character. Press * for a list of special characters. Select the desired character and press OK to enter it. Use the side keys +/– or the text. / to move the cursor within Press # to shift between sentence case, upper case, lower case and numerals.
English Display symbols Signal strength Missed call Ring only Keylock on Ring + vibration Headset connected Vibration only Alarm active Light only (silent) Battery level Roaming (in other network) New message SIM card missing Charger connected SIM card error Charger disconnected SOS calls only Headset connected Keylock off Headset disconnected Keylock on Handsfree on New message Handsfree off Error Incoming call Warning Outgoing call Query Missed call OK (confirmed) Call ende
English Additional functions Call options During a call the soft keys give access to additional functions: Options (left soft key) A menu with the following options is displayed: Hold single call Hold the current call End single call End the current call (same as New call Call another number (three-party call) Phonebook Search the phonebook Msg centre Write or read SMS messages Mute Disable the microphone (mute) ) SPK on (right soft key) Activates handsfree, which allows you to speak without
English Call waiting An alert tone will be heard if there is an incoming call while talking. To put the current call on hold and answer the incoming call, press Options. Call waiting must be activated, see Settings/Call setup. Call information During a call, the outgoing or incoming phone number and the elapsed call time is displayed. If the identity of the caller is withheld, Unknown is displayed. Call log Answered, missed, and outgoing calls are saved in a combined call log.
English View Show details for the selected call. Delete Delete the call. Delete all Delete all calls in the call log. Save Save the number in the Phonebook. Call time Call time counter Last call time Show the elapsed time of the most recent call. Dialled calls Show the elapsed time of all outgoing calls. Received calls Show the elapsed time of all incoming calls. Reset all time Press Yes to reset the time-counter, or No to return to the menu.
English View Shows details for the selected contact. Edit 1 . Use / 2 . Press Save. to move the cursor. Delete with Clear. Add new See Creating a phonebook entry. Call Press OK to call the contact. Send SMS Press OK to write an SMS message, see SMS messaging. Top 10 setting Set the entry as one of the first 10 numbers listed in the phonebook. 1 . Select one of the empty entries and press Add. 2 .
English Copy all Select From SIM and press OK to copy all phonebook entries from the SIM card to the phone memory. Press Yes to confirm or No to abort. Select From Phone and press OK to copy all phonebook entries from the phone memory to the SIM card. Press Yes to confirm or No to abort. Storage Select Phone or SIM and press OK to select storage for new phonebook entries. Phone 300 contacts with 3 phone numbers each Mobile, Home number or Office number. SIM 1 phone number per contact.
English Key lock You can lock the keypad to prevent the keys being accidentally pressed, for example, when your phone is in your handbag. Press and hold N on the top of the phone to lock/unlock the keypad. See Settings for key lock options. Incoming calls can be answered by pressing even if the keypad is locked. During the call, the keypad is unlocked. When the call is ended or rejected, the keypad is locked again. Note! The SOS numbers (999, 112 and 911) can be dialled without unlocking the keypad.
English Headset When a headset is connected, the internal microphone in the phone is automatically disconnected. When receiving a call you can use the answer key on the headset cable (if it has one) to answer and end calls. Warning! Using a headset at high volume can damage your hearing. Adjust the sound volume carefully when using a headset. SOS calls When the phone is turned on, the right soft key shows SOS before the SIM card is activated or if the phone lock is on.
English Emergency key The Emergency key allows you easy access to contact predetermined numbers should you need help. To make an emergency call, press and hold the Emergency key on the back of the phone for 3 seconds, or press it two times within 1 second. The phone will send a Message to all phone numbers in the Numbers list. The phone will then dial the first number on the list. If the call is not answered within 25 seconds, the next number is dialled.
English Warning: Do not hold the device near your ear when the handsfree mode is in use, because the volume may be extremely loud. Important! Information to the receiver of an Emergency call, when Confirm with ”0” is activated After receiving the emergency message, each number in the Numbers list will be called sequentially. To confirm the emergency call, the receiver need to press 0.
English SMS messaging Creating and sending messages 1 . 2 . 3 . 4 . Press Menu, scroll to and press OK. Select Write message and press OK. Type your message (see Text input) then press Done. Select one of the Send options below and press OK to confirm. Save and send Send the message and save it in the Outbox Send only Send the message without saving Send to many Add more recipients for the message If Send to many was selected, do the following: 1 . Select one of the empty entries and press Edit.
English Incoming messages (Inbox) 1 . Press Menu, scroll to and press OK. 2 . Select Inbox and press OK. 3 . Select a message from the list and press Read. Use the arrow keys to scroll the message up/down. 4 . Press Options. Call (Inbox) Press OK to call the contact. Reply (Inbox) Type your reply, then press Done. The message will be sent immediately. Send (Outbox) Select one of the Options and press OK to confirm, (see Creating and sending messages).
English Use number Displays all phone numbers contained in the message as well as the number of the sender. 1 . Use the arrow keys to select one of the displayed numbers. 2 . Press Options. 3 . Select one of the following options and press OK.
English Settings Note! The settings described in this chapter are carried out in standby. Time and date Setting the time and date 1 . Press Menu, scroll to and press OK. 2 . Select Time & date and press OK. 3 . Select Set time and press OK. 4 . Enter the time (HH:MM), then press OK. 5 . Select Set date and press OK. 6 . Enter the date (DD/MM/ YYYY), then press OK. Setting the time/date format 1 . Press Menu, scroll to and press OK. 2 . Select Time & date and press OK. 3 . Select Set format and press OK.
English Setting Auto time on/off To set the phone to automatically update the time and date according to the current time zone, select On. (Does only work with some operators.) Automatic update of date and time does not change the time you have set for the alarm and calendar. They are in local time. Updating may cause some alarms you have set to expire. 1 . 2 . 3 . 4 . Press Menu, scroll to and press OK. Select Time & date and press OK. Select Auto time and ���������� press OK. Select On/Off and press OK.
English Alert type (ring/vibrate) Incoming calls can be signalled by a ring tone and/or vibration or by light only. 1 . 2 . 3 . 4 . Press Menu, scroll to and press OK. Select Tone settings and press OK. Select Alert type and press OK. Select the desired signalling and press OK. Ring only Ring tone only Vib.
English User setup Wallpaper (display background) You can select from 8 different display backgrounds. 1 . 2 . 3 . 4 . 5 . Press Menu, scroll to and press OK. Select User setup and press OK. Select Wallpaper and press OK. Use / to display the available wallpapers. Press OK to confirm or Back to discard changes. Themes Your phone has 3 available themes that you can use to personalise the phone ‘s texts and background. 1 . 2 . 3 . 4 . 5 . Press Menu, scroll to and press OK. Select User setup and press OK.
English Owner number The phone numbers assigned to your SIM card are saved in Owner number if this is allowed by the card. To view/edit/delete the numbers: 1 . Press Menu, scroll to and press OK. 2 . Select User setup and press OK. 3 . Select Owner number and press OK. To edit or delete an existing entry, select it and press Options, then select Edit or Remove and press OK. Torch (flash light) 1 . Press Menu, scroll to and press OK. 2 . Select User setup and press OK. 3 . Select Torch and press OK. 4 .
English LCD backlight (display backlight) Sets the delay time before the display backlight is turned off. To save power the LCD backlight goes off after a short while but the phone is still charging. Press any key to illuminate the display. 1 . 2 . 3 . 4 . Press Menu, scroll to and press OK. Select User setup and press OK. Select LCD backlight and press OK. Select 15 sec, 30 sec. or 1 min. and press OK. Brightness You can customize the phone’s brightness settings. 1 . 2 . 3 . 4 . 5 .
English Audio setup If you use hearing aid or have hearing difficulties when using the telephone in noisy environment, you can customize the phone’s audio settings. 1 . 2 . 3 . 4 . Press Menu, scroll to and press OK. Select User setup and press OK. Select Audio setup and press OK. Select one of the following options and press OK. Normal For normal hearing in normal conditions. Medium For mild hearing impairment or usage in noisy environment.
English Emergency Settings for the Emergency key. 1 . Press Menu, scroll to and press OK. 2 . Select Emergency and press OK for the following settings: Activation Select one of the following options and press OK. Off Emergency call key disabled. On Normal Emergency Call key enabled. To activate, hold key for >3 seconds, or press 2 times within 1 second. On (3) Emergency Call key enabled. To activate, press key 3 times within 1 second.
English SMS The message to be sent when the Emergency key is pressed. Choose if you want the phone to send a message the numbers in Number list before dialling them, or simply call without sending the message first. If you choose to set the phone to send a message, we recommend that you write the message and save it as a standardized message to be sent should you need help. 1 . 2 . 3 . 4 . 5 . Select SMS and press OK. Select Activation and press OK. Select On / Off and press OK.
English Voice mail If your subscription includes an answering service, callers can leave a voicemail message when you cannot answer a call. Voice mailbox is a network service and you may need to subscribe to it first. For more information and for the voice mailbox number, contact your service provider. 1 . Press Menu, scroll to and press OK. 2 . Select Voice mail and press OK, then Options. 3 . Select Connect and press OK to call the voice mailbox.
English Speed dial A, B, C and the numerical ��������������� keys 0 and 2–9 can be used for speed dialling. Adding speed dial numbers 1 . Press Menu, scroll to and press OK. 2 . Select Speed dial and press OK. 3 . Select A (or B, C, 0, 2–9) and press Add. 4 . Select an entry from the phonebook and press OK. 5 . Repeat to add speed dial entries. To speed dial, press and hold the corresponding key. To edit an existing entry, select it and press Options, then select Edit or Delete and press OK.
English Call divert You can divert calls to an answering service, or to another phone number. Set up which calls should be diverted. Select a condition and press OK, then select Activate, Deactivate or Query status for each. Div. voice calls Diverts all voice calls. Div. unreach Diverts incoming calls if the phone is turned �������������� off or out of range. Div. no reply Diverts incoming calls if unanswered. Divert if busy Diverts incoming calls if the line is busy.
English SMS settings 1 . Press Menu, scroll to and press OK. 2 . Select SMS settings and press OK for the following settings: Predictive text When writing SMS messages in some languages you can use the Predictive text (eZiType™) input method which uses a dictionary to suggest words. The selected menu language determines the selection of dictionary. See Settings/User Setup on how to change language. 1 . Press OK. 2 . Select On/Off to enable/disable it.
English Cell information Information messages may be sent to network subscribers within a certain area or cell. Please note! Contact your service provider for more information. 1 . Press OK. 2 . Select one of the following options and press OK. Function on/off To turn information On or Off Read Select read and press OK to read the message Languages Select language and press OK Settings Select one of the following options: Select, Add, Edit or Delete and press OK. Network setup 1 .
English Security 1 . Press Menu, scroll to and press OK. 2 . Select Security and press OK. SIM lock The SIM card is protected with a PIN code (Personal Identification Number). The phone can be set to ask for the PIN code on startup. 1 . Select one of the following options and press OK: Off PIN code deactivated. Warning, if SIM card is lost/stolen it is unprotected. On PIN cod activated, you need to enter the PIN code every time the phone is started.
English Fixed dial (FDN) The fixed dialling function allows calls to be made to certain numbers saved on the SIM card. The fixed numbers are protected by your PIN2. Mode Select On/Off. Enter PIN2 and confirm with OK. Fixed numbers Select Options and one of the following options: Add, Edit or Delete and press OK. Enter PIN2 and confirm with OK. Note! Partial numbers can be saved. For example, saving 01234 allows calls to be made to all numbers starting with 01234.
English Numbers list You need to add the name and number of the person (s) that is allowed to send information from their phone to your Doro Phone Easy 332gsm. 1 . Select Numbers list and press OK. 2 . Select Empty and press Options. 3 . Select Phonebook if you want to add a contact from the Phonebook. Alternatively press Manual. 4 . Press . 5 . Enter the number and press Save. Repeat until you have max. 5 contacts.
English Alarm 1 . Press Menu, scroll to and press OK. 2 . Select On and press OK. 3 . Enter the alarm time using the keypad, then press OK. Use the side keys - / + to move the cursor. 4 . For a single occurrence, select Single and press OK. 5 . For a repeated alarm, select Repeated and press OK. Scroll through the list of weekdays and press On/Off to enable/disable the alarm for each weekday, then press Done. 6 . To edit an alarm, press Edit, then press OK. 7 . To stop the alarm, press Off.
English Add task 1 . Enter a date for the task, then press . 2 . Enter a time for the task, then press . 3 . Press Edit, enter a description for the task, then press Done. 4 . Press Save to save the task. At the given date/time, an tone is played and the task is shown. See Settings how to select Alarm tone. Jump to date Enter the date and press OK. Note! The calendar tone will sound even when the phone is off.
English Instructions for the REMOTE USER Sending Remote Control Commands by Text Message Activation must be set to On Normal and the remote user must be entered in Numbers list in Doro PhoneEasy 332gsm. All contacts sent to Doro 332 by remote configuration are stored in the Phone, even if the default storage is set to SIM storage. 3 phone numbers for each contact Mobile, Home number or Office number. Note! SMS format must be *#Command#, otherwise the SMS cannot be identified as a remote control command.
English Setting the emergency function Command alert alert alert P1 a P2 0/1/2 (activation) 0 = Off 1 = On Normal 2 = On (3) n 1~5 number location in numbers list m 0/1 message 0 = Off 1 = On P3 P4 Name number max length = 30 Text max length = 40 max length = 70 Example 1: You want to activate the emergency function. *#alert#a#1# You want Mr Jackson to be stored in Numbers list in position one (1) with phone number: 0700-393939.
English Setting the one touch memories Command memorykey P1 A P2 Name P3 number memorykey B Name number Name number memorykey A key B key C C key max length = 30 max length = 40 max length = 30 max length = 40 max length = 30 max length = 40 Example 1: You want to set Mr Jackson’s mobile phone number in position key A in Doro 332. Mrs Thomson should be in position key B and Mr Lewis should be in position key C.
English Safety instructions Warning! The unit and the accessories can contain small parts. Keep all of the equipment out of the reach of small children. Operating environment Follow the rules and laws that apply wherever you are, and always turn off the unit whenever its use is prohibited or can cause interference or hazards. Only use the unit in its normal user position.
English Pacemakers The Health Industry Manufacturers Association recommends that a minimum separation of 15 cm be maintained between a handheld wireless phone and a pacemaker to avoid potential interference with the pacemaker.
English Hearing aids This device should work with most hearing aid equipment in the market. However, full compatibility with all equipment can not be promised. Vehicles Radio signals can affect electronic systems in motor vehicles (for example, electronic fuel injection, ABS brakes, automatic cruise control, air bag systems) that have been incorrectly installed or are inadequately protected.
English Troubleshooting Phone cannot be switched on Battery charge low Connect the power adapter and charge the battery for 3 hours. Battery incorrectly installed Check the installation of the battery. Failure to charge the battery Battery or charger damaged Check the battery and charger. Battery recharged in temperatures . Improve the charging environment. < 0°C or > 40°C Charger incorrectly connected to phone or power socket Check the charger connections.
English SIM card error SIM card damaged Check the condition of the SIM card. If it is damaged, contact the network operator. SIM card incorrectly installed Check the installation of the SIM card. Remove the card and reinstall it. SIM card dirty or damp Wipe the contact surfaces of the SIM card with a clean cloth. Failure to connect to network SIM card invalid Contact the network operator. No coverage of GSM service Contact the network operator. Signal too weak See Weak signal below.
English Common Questions and Answers Q – Why hasn’t the mobile phone been supplied with a SIM card? A – Many people already have a mobile phone and wish to transfer their card over to the new phone. This has the advantage of keeping the same telephone number and if the card is subscribed to a Pay-as-you-go service then you also benefit from being able to carry over any credit that has been paid the card.
English Q – How do I pay for my calls? A – There are two main types of registration with a service provider. One is a contract – this is where you sign up for agreed contract over several months / year and pay an agreed monthly fee. This is more suited to people who are using their mobile phone as part of their job for example. The other is Pay-as-you-go, sometimes abbreviated to PAYG. With this type of service you add credit to the card and top up as and when required.
English Care and maintenance Your unit is a technically advanced product and should be treated with the greatest care. Negligence may void the warranty. • Protect the unit from moisture. Rain/snowfall, moisture and all types of liquid can contain substances that corrode the electronic circuits. If the unit gets wet, you should remove the battery and allow the unit to dry completely before you replace it. • Do not use or keep the unit in dusty, dirty environments.
English Warranty and technical data This product is guaranteed for a period of 12 months from the date of purchase. In the unlikely event of a fault occurring during this period, please contact the place of purchase. Proof of purchase is required for any service or support needed during the guarantee period. This guarantee will not apply to a fault caused by an accident or a similar incident or damage, liquid ingress, negligence, abnormal usage, nonmaintenance or any other circumstances on the user’s part.
English Version 1.