Doro 8030 English
1 2 12 11 13 14 15 3 4 10 5 6 7 9 8 16 Note! All illustrations are for illustrative purposes only and may not accurately depict the actual device. Overview 1. Headset port 2. Earpiece 3. Volume 4. Power button 5. Recents key 6. Home key 7. Microphone 8. Back key 9. 10. 11. 12. 13. 14. 15. 16.
English Contents Congratulations on your purchase ............................................................... 1 Get started..................................................................................................... 1 Insert memory card, SIM card and battery.......................................... 1 Charge the phone.................................................................................. 3 Turn the phone on and off ....................................................................
English Aeroplane mode ..................................................................................29 Connect the phone to a computer .....................................................30 About phone ........................................................................................ 31 How to improve battery performance ................................................32 Backup .................................................................................................33 Reset the phone ..
English FM Radio..............................................................................................59 Alarm ....................................................................................................60 Calendar............................................................................................... 61 My notes............................................................................................... 61 Timer .....................................................................
English Congratulations on your purchase Doro 8030 is a revolutionary smartphone that does what other smartphones do, but far more easily than ever before. Now you can communicate and enjoy photos, videos, fast 4G Internet and much more in a way that simplifies how you set up, access and use the phone's various functions. Get help as you go from the built-in coach, and feel even more secure with safety features such as our Assistance button.
English Insert the SIM card CAUTION This device accepts micro SIM or 3FF SIM card. Use of incompatible SIM cards may damage the card or the device, and may corrupt data stored on the card. Insert the memory card IMPORTANT! Use only compatible memory cards with this device. Compatible card type: microSD, microSDHC. Incompatible cards may damage the card itself, the device and corrupt any data stored on the card. Some phones may have a pre-installed memory card.
English Insert the battery Charge the phone CAUTION Only use batteries, chargers and accessories that have been approved for use with this particular model. Connecting other accessories may be dangerous and may invalidate the phone's type approval and warranty.
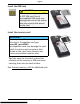
English 1. Insert the small end of the USB cable into the charging port of the phone (A) or into the charging port of the cradle (B). 2. Insert the other end of the USB cable to the mains adapter that you plug into to a wall socket. To increase the charging speed, turn the device or its screen off when you charge the battery. Press the ! Power button to view charging status. The device can be used during charging, but it may take longer to fully charge the battery.
English Turn off the phone 1. Press and hold the ! Power button until the options menu opens. 2. In the options menu, tap Power off. Get to know your phone Assistive symbols in the user guide Use the symbols to guide you through supporting sections in the manual.
English Touch or tap • Touch or tap an item, such as a button or a program icon, to select it or to open it. Touch can be used to select or deselect a relevant tick box in a list of options. Double-tap • Touch the same item twice to zoom in on a map or an image. Long press • Touch and hold an item on the screen. Some actions, such as to move an icon on the Home screen, begins with a long press. Select or deselect options • Select or deselect (tap) relevant boxes or list option.
English Pinch and spread (zoom) • • • To pinch: Place two fingers separated on the screen and pinch them together to zoom out of a map. This function is not always applicable. To spread: Place two fingers together on the screen and spread them to zoom in. This function is not always applicable. @ @ to zoom in If available, tap to zoom out. or Sensors Your device has sensors that detect light and proximity.
English Go to the Home screen • Press . Access the extended Home screen 1. 2. Tap the arrow at the bottom end of the Home screen. To close the extended screen, tap the arrow again. Tip: You can also swipe upwards or downwards to open and close the extended Home screen. Lock screen The screen turns off and locks when you are not using the phone. The lock screen can show time and date as well as notifications like missed calls or messages. Note! Your phone continues to run while it’s sleeping.
English • • Swipe (default setting) to unlock you slide up with your finger. No security. Pattern to unlock you trace a pattern with your finger on the screen. Medium security. Note! You can trace over the dots in any order, but you can trace over the same dot only once. The pattern must cover at least four dots. • • PIN to unlock you type a PIN. A PIN consists of numbers only. Enter at least four numbers, and then enter the password again to verify it. Medium to high security.
English • Press and hold to launch Google Now. Google Now is an intelligent personal assistant developed by Google, that is available within the Google search mobile application. IMPORTANT! You need an Internet connection and a Google account (see, Google Google account, p.37) to use this service. It is recommended to use Wi-Fi connections when available to reduce costs for data traffic. Contact your service provider for detailed subscription costs before activating.
English To enable and disable features and functions or enabled functions. or disabled functions. My applications screen Application is another word for program or software, a common way to shorten the term application is App. The application screen contains the applications that come pre-installed on your Doro 8030 and any other apps that you choose to install. The applications screen extends beyond the regular screen width, so you need to swipe left or right to view all content.
English 2. Drag the slider to adjust the sound level or tap: • Silent. • Sleep. • Sound. Notification panel and status bar Status bar The status bar, located at the top of your screen, shows signal strength, ongoing and new applications as well as battery status. Indicator icons appear when something new happens, like new message or missed call.
English • To clear all the notifications, tap . • To close one by one, swipe to the left or right. Use the quick setting buttons 1. To enable or disable features, tap: • Wi-Fi. • Mobile Data. • Bluetooth. • Aeroplane mode. Tip: Use the shortcut in the upper right corner to reach Set. Notifications on lock screen All app notifications appear on the lock screen ready for viewing. Not only that, but you can interact with them as well. Depending on the app in question you can: • • • Swipe to dismiss.
English 2. 3. Select the desired character or select {&= to view additional characters. To return, select abc. Move the cursor within text • Tap somewhere in the text to get the marker. Put your finger on the marker to move the cursor within the text. As you move your finger, the marker is dragged over the text. Place your finger where you want the marker to go and release your finger. The marker drops. Upper case, lower case • To write one upper case letter, tap in the lower left corner.
English 3. 4. When the highlighted area is the size you want, select Copy or Cut. Touch and hold where you want to paste. The text box Paste will be displayed. Press the text box to paste the text. Change input language Change the writing language while you're in the middle of writing a message. 1. 2. 3. Tap (on the top left side of the keyboard) More Languages and select language to enable. Press to save and return.
English 2. Simultaneously press and hold the ! Power button and the volume minus key on the right side of the phone. Connect to the Internet Your smartphone Doro 8030 is just like any other mobile phone - you can make calls and send texts. But you can also access the internet, send and receive emails, install apps and games, and check your social networking sites, like Facebook and Twitter, for this you need to be connected to Internet.
English Connect to Internet using mobile data Use Mobile data to connect your smartphone to a network provider with a data traffic plan. What that means is that the smartphone can connect to the Internet anytime it is in range of your operators mobile network. This you have to pay for as a monthly data traffic plan. And there may be a limit to the amount of data you can use per month. 1. 2. 3. From the Home screen, tap My Mobile data settings. Switch to enable. When done, tap .
English Tip: is shown in the status bar when roaming. Your phone can still access the Internet over the Wi-Fi connection even if you disable roaming. Note! Using data services while roaming can be costly. Contact your service provider for data roaming rates before you use data roaming. Switch data roaming On/Off 2. Set My Internet connection From the Home screen, tap My Mobile data settings More… . Use the Data roaming switch to enable/disable and confirm with OK. 3. When done, tap 1. .
English My voicemail to call your voicemail, see Open call settings, p.42. View To reach many of the most frequently used apps. My messages to view messages. My call log to view call logs, see Call log, p.41. My pictures and videos to view stored images and videos, see Gallery, p.52. My emails to view emails, create or add an email account, see Email, p.48. My contact book to see and handle your ICE card (In Case of Emergency), see Contacts, p.43.
English A message see Write messages, p.47. An email, see Write emails, p.48. A picture or video to send a picture or video. To view stored images and videos, see Gallery, p.52. A contact card to send a contact card. A note, see My notes, p.61. My location to send your present location. A music file to send a music file. A recorded sound to record and send a recorded sound. To access the extended Home screen. 1. 2. Tap the arrow at the bottom end of the Home screen.
English An event to book an event and get a reminder at the start time, seeCalendar, p.61. An application to add new applications, see Doro Selection, p.46. My home screen shortcuts to select the shortcuts you want access to from the Home screen. My information in case of emergency (ICE), see ICE (In Case of Emergency) , p.45. Snap Document an event with a picture, video or sound. A photo to take photos, see Camera, p.49. A video to record a video, see Camera, p.49.
English To the radio to listen to the FM-radio, see FM Radio, p.59. To my music to search and listen to your downloaded music, see Music, p.59. To a recorded sound to search and listen to your recorded sounds, see Recorder, p.62. Voicemail messages to listen to the message(s) you use in the voicemail and to the voicemail you have received, see Open call settings, p.42. Set To manage the settings of your phone. My alarms to set an alarm, see Alarm, p.60.
English Phone settings Introduction To reach the most common settings for your phone 1. From the Home screen, tap Set. To reach the advanced settings for your phone 1. Swipe the status bar downwards, to open the notification panel. 2. Tap in the upper right corner. 3. Tap A general option Advanced settings. A general option Time and date Your phone should already be set to the correct time, date, and time zone. If not, you can set it yourself.
English Display My home screen 1. From the Home screen, tap Set My home screen. 2. Tap an item to select it: My wallpaper Wallpaper is the background on the Home screen and on the Lock screen. You can change the wallpaper image into any image, such as a picture you've taken or images provided by your service provider. 1. 2. 3. Tap My wallpaper. Tap Change and tap to select an option in the pick list. Confirm with . Tap Gallery. 4. Tap an image to select it and confirm with .
English Widgets are small apps that launch specific functions to provide you information and convenient access. Turn on weather forecasts for your location, add one or more locations. Disable Google search bar • To disable switch . Weather forecast display 1. Tap My widgets. 2. Tap Today to select from the pick list. Confirm with . Disable clock • To disable switch . Confirm with . A display option 1. From the Home screen, tap Set A display option. 2. Tap an item to select it: The text size 1.
English To switch colour mode for persons with colour vision deficiency to see things more clearly. • • • • • • • • Disabled Monochromacy Inverted deuteranomaly Deuteranomaly (red-green) Inverted protanomaly Protanomaly (red-green) Inverted tritanomaly Tritanomaly (blue-yellow) • When done, tap . Sound 1. From the Home screen, tap Set An audio option. The volume Adjust settings for various sounds on your device. 1. 2. 3. Tap The volume.
English • 3. Ringtone and tap to select an option in the pick list. Confirm with . • Message & Notification tone tap to select an option in the pick list. Confirm with . • Keypad tone switch to enable. • Power on tone switch to enable. • Power off tone switch to enable. When done, tap to confirm. Tip: You can also press the volume keys on the side of the phone to adjust the volume.
English • • M: To use your hearing aid in this mode, make sure that your hearing aid is set to M-mode or acoustic coupling mode, and position the telephone's receiver near the hearing aid’s built-in microphone. For the best results, try using the telephone in different positions relative to your hearing aid—for example, placing the receiver slightly above the ear may result in better performance for hearing aids with microphones positioned behind the ear.
English Note! Because the devices are now paired, when you turn on Bluetooth on your device and the other device is on, the connection reestablishes and they'll stay paired until you unpair them. Unpair devices 1. 2. From the Home screen, tap Set The Bluetooth connection. The paired devices are listed. My other connections 3. 4. Tap next to the device name that you want to unpair. Tap FORGET. Note! You can also turn off the other unit or disable Bluetooth on that device.
English Connect the phone to a computer Connect the phone to a computer and start transferring pictures, music and other file types. All you have to do is connect a USB cable between the phone and computer. From your computer's file explorer, you can drag and drop content between your phone and the computer. Note! You might not be able to transfer some copyright-protected material.
English Tip: You can select different connection modes for you phone when connecting to a computer. Swipe down the status bar and select Connected as a media device. Note! When the phone/memory card is mounted to the computer, the phone cannot access the memory card. Some functionality and applications in the phone, such as the camera, may not be accessible. You can transfer files by using a USB cable on most devices and operating systems supporting a USB Mass Storage interface.
English Note! During the installation, your phone will be temporarily out of service, even for emergency calls. All contacts, photos, settings, etc. will remain safely stored in the phone. Do not interrupt the installation. Battery saver mode Once activated, the battery saver mode, helps to increase battery life. The battery saver is designed to start functioning when the battery level of your phone reaches a certain level.
English • • • • • • • Synchronise your applications manually, like your email, calendar and contacts. Use the Battery status menu in your device to see which applications use the most power. Check the screen brightness level, we recommend you to use the setting automatic. See The screen brightness, p.25. When in areas with no network coverage, turn off your device or activate the Aeroplane mode. The device repeatedly scans for available networks which consumes power. See Aeroplane mode, p.29.
English 4. Make sure that every wanted item in the list is activated. Each item needs to be activated if you want it to be backed up. 5. Press three times to save and return to Advanced settings. 6. Select Backup & reset. 7. Make sure that Back up my data is switched on. To immediately do a backup, tap Backup account. There are many apps that allow you to backup your photos, applications and much more.
English 4. Select Erase everything. CAUTION This is the last step before ALL data from the device, including Google or other account settings, system and application data and settings will be permanently erased. 5. After your phone resets, it will be set back to factory defaults and will be just like it was when it came out of the box. Memory and storage Note! When you update the phone the available capacity may change. Your phone has different types of memory and storage possibilities.
English Free up memory space The memory in your device tends to fill up as a result of normal usage. If your phone starts to slow down, or applications suddenly shut down, consider the following: Delete pictures • If you use your phone to take a lot of pictures, remember to back them up to your computer every now and again. Not only will this prevent you from losing any photos if anything were to happen to your phone, but it also gives you the opportunity to delete them from your phone and free up space.
English 4. 5. Tap for the items to delete. Tap OK to confirm. Tip: All purchases are managed by your Gmail account. If you want to install a particular app again later on, as long as you are signed in with your original Gmail account you won’t be charged again for the same app. Change the SIM PIN code 1. 2. 3. 4. 5. From the Home screen, tap Set A general option Advanced settings. Select Security. Select Set up SIM card lock Change SIM PIN. Enter old PIN and select OK. Enter new PIN and select OK.
English ™ To get the most out of your phone, you need to have a Google account. It’s a convenient way to manage your phone’s applications, contacts, calendar events, reminders and more. You can also back up your information in case you should lose your phone. ™ Create Google account 1. 2. From the Home screen, select Play Store. Follow the on-screen instructions to complete the account setup. ™ Google Play Store IMPORTANT! You need an Internet connection to use this service.
English Tip: All downloaded applications can be found in and tap to select My apps. Play Store. Tap , Open an installed application 1. 2. Play Store, tap and tap to select My apps. In Select the downloaded application. If needed tap Open. Update an installed application 1. 2. Play Store, tap and tap to select My apps. In You can select to update all applications that needs to be updated, tap Update all, or select a specific application and tap Update and confirm. Uninstall applications 1. 2.
English Calls Make a call To call a contact that is currently not available in your contact book. 1. From the Home screen, tap 2. 3. Tap A number. Enter the phone number including the area code, you are offered suggestions as you type. 4. Select Call. Call to end or cancel. Tip: For international calls, use the international prefix + before the country code. Touch and hold 0 until + is shown. Receive a call The phone rings or vibrates to alert you to an incoming call.
English Mute 1. During a voice call, select 2. To disable, select . again. Keypad (tone sending) 1. 2. 3. During a voice call, select Enter number. To close, select again. . Loudspeaker 1. 2. 3. During a voice call, select . Speak clearly into the microphone at a maximum distance of 1 m. Use + or – to adjust the loudspeaker volume. To disable, select again. Note! During a voice call more actions are available. Tap I want to to view your selectable actions.
English 2. Tap I want to and select Clear my call history. 3. Tap 4. Tap and select OK or Cancel. 5. Tap to confirm. next to the items to delete, or tap Select all. Open call settings Lock the screen during calls, call log limitation and more 1. From the Home screen, tap Call. 2. Tap A number I want to Open call settings : • Lock during calls to avoid making touch mistakes during a call. Your phone contains a proximity sensors that should disable the touchscreen when you are on a call.
English Note! The features in Advanced settings are network services and you may need to subscribe to them first. For more information and for the voicemail number, contact your service provider. 3. 4. to enable. Switch When done, tap . SOS calls As long as the phone is switched on, you can always make an SOS call. 1. From the Home screen, tap 2. Tap A number to enter the main local emergency number for your present location. Call. Call. 3.
English Google account). To manage synchronization for your Google account, see Backup, p.33. Tip: To hide the keyboard tap a text field once again. and to activate the keyboard simply tap Search contacts 1. From the Home screen, tap Something in my phone. 2. Start to enter a name or a number in the search bar are offered suggestions as you type. Select the correct match by tapping it. 3. Search Search. You Manage your contacts 1. 2. 3. 4. 5.
English 2. 3. Tap I want to. Tap Import/Export to select an option from the pick list. 4. Tap to confirm. ICE (In Case of Emergency) In the event of a trauma, it is critical to have this information as early as possible to increase the chances of survival. Add ICE contact to improve your own safety. First responders can access additional information such as medication and next of kin from your phone in case of an emergency. All fields are optional, but the more information provided the better. 1. 2.
English Applications Applications can be a program or game that you can use on your Doro 8030. Depending on market and service provider, the pre-installed applications can vary. Some applications need Internet access. Contact your service provider for detailed subscription costs before activating. Some applications need to be purchased. The cost is shown in the application description as well as if it is free.
English Messages Write messages You can send different types of messages from your phone. Here we will explain how to send a text message, but you can also send other mesSend menu. sage types from the Tip: Text messages (sms) are delivered immediately to a device that most of us have with us at all times, a text message also represents a more personal and intimate connection.
English Note! Message settings are normally already set and should not need to be altered by you, unless, of course you want to make changes. Some features are network services and you may need to subscribe to them first. For more information contact your service provider. Email Set up email account When opening email the first time you are prompted to set up an email account. IMPORTANT! You need an Internet connection to use this service.
English 4. 5. 6. 7. Enter subject. Tap just above Sent from my Doro to compose your email. If desired, tap I want to to access more options. When done, tap Send. Read emails 1. 2. 3. 4. 5. 6. From the Home screen, tap View My emails. Tap to read an mail. Tap Reply / Forward to select an option from the pick list. Confirm with . Compose your email. If desired, tap I want to to access more options. When done, tap Send. Email settings 1. 2. 3. 4. From the Home screen, tap View My emails. Tap I want to.
English Zoom • On the preview screen, place two fingers together on the screen and spread them apart to zoom in and pinch them together to zoom out. Take photos 1. From the Home screen, tap 2. Tap Snap , or press the side button A photo. . Take a selfie Selfie means to take a picture of yourself. You can use the front camera to take self-portraits. 1. 2. to switch to the front camera On the camera preview screen, tap for self-portraits. Face the front camera.
English Camera resolution Low resolutions are just fine for uploading to Facebook. The higher the resolution the clearer the photo will be, however high resolution takes up more storage space. High-resolution images are great for printing photos and photo-editing. 1. Select 2. Settings Photo mode Back camera and select: Select • 5MP (default setting) • 3MP • 2MP • VGA (resolution of 640 × 480 pixels) Select Resolution (front camera): • VGA (resolution of 640 × 480 pixels) 3. 4. More Options.
English 2. Tap • Settings Options and select: to enable. Exposure control, switch Once activated, exposure can be set via • • Exposure control. Shutter sound. Switch Save on SD card. Switch More Options to enable. to enable. Note! This option is only available when an SD card is inserted. See External memory, p.35 3. • Video stabilization. Switch When done, tap . to enable.
English 5. From here you can tap I want to to access more options. • Edit this picture • Crop picture • Rotate picture • Rotate picture • Set this picture as • Share this picture • Picture details • Add to favourites • Delete this picture 6. When done, tap . Assistance button CAUTION When an assistance call is activated the phone is pre-set to handsfree/ speakerphone mode. Do not hold the device near your ear when the handsfree mode is in use, because the volume may be extremely loud.
English Assistance button settings Note! Not all steps needs to be done, but at least Assistance button configuration and one contact in the Assistance numbers list must be set up to activate this feature. From the Home screen, tap assistance button. Set An assistance option My Assistance button configuration Select the mode of how to activate the assistance function. • • • Off to disable the assistance button.
English Assistance position message If you send an assistance alert it can be of great help for your help contacts to know your current position. This allows them to be able to assist you in the fastest possible way. The position SMS lets you share your GPS coordinates via a text message to your assistance contacts. The position information is based on the GPS position at the time for the assistance call, and if that position can't be detected, your latest known position is shared.
English My Doro Manager is an application that gives you the opportunity to get help from a helper i.e. a friend or relative with a smart device that can run the My Doro Manager application. The help can be carried out from anywhere (remote help). You can also watch tutorials and discover a lot of possibilities in your Doro 8030. Note! Both the Doro 8030 user and any of the helpers needs to have Google accounts (Gmail adresses) to be able to use My Doro Manager.
English Note! No personal information (messages, notes etc.) on the user’s phone is visible to the helper, only the actual My Doro Manager application and its settings are displayed. 4. Select Accept to access the remote help or Decline. 5. When done, select . Internet (web browser) IMPORTANT! You need an Internet connection to use this service. It is recommended to use Wi-Fi connections when available to reduce costs for data traffic.
English • • Slideshow to use the device as a photo frame. Do not disturb to activate press once and simply press it again to deactivate. Note! Do not disturb is a helpful setting for when you do not want to be disturbed, such as when you are sleeping or in a meeting. All notifications, alerts and calls are stopped from making any noise, vibration or lighting up the phone screen. You can schedule quiet hours to be repeated at the same time every day.
English Music Use the music player to listen to music or other audio files. Play music 1. 2. 3. 4. From the Home screen, tap Listen To my music. Select to sort by Title, Artist (default), Album, Genre or Favourites using the drop down menu. Select a track from the list. The next track is automatically played. • Tap to pause the track. to return to the Home screen. The music continues to • Press play. For more options, tap I want to: • Sort by to select song as favourite.
English Turn on the radio 1. Connect the headset to the headset socket. 2. From the Home screen, tap Listen To the radio. The radio is turned on. The tuned frequency is displayed. 3. or to scan channels and press to play. Select Slide on the scale to set the frequency manually. Use the side keys + and – to adjust the volume. Tip: Select to save a selected channel as favourite. to return to the Home screen. The radio continues to play. Press 4. 5.
English 8. Tap to confirm. Tip: To save battery and prevent incoming calls or messages, you can turn on Aeroplane mode but still keep the alarm function, see Aeroplane mode, p.29. To edit or delete alarms 1. 2. 3. 4. From the Home screen, tap View My alarms. To turn on and off switch . Tap an alarm to edit it. To delete an alarm tap I want to and select Delete. 5. Tap to confirm. Stop or snooze an alarm • • Tap Snooze to snooze the alarm for 5 minutes. Tap Stop to stop the alarm.
English 3. 4. For more options, tap I want to: • Delete this event to share. • Delete this note to delete. Tap Save to confirm. Timer Set timer 1. 2. 3. 4. From the Home screen, tap My apps Timer. Tap Set and use the keypad digits to set the duration. When done, tap Start. Tap Stop when the alarm goes off. Tip: You can use the phone as usual when the timer application is running as long as the phone is turned on. Calculator Perform simple calculations. 1. 2. 3. My apps Calculator.
English 2. 3. Tap a recording to listen to it. Tap I want to and select: • Record a sound. • Rename a sound. • Send sound(s). • Delete sound(s). Select for the items to delete, or Select all. Code safe A convenient password manager for you to help keep track of and to remember your passwords and other personal information and sensitive data. The only code you need to remember from now on is the simple password you create for your personal password vault Code safe. Activate the code safe 1.
English Google Apps IMPORTANT! You need an Internet connection to use this service. It is recommended to use Wi-Fi connections when available to reduce costs for data traffic. Contact your service provider for detailed subscription costs before activating. ™ All pre-installed Google applications can be found in Google Apps. Depending on the market, the pre-installed applications can vary. • From the Home screen select Google to open the Google applications. ™ Status icons / Signal strength 2.
English Missed call Headset connected (with microphone ) Call ongoing SIM card not inserted Call forwarding on Memory full Examples of soft keys Validate Add picture Discard Add current location Advanced Add template text Call contact Add video Write text or picture message (SMS/MMS) Add voice recording Write email Bring up the keypad Handle attachments Safety instructions CAUTION The unit and the accessories can contain small parts.
English Parts of the unit are magnetic. The unit can attract metal objects. Do not keep credit cards or other magnetic media near the unit. There is a risk that information stored on them can be erased. Medical units The use of equipment that transmits radio signals, for example, mobile phones, can interfere with insufficiently protected medical equipment.
English WARNING Danger of explosion if battery is incorrectly replaced. To reduce risk of fire or burns, do not disassemble, crush, puncture, short external contacts, expose to temperature above 60° C (140° F), or dispose of in fire or water. Recycle or dispose of used batteries according to the local regulations or reference guide supplied with your product.
English Do not keep or transport flammable liquids, gases or explosives together with the unit or its accessories. For vehicles equipped with air bags: Remember that air bags fill with air with considerable force. Do not place objects, including fixed or portable radio equipment in the area above the airbag or the area where it might expand. Serious injuries may be caused if the mobile phone equipment is incorrectly installed and the airbag fills with air. It is prohibited to use the unit in flight.
English Care and maintenance Your unit is a technically advanced product and should be treated with the greatest care. Negligence may void the warranty. • Protect the unit from moisture. Rain, snow, humidity, and all types of liquids can contain substances that corrode the electronic circuits. If the unit gets wet, you should immediately power off the phone, remove the battery and allow the unit to dry completely before you replace it. • Do not use or keep the unit in dusty, dirty environments.
English Warranty This product is guaranteed for a period of 12 months from the date of purchase. In the unlikely event of a fault occurring during this period, please contact the place of purchase. Proof of purchase is required for any service or support needed during the guarantee period. This guarantee will not apply to a fault caused by an accident or a similar incident or damage, liquid ingress, negligence, abnormal usage, non-maintenance or any other circumstances on the user’s part.
English Display Size: 4.5” Display resolution: 480 x 854 Internal memory: 8 GB External memory: microSD, microSDHC max 32 GB Operating ambient temperature: Min: 0° C (32° F) Max: 40° C (104° F) Charging ambient temperature: Min: 0° C (32° F) Max: 40° C (104° F) Storage temperature: Min:–20° C (–4° F) Max: 60° C (140° F) Copyright and other notices ® Bluetooth is a registered trademark of Bluetooth SIG, Inc. vCard is a trademark of the Internet Mail Consortium.
English Any rights not expressly granted herein are reserved. All other trademarks are property of their respective owners. To the maximum extent permitted by applicable law, under no circumstances shall Doro or any of its licensors be responsible for any loss of data or income or any special, incidental, consequential or indirect damages howsoever caused.
English above the ear may result in better performance for hearing aids with microphones positioned behind the ear. • T: To use your hearing aid in this mode, make sure that your hearing aid is set to "Tmode" or telecoil coupling mode (not all hearing aids have this mode). For the best results, try using the phone in different positions relative to your hearing aid—for example, placing the receiver slightly below or in front of the ear may result in better performance.
English This marking on the product, accessories or manual indicates that the product and its electronic accessories (e.g. charger, headset, USB cable) should not be disposed of with other household waste. To prevent possible harm to the environment or human health from uncontrolled waste disposal, please separate these items from other types of waste and recycle them responsibly to promote the sustainable reuse of material resources.
Doro 8030 (2021) English Version 1.1 ©2015 Doro AB. All rights reserved. www.doro.