Doro PhoneEasy 740 ® English
15 18 16 19 17 20 21 22 23
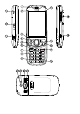
English 1. Earpiece 2. Green LED light = New message / Missed call 3. Up / Down key 4. OK key 5. Menu key 6. Function key 7. Call key 8. Voice mail 9. Microphone 10. Silent / Input method 11. End call key 12. Home key 13. Back key 14. Red LED light = Battery level low / charging 15. Headset socket 16. Key lock / Power key 17. Charging socket 18. Volume control 19. Camera shortcut key 20. Camera lens 21. Flash 22. Assistance button 23. Loudspeaker 24. Lanyard 25.
English Contents Getting started ........................................................................... 1 Inserting SIM card, memory card, and battery ........................ 1 Charging ............................................................................. 2 Turning the phone on and off ................................................ 3 PIN and PUK codes ............................................................. 3 Startup guide ...............................................................
English Camera adjustments.............................................................20 Gallery ................................................................................21 Connectivity ...............................................................................22 Connecting the phone to a computer .....................................22 Wireless networks.................................................................22 Bluetooth .................................................................
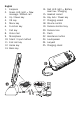
English Getting started IMPORTANT! Turn off the phone and disconnect the charger before removing the battery cover. Inserting SIM card, memory card, and battery GB The SIM and memory card holder’s are located inside the battery compartment. 1 1. 2. 3. 4. 2 3 4 Remove the battery cover and the battery if it is already installed. To insert a memory card gently slide it into the holder. Make sure that the memory card’s contacts are facing inwards and that the cut off corner is pointing to the right.
English Tip: Take care not to scratch or bend the contacts on the memory or SIM card when inserting them into the card holders. IMPORTANT! Use only compatible memory cards for use with this device. Compatible card type: microSD, microSDHC. Incompatible cards may damage the card itself, the device and corrupt data stored on the card. Depending on the market some phones may have a pre-installed memory card.
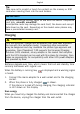
English Note! To save power the display goes to sleep after a while. Press any key to illuminate the display. Turning the phone on and off Press and hold 1 located on the left side of the phone to turn it on/off. Select Yes to confirm. Press to cancel. PIN and PUK codes If the SIM card is protected with a PIN code (Personal Identification Number), Enter PIN is displayed when turning on the phone. Enter the PIN code and press . Delete with .
English 6. Select network from the list enter password Save Next. Select Yes to set up Doro Experience account or No to continue. Tip: ® See Create Doro Experience® account, p.14 to set up later on. • • • • 7. Enter User name name (the name must contain at least 6 characters). This name will also be your Doro email. Enter Password (the password must contain at least 6 characters) re-enter Password. Enter E-mail address (Alternative e-mail address if you loose your password).
English 12. The Startup guide is now complete. Select OK to start using the phone. Tip: You can also access the Startup guide from General. The Startup guide is also shown if changing the SIM card, after factory reset or after updating software.
English Scroll Touchscreen Drag or flick your finger on screen in the direction you want to scroll. Scroll to the item by pressing or . Phone keys Zoom Touchscreen Place two fingers on the screen and pinch them together to zoom out or spread them apart to zoom in. This function is not always applicable. Use the phone hard keys Confirm action. Access options/menu available on the current screen or application. Scroll up or down in menus. Return to the previous screen.
English Special Press * for a list of characters special characters. Select the desired character with / and press to enter it. Tap for a list of special characters. Select the desired character or tap 1/2 to view additional characters. To return, tap . Move the Use the side keys +/– to cursor move the cursor within the within text text. Tap within the text to move the cursor. Upper case, lower case and numerals Press # to choose between upper case, lower case and numerals.
English Input mode Input mode Phone hard keys Virtual keyboard Sentence case with predictive text + UPPER CASE with predictive text + Sentence case UPPER CASE Numerals Doro Experience ® Create an Doro Experience account to get the most out of your phone. Add applications and access the phone using any web browser. See Doro Experience , p.13 for more information and how to get started. ® ® Basic phone settings Modify your phone settings to make it more personal using the Settings menu.
English Time and date 1. 2. 3. Select General Time and date. Select Set time and enter time (hh:mm). Press . Select Set date and enter date (dd/mm/yy). Press . Tip: You can also change the time and date format as well as activate auto time in the Time and date menu. Automatic update of date and time does not change the time you have set for the alarm clock or the calendar. They are in local time. Updating can cause some alarms you have set to expire.
English phone. The key lock will lock both the keys and touchscreen. Press 1 located on the left side of the phone to lock or unlock. Tip: To unlock the phone, slide the phone open. 1. 2. Select Security Key lock. Select the preferred key lock option. Silent You can activate the silent mode to turn off the ring tone and other sounds, except for any reminders, alarm and calendar events you have set. • • Press and hold 1 located on the left side of the phone, then select Silent mode.
English 2. Enter First name, Last name, phone number(s) including area code, and E-mail. Delete with . See Entering text , p. 6 . 3. To add a picture, select 4. Add picture and then choose between: • Gallery to select an existing picture. • Camera to take a picture with the camera. When chosen, select Save. Note! For international calls, use + before the country code. Press and hold 0 until + is shown. Tip: You can add a number from the Call log to a new or existing contact.
English 3. Repeat until you have 5 contacts (maximum). Edit text message to be sent when the Assistance button is pressed 1. 2. 3. Select Assistance Enter the text and press Select Activation On. SMS Message. . Signal type Select one of the following signal types for notification of the assistance sequence and press : High Low Silent Loud signals (default). One low signal. No sound indication, like a normal call. Make an assistance call 1. 2.
English 1. 2. 3. Select . Select Edit and enter your medical information, see the below table. Delete with . When finished, select Save. Name Birth Height Weight Language Insurance Contact 1 Contact 2 Doctor Condition Allergies Blood type Vaccination Medication Other info Your own name. Your date of birth. Your height. Your weight. Your language. Your insurance provider and policy number. Select a saved contact from Contacts, or add a new number in the Mobile text field.
English Note! You need to have Internet access to use most of the features in Doro Experience®. Contact your service provider if you need detailed information about your subscription plan and data traffic costs. Create Doro Experience account ® 1. 2. 3. 4. 5. Select Doro Experience® Create account. Enter a log in name you would like to use in the User name field. The user name will also be your Doro e-mail. Select the Password field and enter a password.
English Shows all available applications. Shows all featured applications. Shows the latest available applications. Shows all Internet related applications. Shows all entertaining applications. Shows organising and personal applications. Shows all phone specific applications. Shows all applications installed on your phone. To uninstall an application, select the application Uninstall. Select Yes to confirm.
English 3. 4. Press Press to dial. to end or cancel the call. Tip: For international calls, use the international prefix + before the country code. Press and hold 0 until + is shown. To improve sound quality, slide the phone open during calls. Making a call from contacts 1. 2. Select . Select contact from the list. 3. Select the number . Receiving a call 1. 2. Press Press Press or touch and hold Answer. or touch and hold Reject to reject the call directly. to end the call or tap End call.
English Headset When a headset is connected, the internal microphone in the phone is automatically disconnected. You can use the answer key on the headset cable (if it has one) to answer and end calls. CAUTION Using a headset at high volume may damage your hearing. Adjust the volume level carefully when using a headset. Call log Use the Call log to view your calling history. Select the following options: and one of All calls Shows all outgoing and received calls. Missed Shows all missed calls.
English Voice mail If your subscription includes an answering service, callers can leave a voice mail message when you cannot answer a call. Voice mail is a network service and you may need to subscribe to it first. For more information and for the voice mail number, contact your service provider. 1. 2. 3. 4. Select Calls Voice mail Add. Enter input number. When finished, select Save. If wanted, select: • Call to call your voice mail. • Edit to edit the given information. When finished, select .
English 3. 4. 5. Select a contact from the list or enter a number manually. To add more recipients, select Add and repeat step 3. When finished, select Send. Picture messaging Picture messaging requires an MMS profile and that both you and the recipient have subscriptions that supports picture messaging. The MMS profile is often pre—installed, if not contact your service provider for information. MMS Profile 1. 2. 3. Select Connectivity Messages MMS MMS profile.
English Create e-mail message 1. 2. Select Write e-mail. Enter subject and your message, see Entering text 3. If wanted, add picture as attachment. Press and select Attach and select picture. Select Send a contact from the list or enter an e-mail address manually. To add more recipients, select Add and repeat step 4. When finished, select Send. 4. 5. 6. , p. 6 . Camera Use the camera to take photos. Take pictures 1. 2. 3. 4. 5. Press and hold (on the side of the phone) to activate the camera.
English Flash mode Change flash settings for your pictures. In Camera mode, press Auto Off On and select Flash mode. Then select: Used automatically if needed. Always off. Always on. Pictures You can access your pictures in Camera mode, press Gallery. To return to Camera mode press . and select Settings In Camera mode, press of the following: and select Settings. Then select one Picture size Choose picture size from 1MP to 5MP. The higher the size, the better quality the picture.
English Delete View mode Delete the selected picture. Select Yes to confirm. Change image view. Select Single to view the picture one by one or Gallery to view thumbnails. Connectivity Connecting the phone to a computer Connect the phone to a computer and start transferring pictures, music and other file types. All you have to do is connect a USB cable between the phone and computer. From your computer's file explorer, you can drag and drop content between your phone and the computer.
English 2. 3. 4. Tick the Turn on box. Available networks are displayed in a list. The networks can be open or secured (marked with padlock). Select a network to connect to. If secured, enter the password. When finished, select Save. For more information, contact the relevant network administrator. Connection status is shown above the list. Example: Connected to: my network. Note! Your phone remembers Wi-Fi networks you connect to.
English you to do so. This is called roaming. Contact your service provider for more information. Note! Roaming can incur additional costs. Contact your service provider for more information. 1. 2. Select Connectivity Network setup. Select one of the following options: Select network View a list of available network operators (displayed after a short delay). • Service selection Select type of network service: • • • Network information Select desired service provider to connect to.
English Navigate the web browser In the web browser, press and select: Add current web page as bookmark. Add bookmark 1. 2. 3. Edit title if preferred. When finished, select Select Yes to confirm. Save. View all saved bookmarks. Bookmarks Reload page History Reload the current web page. View your browser history. Select an item to directly go to the web page. If wanted, press and select Delete all to clear history. Select Yes to confirm. Start page Change start page.
English Additional functions Magnifier Use the magnifier to magnify text or other things you have trouble reading or seeing. 1. 2. 3. Select . Use the display as a magnifier. Select Freeze image to temporarily freeze the view in the 4. display. To un-freeze select To exit the magnifier press Release. . Calculator Use the calculator to perform basic mathematical calculations. 1. 2. 3. 4. 5. Select . Enter the first number. Select an operation (+, -, x, ÷). Enter the next number.
English At the set date/time, an alert tone is played and the event description is shown on the display. Select Dismiss to turn off the alarm or Snooze to repeat the alarm after 9 minutes. Note! The calendar reminders only work when the phone is switched on. View mode You can select to view the events for a specific day. Go to date Enter the date you wish to view and select Go to date. Delete all 1. 2. 3. Mark the date in the calendar overview. Press and select View mode.
English Note! The alarm will not work when the phone is switched off. To save battery and prevent incoming calls or messages, you can turn Flight mode on to keep the alarm function, see Flight mode, p.24. Only one time can be set. Use Daily reminder, p.28 to add further reminders. Daily reminder Use reminders to get daily reminders of occurring events. Select Add. Enter subject and time (hh:mm). See Entering text input. 3. When finished, select Save. Edit or delete a reminder. 1. 2. 1.
English Note! The Remote help function requires data connection, make sure to be connected to Wi-Fi connection or allow Data traffic. 1. Call the nearest Doro support centre. It is recommended to use another phone, if using the Doro PhoneEasy 740 connect a headset. When asked to, select General Remote help. Tick the box if you agree with the user agreements, then select Request Remote Control. When requested add activation code, then select OK to confirm. If you agree with user agreements, select Yes.
English Troubleshooting Phone cannot be switched on Battery charge low Battery incorrectly installed Connect the power adapter and charge the battery for 5 hours. Full battery capacity is reached after the battery has been charged 3–4 times. Check the installation of the battery. Failure to charge the battery Battery or charger Check the battery and charger. damaged Battery should only be Improve the charging environment. charged in temperatures between 0 °C and 40 °C Check the charger connections.
English SIM card error SIM card damaged Check the condition of the SIM card. If it is damaged, contact your service provider. Check the installation of the SIM card. Remove the card and reinstall it. Wipe the contact surfaces of the SIM card with a clean cloth. SIM card incorrectly installed SIM card dirty or damp Failure to connect to network SIM card invalid No coverage of GSM service Contact your service provider. Contact your service provider.
English Network services and costs Your device is approved for use on the WCDMA 900/2100 MHz, GSM 850/900/1800/1900 MHz networks. To use the device, you need a subscription with a service provider. Using network services may result in traffic costs. Some product features require support from the network, and you may need to subscribe to them.
English Areas with explosion risk Always turn off the unit when you are in an area where there is a risk of explosion. Follow all signs and instructions. There is a risk of explosion in places that include areas where you are normally requested to turn off your car engine. In these areas, sparks can cause explosion or fire which can lead to personal injury or even death. Turn off the unit at filling stations, and any other place that has fuel pumps and auto repair facilities.
English WARNING Excessive exposure to loud sounds can cause hearing damage. Exposure to loud sounds while driving may distract your attention and cause an accident. Listen to a headset at a moderate level, and do not hold the device near your ear when the loudspeaker is in use.
English Care and maintenance Your unit is a technically advanced product and should be treated with the greatest care. Negligence may void the warranty. • • • • • • • Protect the unit from moisture. Rain/snowfall, moisture and all types of liquid can contain substances that corrode the electronic circuits. If the unit gets wet, you should remove the battery and allow the unit to dry completely before you replace it. Do not use or keep the unit in dusty, dirty environments.
English Weight: 149 g (including battery) Battery: 3.7 V / 1450 mAh Li-ion battery Copyright and other notices Copyright © 2012 Doro AB. All rights reserved. Bluetooth® is a registered trademark of Bluetooth SIG, inc. vCard is a trademark of the Internet Mail Consortium. Wi-Fi is a trademark or a registered trademark of the Wi-Fi Alliance. microSD is a trademark of SD Card Association. Java, J2ME and all other Java-based marks are trademarks or registered trademarks of Sun Microsystems, Inc.
English Specific Absorption Rate (SAR) This device meets applicable international safety requirements for exposure to radio waves. Doro PhoneEasy® 740 measures 0.475 W/kg measured over 10 g tissue. The maximum limit according to WHO is 2.0 W/kg measured over 10 g tissue. Declaration of Conformity Doro hereby declares that Doro PhoneEasy® 740 conforms to the essential requirements and other relevant regulations contained in the Directives 1999/5/EC (R&TTE) and 2002/95/EC (RoHS).
English 38
PhoneEasy 740 (1011) LAST PAGE English Version 1.0 © 2012 Doro AB. All rights reserved. www.doro.