������ �� �������� ����� Manual doro 930R Downloaded from: http://www.guardianalarms.
a 4 5 v v 1 2 3 9 8 7 6 10 11 12 13 16 15 14
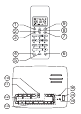
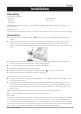
English (see pages 4-43) 1 Mute/Erase button 10 Page button 2 Scroll down and Caller Identification button 11 Mailbox 1 and 2 buttons and indicator lights 3 Talk button 4 Recall button and Handset Off/On button 12 Off/On and OGM programming/ settings 5 Hands free button 6 Intercom button 7 Phone Book button 8 Scroll up and Redial/Pause button 9 OK/Menu button 13 Answering machine functions buttons (please refer to page 27) 14 Charging indicator light 15 Display (Call Counter) 16 Power (
English Installation Index 5 Unpacking ................................ 5 Connection ............................... 5 Wall mounting........................... 6 Belt clip..................................... 6 Battery...................................... 6 Turning the handset On/Off ..... 6 Battery charge indicator 7 Range....................................... 7 Headset .................................... 7 The display ............................... 8 Base unit indicator....................
Installation English Unpacking The package contains: - Handset - Mains adapter - Base unit - Line cord - 2 batteries Models with an extra handset (+1) also include an additional handset, batteries, charger and mains adapter*. IMPORTANT! Only use with the supplied power adapter/s. *Connect the correct adapter according to the colour indication/markings. Connection 1. Connect the mains adapter to the y socket on the base unit and to an electrical wall socket. 2.
English Installation Wall mounting The base unit can be wall mounted. Attach the enclosed wall bracket to the underside of the base unit. A click will be heard as it locks into place. To remove the wall bracket, press the plastic button on the underside of the base unit. Belt clip A belt clip is fitted to the back of the handset, allowing the handset to be attached to a belt, shirt pocket or similar.
Installation English Battery charge indicator The symbol | in the display indicates when it is time to recharge the batteries. The indicator has three segments, which disappear one by one as the battery charge decreases. When the battery is running low, a warning signal sounds. If the handset is not recharged at this time, the phone will cease to function until it is recharged. | will only be displayed when the battery is fully charged.
English Installation The display basN DORO DECT 1 | Indicator b Function Phone Book a Message indication can be erased manually by turning off the handset. s Hands free Function N Key Lock w Menu q Indicates that a handset is connected (during a call). EXT External call INT Intercom Function | Battery charge indicator New number(s) in Caller ID log. Shown within reception range. Flashes when out of range.
Operation English Important! Please note when programming all references to press = to press once and then immediately release the button. Making a call 1. Enter the required telephone number. Mistakes can be erased using x. 2. Press q the telephone number will now be dialled. 3. Press q again to terminate the call. Receiving a call 1. Wait for the handset to ring. 2. Press q to answer the call. 3. Press q again to terminate the call.
English Operation Mute button The microphone can be muted during a call by pressing z . Press z again to reactivate the microphone. MUTE will be displayed for as long as this function is active. Paging Pressing j on the base unit will activate the paging signal on the handset. This function is used to help locate the handset or to page the person carrying the handset. The signal will stop automatically after a while or if any button on the handset is pressed.
Operation English Hands Free function The hands free button s is located on the front of the handset, this allows calls to be made without having to hold the handset. If you wish you can switch between handset and hands free during a call. 1. Press s, the hands free function will be activated ( s will be displayed) and dial tone will be heard through the speaker. 2. Dial the required telephone number. 3. Place the handset on a hard flat surface, e.g. a table, shelf or similar, with the display facing up.
English Caller Identification Explanation of Caller ID Caller ID allows you to see who is calling before you answer a call, while you are on a call and see who has called in your absence. If the number received is stored in the phone book with a name attached, the name will be displayed. The call log will store up to 20 telephone numbers. When the log is full the oldest number will be deleted automatically, as the new call is logged. New calls are indicated in standby mode with a flashing in the display.
Caller Identification English Other information Erase number 1. Press . { } 2. Scroll / to the required telephone number. 3. Press 0 until ADD is displayed. 4. Scroll { /} to DELETE. 5. Press 0 to confi rm or hold down x to return to standby. Please Note! When a number is stored in the phone book, step 3. Press 0 repeatedly until DELETE is displayed, then press 0 to confirm deletion. Transferring Numbers to the Phone Book 1. Press . 2. Scroll { /}to the required telephone number. 3.
English Menu Description of the menu system The telephone has a menu system, controlled by the following buttons: w /0 Access menu system. Move to the next setting and/or confirm your selection. { /} Scroll through the menu alternatives. x Used to erase, correct, go back or hold down to exit the menu system. The menu contains the following main headings: 14 TAM MENU This setting allows you to listen to the answering machine.
Phone Book English Using the phone book Use the phone book to store names and telephone numbers. A stored phone number can be dialled using fewer keystrokes than if dialled manually. If you subscribe to a Caller ID service, the name/number of the caller will be shown when receiving an incoming call (for those numbers stored in the Phone book). The phone book will store 50 sets of names and phone numbers.
English Phone Book Dialling from the phone book 1. Press b . 2. Scroll { /} through the phone book. It is also possible to perform a quick search by pressing the button corresponding to the first letter in the name (see the table on the previous page). 3. Press q the displayed number will now be dialled. Dialling from the phone book via the menu 1. Press w. 2. Scroll { /} to PHONEBK. Press 0. 3. Scroll { /} to LIST. Press 0. 4. Scroll { /} through the phone book. 5.
Handset settings English Warning tones Here you can switch the unit’s various warning signals on or off. KEYTONE Heard when the buttons are pressed. LOW BATT Heard when the battery is running low. OUTRANGE Heard if the handset is taken out of range. 1. 2. 3. 4. 5. Press w. Scroll { /} to HANDSET. Press 0. Scroll { /} to BEEP. Press 0. Scroll { /} to the desired function (see above). Press 0. Scroll { /} to either ON or OFF. Press 0 to save.
English Handset settings Type of ringer melody There are several different types of handset ringer melodies for both external (EXT) and internal (INT) calls. 1. Press w. 2. Scroll { /} to HANDSET. Press 0. 3. Scroll { /} to EXT MEL or INT MEL. Press 0. 4. Scroll { /} to the required setting. Press 0 to save. Auto - Answer When activated this feature allows incoming calls to be connected immediately the handset is lifted from the base unit. 1. Press w. 2. Scroll { /} to HANDSET. Press 0. 3.
Handset settings English User name The text displayed in standby mode can be customised. Maximum 8 characters. 1. Press w. 2. Scroll { /} to HANDSET. Press 0. 3. Scroll { /} to NAME. Press 0. 4. Delete the name using x, press the number button corresponding to the first letter of the name required one or more times, see the table on page 15. 5. Press 0 to save. Language Display texts can be shown in eleven different languages. 1. Press w. 2. Scroll { /} to HANDSET. Press 0. 3. Scroll { /} to LANGUAGE.
English Settings Base unit ringer volume and melody The base unit ringer volume and melody can be customised. 1. Press w. 2. Scroll { /} to SETUP. Press 0. 3. Scroll { /} to BASE VOL or BASE MEL. Press 0. 4. Scroll { /} to the required setting. Press 0 to save. Select base unit You can select which base unit you wish the handset to communicate with, alternatively the unit can automatically select which base unit to communicate with (AUTO). 1. Press w. 2. Scroll { /} to SETUP. Press 0. 3.
Settings English PIN number The PIN number is a four-digit code that you select to protect against unauthorised use of certain functions. 1. Press w. 2. Scroll { /} to SETUP. Press 0. 3. Scroll { /} to PIN CODE. Press 0. 4. Enter the current PIN number (0000 when supplied). Press 0. 5. Enter your new PIN number. Press 0. 6. Enter the new PIN number again. Press 0.
English Settings Dialling method (UK only) You can select either tone or pulse dialling, the standard setting is tone. In normal domestic use, this setting should not require changing. 1. Press w. 2. Scroll { /} to SETUP. Press 0. 3. Scroll { /} to DIALMODE. Press 0. 4. Scroll { /} to the required setting. 5. Press 0 to save. Recall button timing In some advanced PBX system the recall timing may require adjustment. In normal domestic use, this setting should not require changing.
Settings English An example of how to use the prefix function: The prefi x “9” is preset. When dialling a phone number: “9123456”, the phone will dial: “9” followed by a pause while the external line is connected, and then the remaining part of the number: “123456”. It makes no difference if the number is dialled manually or by using speed dialling. Numbers not starting with “9” (in this example) will be dialled as usual, without any pauses. 1. Press w. 2. Scroll { /} to SETUP. Press 0. 3.
English Registration Registering a new handset To enable the use of more than one handset a registration has to be performed. Every new handset must be registered in order to use the current base unit, each base unit can handle up to 5 handsets. On registration the handset is allocated a handset number for use on the new base unit, the handset numbers are 1-5. Additional handsets can be purchased from your local retailer. Please refer to the Expanded Systems chapter for more information. 1.
Expanded System English General information DECT (Digital Enhanced Cordless Telephone) is a digital method of transmission for cordless telephones. You can: - Use up to 5 handsets with the same base unit. - Make internal calls (intercom) and transfer calls between handsets using the same base unit. - Use (register) up to 4 base units with the same handset. Additional handsets can be purchased from your local retailer.
English Expanded System Intercom When using more than one handset with the same base unit, calls can be made internally between the handsets referred to as internal calls, or intercom. Intercom calls can only be made between handsets connected to the same base unit 1. Press i. 2. Enter the handset number for the handset that you wish to call, 1 - 5 . 3. To answer the call press q on the handset being called.
The answering machine English About the answering machine The answering machine has to be turned on in order to receive messages. On incoming calls the answering machine will respond after the selected number of rings (please refer to page 30). When the answering machine answers the incoming call the caller will hear your outgoing message (OGM) followed by a tone, at this point they can leave a incoming message (ICM) up to 3 minutes in length.
English The answering machine Switching the answering machine On/Off Press ! on the base unit to switch the answering machine On or Off. Upon switching this function on “Answer on” and the outgoing message will be heard. In the ON position (Answer on), incoming calls will be answered by the answering machine. In the OFF position (Answer off) no calls will be answered and - will flash in the base unit display.
The answering machine English Recording an Outgoing Message (base unit) 1. Press and hold ! until you hear “Please select outgoing message”. 2. Press 8 8 for the normal outgoing message (OGM) or 9 9 for Answer only (ANN). 3. The display will flash P1 (OGM) or P2 (ANN). The selected message will be heard. 4. To record your OGM message press and hold 8 8 . You will hear a short beep and the display will flash. 5. To record your ANN message press and hold 9 9.
English The answering machine Day/Time stamp The machine has a voice function that announces the day of the week and the time when each message was recorded. Hold the handset close to your ear in order to hear the voice prompts and tones. Setting Day/Time stamp (handset) 1. Press w . 2. Press w again. TAM MENU will flash in the display. 3. Press 0 . 4. After a beep tone is heard press *. 5. After the audible voice prompt another beep will be heard. Enter the correct settings Day (1=Sunday, 2=Monday...
The answering machine English Playback and Deletion of ICM messages (base unit) The display on the base unit will show the total number of messages in the memory. 1. Press 9 to start playback of all ICM messages, alternatively press and hold 9 to hear just the new ICM messages. The number of recorded messages will now be announced. 2. After each ICM message the day and time the message was received will be announced. 3. If you wish to delete a single ICM message press C while the message is playing. 4.
English The answering machine Call Screening Incoming messages will be heard through the base unit loudspeaker as they are received. If there is no sound adjust the volume using { /}. The call can be intercepted by pressing Q or lifting the handset of another telephone connected to the same line. If the recording does not terminate automatically, press ■ on the base unit.
The answering machine English Mailbox (base unit) The mailbox function allows several users to share an answering machine. The incoming caller can press either keypad button 1 or 2 to record a message for a specific person. The outgoing message should include these details, e.g.: -”Hello, we are unable to take you call right now, to leave a message for Linda press 1, for Stephen press 2 or for both of us just wait and speak after the beep.
English The answering machine Voice control (VOX) The answering machine will record a message as long as the caller keeps speaking (max. 3 minutes). If the caller stops speaking the answering machine will disconnect after approximately five seconds. Out of memory The answering machine can receive a maximum of 59 messages, but will only record up to 8 minutes in total (this includes the outgoing message).
The answering machine English Control from the handset To access the following functions it will be necessary to hold the handset close to your ear in order to hear the voice instructions and tones. 1. Press w . 2. Press w again. TAM MENU will flash in the display. 3. The available options will now be announced. 4. Select a command from the list below by pressing the corresponding button on the handset keypad. 5. Press and hold x to return to standby.
English The answering machine Remote code (handset) This code is needed in order to gain access to the remote control functions of the answering machine (factory setting is 123). You can alter the code according to the description below. 1. Press w . 2. Press w again. TAM MENU will flash in the display. 3. Press 9 . 4. After a beep is heard press *. 5. After the voice prompt enter the new code number ( 000 - 999 ). 6. The new three digit code will now be replayed. 7. Press and hold x to return to standby.
The answering machine English Remote control The answering machine functions can be remotely accessed using the keys of an ordinary tone dialling telephone. Dial the telephone number to which the answering machine is connected, enter the current remote code after the OGM message has played. Once the code is accepted, several remote options are available. Remote control 1. Dial the telephone number to which the answering machine is connected. 2. After the OGM message has played press *. 3.
English Other Troubleshooting Check that the telephone cord is undamaged and properly plugged in. Disconnect any additional equipment that may be connected. If the problem is resolved, the fault is with the other equipment. Test the equipment on a known working line. If the product works then the fault is with the line. Please inform your local telephone company.
Other English The answering machine is not answering Memory may be full. Listen to your messages and erase them. Check that the unit is switched on Check that the telephone cable and the mains adapter are correctly connected The answering machine does not respond to remote control Check that the telephone you are using to remotely control the answering machine is a tone dialling telephone.
English Other UK If you cannot resolve the fault using the faultfinder section, technical support is available on the Premium Rate Number: 0906 302 0114. Calls cost 50 pence per minute (prices correct at the time of going to press), and is operational between 9AM - 5PM Monday-Friday excluding Bank Holidays. Alternatively, E-mail on: tech@doro-uk.com You can contact us in writing: Consumer Support Group, Doro UK Ltd.
Other English Australia and New Zealand Products permitted for connection to the telephone network are marked with in Australia and in New Zealand. These marks indicate the products comply with the regulations and can be used without concern in the country of purchase. If you believe this product is malfunctioning, please refer to the relevant section and/or consult the troubleshooting guide in this manual to ensure that you have followed the instructions carefully.
English Other REN (RN for New Zealand) The REN (Ringer Equivalence Number) or (RN) is of significance only if you wish to connect more than 1 telephone to your telephone line. A standard telephone line has a maximum REN capacity of 3 (RN of 5). It is possible to connect 3 devices with a REN of 1 (RN of 1) with no degradation to the product’s performance. Exceeding this limit may cause the volume of the ringer in any phone to decrease or not ring at all.
English Version 1.