Manual doro 850 colour/855SIM
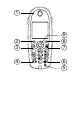
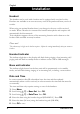
1 2 3 4 9 8 7 6 5
English 1 New Message and Ring indicator 6 # 2 Left menu button/OK 7 Disconnect and on/off 3 Talk button/hands free function 8 Right menu button/erase/redial 9 Scroll button 4 * and ringer on/off 5 Recall and key lock
English Installation Index 5 Unpacking........................... 5 Connection ......................... 5 Belt clip ............................... 6 Battery ................................ 6 Battery charge indicator ..... 7 Turning the handset on/off . 7 Range ................................. 7 Headset .............................. 8 Handset indicator................ 8 Base unit indicator .............. 8 Date and time ..................... 8 The display .........................
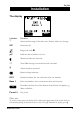
Installation English Unpacking The package contains: - Handset - Mains adapter (9VAC 300mA) - Base unit - Line cord - 3 AAA batteries (Ni-MH 1.2V 600 mAh) - Belt clip Models with an extra handset (e.g. +1) also include an additional handset, batteries, charger and mains adapter. IMPORTANT! Only use with the supplied power adaptor/s. Connection 1. Connect the mains adapter to the AC 9V socket on the base unit and to an electrical wall socket. 2. Carefully remove the handset battery cover.
English Installation Belt clip A belt clip is included, which can be fitted on the back of the handset. The belt clip enables the handset to be attached to a belt, waistband or similar. To attach the clip, align it with the indents on the sides of the handset and press it into place over the back of the handset. Battery The telephone is supplied with environmentally-friendly nickel metal hydride (NiMH) batteries – 3 x AAA 1.2V.
Installation English Battery charge indicator The symbol [ in the display indicates when it is time to recharge the batteries. When the battery is running low the display will show and a warning tone will be heard. If the handset is not recharged at this time, the phone will cease to function until it is recharged. The symbol will be displayed when the battery is fully charged.
English Installation Headset The handset can be used with a headset and is equipped with a socket for this. Headsets are available as an extra accessory and can be purchased from your local retailer. When using an optional headset there is no change in the way a call is received or made. When a headset is connected the handset microphone and earpiece will automatically be disconnected. This telephone supports the use of the answering function with a button on the headset cable available on many headsets.
Installation The display English � ���� � �� Indicator ���� 6 Function Shown within range of the base unit. Flashes when out of range. INT Intercom call Ringer off (with * ). q Indicates that a handset is in use. Monitor/hands free function. * New SMS messages received/network voicemail. H Alarm function activated. Battery charge indicator INT 1 Handset number, for use with more than one handset. Base 1 Base unit number, for use with more than one base unit.
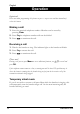
English Operation Important! Please note when programming all references to press = to press once and then immediately release the button. Making a call 1. Enter the required telephone number. Mistakes can be erased by pressing Clear. 2. Press O the telephone number will now be dialled. 3. Press L to terminate the call. Receiving a call 1. Wait for the handset to ring. The indicator light on the handset will flash. 2. Press O to answer the call. 3. Press L to terminate the call.
Operation English Volume control The speaker and earpiece volume may be adjusted during a call using v/V (1 - low, 3 - high). Timer Within approximately 10 seconds of the connection of a call, a timer will be shown on the display. The timer is a simple way to help you keep track of how long the call lasts. Redial function The 10 most recently dialled numbers can easily be redialled using the Redial button. 1. Press Redial and scroll using v/V to the desired telephone number. 2.
English Operation Hands free/monitor In addition to normal handset mode you can select either monitor or hands free mode. In monitor mode the handset is used as normal with the handset next to your ear, but allows everyone within the room to hear the caller. With hands free mode you make a call then place the handset on a table or similar hard surface, this allows everyone in the room to converse with the caller. 1. Dial the required telephone number. Mistakes can be erased by pressing Clear. 2.
Menu English Description of the menu system The telephone has a menu system controlled by the buttons directly under the display. The functions shown in the display (directly above the button) are: Menu OK Delete Entry Back Accesses the menu system. To scroll one step forward and/or confirm selected option. Used to delete. Used to go back to the previous menu option. There are also the following buttons: v/V To scroll through the menu alternatives.
English Phonebook Using the phone book Use the phone book to store names and telephone numbers. A stored phone number can be dialled using fewer keystrokes than if dialled manually. If you subscribe to a Caller ID service the name/number of the caller will be displayed when you receive an incoming call (names will only display when associated with a numbers stored in the Phonebook).
Phonebook English Storing names/numbers in the handset 1. Press Menu. 2. Scroll using v/V to Phonebook. Press OK. 3. Press Option. 4. Scroll using v/V to Add Entry. Press OK. 5. Enter name. Press the corresponding number button one or more times for the first letter (refer to the table on the previous page). Mistakes can be erased by pressing Clear. 6. Press V. 7. Enter the telephone number, including area code. Press Option. 8.
English Messages SMS messages This feature requires a current Caller ID subscription to be in place and only applies to text message users (SMS). The memory will store up to 30 messages, the maximum number of characters per message is 160. In standby mode new messages will be indicated by the indicator light above the display flashing and * will be shown in the display. Please remember individual SMS features are country dependent and will vary or be unavailable.
Messages English Deleting SMS messages 1. Press Menu. 2. Scroll using v/V to Message. Press OK. 3. Scroll using v/V to SMS. Press OK. 4. Select either Inbox, Outbox or Saved using v/V. The number of SMS messages will be displayed. Press OK. 4. Scroll using v/V to the required message. Press Read. 5. Press Option. 6. Select either Delete Entry or Delete List using v/V. Press OK. 7. If Delete List is selected press OK again to confirm. www.doro.
English Messages Writing a new SMS 1. Press Menu. 2. Scroll using v/V to Message. Press OK. 3. Scroll using v/V to SMS. Press OK. 4. Scroll using v/V to Write Message. Press OK. 5. Write your message. Press the corresponding number button one or more times for the first letter (refer to the table on page 14). To select: Upper/ Lower case press # , to move on one space press keypad digit 0 . Press Option. 6. Scroll using v/V and select either Send to or Store. Press OK. 7.
Messages English Entering telephone numbers for SMS Service Centre/network Check that the right number for your network has been programmed. 1. Press Menu. 2. Scroll using v/V to Message. Press OK. 3. Scroll using v/V to SMS. Press OK. 4. Scroll using v/V to Service Centre. Press OK. 5. Select either Send or Receive using v/V. Press OK. 6. Enter number, mistakes can be erased using Clear. 7. Press OK.
English Messages Explanation of Caller ID Caller ID allows you to see who is calling before you answer a call or to see who has called in your absence. If the number received is stored in the Phonebook its associated name will be displayed instead. New calls are indicated in standby mode by the indicator light above the display flashing. Please note! In order for numbers to be shown, you must subscribe to the Caller ID service provided by your network operator and a current subscription in place.
Messages English Delete a number 1. Press Menu. 2. Scroll using v/V to Message. Press OK. 3. Scroll using v/V to Caller List. The number of calls received will be displayed. Press OK. 4. Select either New calls or All calls. Press OK. 5. Scroll to the required telephone number using v/V. Press Option. 6. Scroll using v/V to Delete Entry or Delete List. Press OK. 7. If you select Delete List press OK again to confirm. Storing numbers in the Phonebook 1. Press Menu. 2. Scroll using v/V to Message. Press OK.
English Handset Set Handset ringer The handset has several different ringer volumes and melodies which can be selected. There is no ringer on the base unit. 1. Press Menu. 2. Scroll using v/V to Handset Set. Press OK. 3. Scroll using v/V to Ringer Set. Press OK. 4. Select either Ringer Volume or Ringer Melody using v/V. Press OK. 5. Select the required setting using v/V. Press OK to save. To turn off the ring signal, press and hold * in standby until Simply repeat to turn ringer back on. is displayed.
Handset Set English Alarm clock When the alarm clock is activated H will be displayed in standby mode. Once the alarm clock goes off the chosen melody will be heard for one minute, to switch the alarm off press any button on the handset. 1. Press Menu. 2. Scroll using v/V to Handset Set. Press OK. 3. Scroll using v/V to Alarm Clock. Press OK. 4. Scroll using v/V to Alarm Set. Press OK. 5. Select the required setting Once or Everyday using v/V. Press OK. 6.
English Handset Set Contrast The display contrast can be adjusted between 0 - faint to 4 - dark. 1. Press Menu. 2. Scroll using v/V to Handset Set. Press OK. 3. Scroll using v/V to Contrast. Press OK. 4. Select the required setting using v/V. Press OK to save. Wallpaper The background image shown in display can be changed. 1. Press Menu. 2. Scroll using v/V to Handset Set. Press OK. 3. Scroll using v/V to Wall Paper. Press OK. 4. Select the required wallpaper using v/V. Press OK to save.
Handset Set English Handset name The text displayed in standby mode can be personalised. 1. Press Menu. 2. Scroll using v/V to Handset Set. Press OK. 3. Scroll using v/V to Handset Name. Press OK. 4. Enter name (maximum 8 characters). Press the corresponding number button one or more times for the first letter (refer to the table on the page 14). Mistakes can be erased by pressing Clear. 5. Press OK to save. Language Display texts can be shown in five different languages. 1. Press Menu. 2.
English Handset Set Registering an additional handset To enable the use of more than one handset a registration has to be performed. Every new additional handset must be registered in order to use the current base unit, each base unit can handle up to 6 handsets. On registration the handset is allocated a handset number for use on the new base unit, the handset numbers are 1-6. Please refer to the Expanded System chapter for more information. 1.
Base Set English Ring Priority This allows you select on incoming calls which handset should ring first (i.e. have priority), or if all handsets should ring simultaneously. 1. Press Menu. 2. Scroll using v/V to Base Set. Press OK. 3. Scroll using v/V to Ring Priority. Press OK. 4. Scroll using v/V to Priority. Press OK. 5. Select the required handset using v/V. 6. Press OK to save.
English Base Set Call barring (call block) The telephone can bar (restrict) various outgoing calls. INT Call Bars all outgoing calls Barred no. Only bars numbers you have specified (see below) 1. Press Menu. 2. Scroll using v/V to Base Set. Press OK. 3. Scroll using v/V to Call Barring. Press OK. 4. Enter your current base unit PIN code (0000 at default). 5. Select the handset to which the restriction applies using v/V. Press OK. 6. Scroll using v/V to Barring Mode. Press OK. 7.
Base Set English Alternate Network Routing (ANR) This function will automatically select the telephone network operator of choice. The telephone can be set up to add digits and/or replace certain digits in telephone numbers. To choose a certain network operator, you would normally dial a prefix code before the actual phone number. If you have chosen a different operator for international calls, to use their service you must dial a prefix code before the telephone number, for example 9301.
English Base Set PBX function This telephone has a PBX function that will automatically insert a pause between the first and second digits of the telephone number before dialling. For Example: When the function is activated dialling a phone number ie: 0123456, the telephone will dial 0 followed by a pause and then the remaining part of the number 123456. 1. 2. 3. 4. 5. 6. 7. Press Menu. Scroll using v/V to Base Set. Press OK. Scroll using v/V to Dial Set. Press OK.
Base Set English Emergency numbers Emergency telephone numbers are the only numbers that can be dialled when the call barring is activated. The telephone is already pre-programmed with some emergency numbers. It is possible to dial numbers that start with the same digits as the full emergency numbers programmed. 1. Press Menu. 2. Scroll using v/V to Base Set. Press OK. 3. Scroll using v/V to Dial Set. Press OK. 4. Enter your current base unit PIN code (0000 at default). 5.
English Base Set Date and Time In some countries caller ID subscribers have the time and date updated automatically when a call is received, in other countries the time and date must be set manually. The time and date only requires setting on one of the handsets. 1. Press Menu. 2. Scroll using v/V to Base Set. Press OK. 3. Scroll using v/V to Date/Time. Press OK. 4. Enter the date using the handset keypad (DD.MM.YY). Press OK. 5. Enter the time (24 hour) using the handset keypad (HH:MM). 6.
Base Set English Reset base unit defaults Resetting will return most functions to the original factory default setting. Registrations are not affected by resetting. 1. Press Menu. 2. Scroll using v/V to Base Set. Press OK. 3. Scroll using v/V to Default Set. Press OK. 4. Enter your current base unit PIN code (0000 at default). 5. Press OK to confirm. www.doro.
English Expanded System General information DECT (Digital Enhanced Cordless Telephone) is a digital method of transmission for cordless telephones. You can: - Use up to 6 handsets with the same base unit. Make internal calls (intercom) and transfer calls between handsets connected to the same base unit Connect (register) up to 4 base units to the same handset. Additional handsets can be purchased from your local retailer.
Expanded System English Intercom calls When using several handsets with the same base unit calls can be made internally between the handsets, this is referred to as an internal call or intercom. Intercom calls can only be made between handsets connected to the same base unit. 1. Press Menu. 2. Scroll using v/V to INT Call. Press OK. 3. Press All for a general call (to all handsets) or enter the handset number 1 - 6 for the handset you wish to call.
English Other Troubleshooting Check that the telephone cord is undamaged and properly plugged in. Disconnect any additional equipment that may be connected. If the problem is resolved, the fault is with the other equipment. Test the equipment on a known working line. If the product works then the fault is with the line. Please inform your local telephone company.
Other English Specific Absorption Rate (SAR) This equipment meets current international safety requirements for exposure to radio waves. This telephone measures 0.004 W/kg (measured over 10g tissue). The limit value set by the WHO is 2W/kg (measured over 10g tissue). UK If you cannot resolve the fault using the faultfinder section, technical support is available on the Premium Rate Number: 0906 302 0114.
English Other Australia and New Zealand Products permitted for connection to the telephone network are marked with in Australia and in New Zealand. These marks indicate the products comply with the regulations and can be used without concern in the country of purchase. If you believe this product is malfunctioning, please refer to the relevant section and/or consult the troubleshooting guide in this manual to ensure that you have followed the instructions carefully.
Technical information English REN (RN for New Zealand) The REN (Ringer Equivalence Number) or (RN) is of significance only if you wish to connect more than 1 telephone to your telephone line. A standard telephone line has a maximum REN capacity of 3 (RN of 5). It is possible to connect 3 devices with a REN of 1 (RN of 1) with no degradation to the product’s performance. Exceeding this limit may cause the volume of the ringer in any phone to decrease or not ring at all.
English Version 1.