Doro PhoneEasy 612 ® English (US)
17 18 19
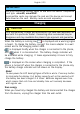
English 1. Earpiece 2. Camera shortcut 3. Left selection button 4. Call button 5. Speed dial 6. Voice mail 7. Silent/Input method 8. Microphone 9. SMS shortcut 10. Arrow buttons 11. End call/Power on/off 12. Right selection button 13. 14. 15. 16. 17. 18. 19. 20. 21.
English (US) Contents Installation ................................................................................ 1 Installing the SIM card, memory card and the battery ............. 1 Charging .................................................................................... 2 Symbols .................................................................................... 3 Assistive functions ............................................................... 3 Phone indicators ..............................
English (US) Camera, options...................................................................20 Camera adjustments.............................................................20 Image viewer..............................................................................21 Image viewer, options...........................................................21 Connecting the phone to a computer ............................................22 Drag and drop content between phone and a computer ...........
English (US) Care and maintenance ................................................................60 Battery disposal and recycling information ....................................61 Warranty ....................................................................................61 Support .....................................................................................62 Specifications ............................................................................
English (US) Installation IMPORTANT! Turn off the phone and disconnect the charger before removing the battery cover. Installing the SIM card, memory card and the battery The SIM and memory card holder’s are located inside the battery compartment. GB S IM 1 1. 2. 3. 4. 2 4 3 Remove the battery cover and the battery if it is already installed. Insert the SIM card by gently sliding it into the holder.
English (US) IMPORTANT! Use only compatible memory cards for use with this device. Compatible card type: microSD, microSDHC. Incompatible cards may damage the card and the device and corrupt data stored on the card. Memory cards are sold separately. Charging CAUTION Only use batteries, charger and accessories that have been approved for use with this particular model. Connecting other accessories may be dangerous and may invalidate the phone's type approval and guarantee.
English (US) Symbols Assistive functions The following symbols indicate information in the manual about assistive functions for: Seeing Handling Hearing Safety Phone indicators LED light on the phone will: • • flash green when you have a new message or a missed call. After reading the new message/missed call, the flashing will stop. flash red when the battery is running low and during charging.
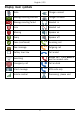
English (US) Display main symbols Mute Charger connect Message sending success Charger removed Message sending failed Headset in Error Headset out Warning Speaker on Query Speaker off Done (confirmed) Incoming call New message Outgoing call Battery level low Call ended Searching Missed call. Press Read to see the missed calls.
English (US) Operation Activating the phone Press and hold the red button Confirm with OK to power off. on the phone to turn it on/off. If the SIM card is valid but protected with a PIN code (Personal Identification Number), PIN is displayed. Enter the PIN code and press OK ( upper left corner of keypad). Delete with Clear ( upper right corner of keypad). Note! If PIN and PUK codes were not provided with your SIM card, please contact your service provider.
English (US) Tip: You can always press to return to standby. Changing the language, time and date The default language is determined by the SIM card. See General, p.23 on how to change language, time and date. Making a call 1. 2. 3. Enter the phone number including the area code. Delete with Clear. Press to dial. Press Abort to cancel dialing. Press to end the call. Tip: For international calls, always use + before the country code for best operation. Press * twice for the international prefix +.
English (US) Volume control Use the side buttons +/– to adjust the sound volume during a call. The volume level is indicated on the display. If you use hearing aid or have hearing difficulties when using the telephone in noisy environment, you can customize the phone's audio settings, see Audio setup , p.27. Entering text Press a numerical key repeatedly until the desired character is shown. Wait a few seconds before entering the next character. Press * for a list of special characters.
English (US) Abc ABC abc Abc ABC abc 123 Sentence case with predictive text UPPER CASE with predictive text lower case with predictive text Sentence case UPPER CASE lower case Numerals Call options During a call the selection buttons1 ( functions: ) give access to additional Options (left selection button) A menu with the following options is displayed: Hold single call/Retrieve single End single call New call Phonebook Messages Mute Hold/retrieve the current call. End the current call (same as ).
English (US) Note! The handsfree function allows only one person at a time to talk. Switching between talk/listen is triggered by the sound of the person talking. Loud noises (music, etc.) in the background may interfere with the function. Call waiting An alert tone will be heard if there is an incoming call while talking. To put the current call on hold and answer the incoming call, press Options, select Answer and then OK. Tip: Call waiting must be activated, see Call setup, p.32.
English (US) CAUTION Using a headset at high volume may damage your hearing. Adjust the volume level carefully when using a headset. SOS calls As long as the phone is switched on, it is always possible to place an SOS call by entering the main local emergency number for your present location followed by . Some networks accept calls to emergency numbers without a valid SIM card. Contact your service provider for more information.
English (US) The Emergency function may be configured so that the receiver of the call must press "0" (zero) to confirm, in order to stop the alarm sequence. If there is a risk that the emergency call will be answered by a voice mail/answering service, please activate the function Confirm with "0". See Confirm with "0", p.39. • Note! Some private security companies can accept automatic calls from their clients. Always contact the security company before using their phone number.
English (US) Phonebook The phonebook can store 300 entries with 3 phone numbers in each entry. Creating a phonebook entry 1. 2. Press Menu, scroll to and press OK. Select -New contact- and press Add. 3. Enter a Name for the contact, see Entering text , p. 7 . Delete with Clear. Use / to select Mobile, Home or Office, and enter the phone number(s) including the area code. 4. 5. Select Picture and press Edit to associate a picture to the contact.
English (US) 2. 3. Select a contact and press Options. Select one of the following options and press OK. View Show details for the selected contact. Edit 1. 2. Use / to move the cursor. Delete with Clear. Press Save. Add See Creating a phonebook entry, p.12. Call Press OK to call the contact. Send SMS Press OK to write a SMS message, see Creating and sending SMS, p.15. Send MMS Press OK to write a MMS message, see Creating and sending MMS, p.16.
English (US) Select From phone and press Select to copy all phonebook entries from the phone memory to the SIM card. Press Yes to confirm or No to abort. Send vCard Select Send by SMS and press OK to send the selected phonebook entry as a vCard via SMS. Enter the phone number of the recipient. Alternatively use the arrow keys / to scroll through the phonebook, or quick search by pressing the key corresponding to the first letter of the entry, see Entering text , p. 7 . Press OK to send.
English (US) Insurance: Contact 1: Contact 2: Doctor: Condition: Allergies: Blood type: Vaccination: Medication: Other info: Your insurance provider and policy number. Press Options and then OK to Add or Delete a contact from the phonebook, or Save to accept the current entry. If possible, add your relationship to your ICE contacts in the phonebook, such as “ICE Wife Mary Smith”. Any medical conditions/medical devices (e.g. diabetic, pacemaker). Any known allergies (e.g. penicillin, bee stings).
English (US) Note! If you choose to add multiple recipients, you will be charged for each recipient (maximum 10). For international calls, always use + before the country code for best operation. Press * twice for the international prefix +. Creating and sending voice message A voice message use the same technology as a MMS. Both you and the recipient must have subscriptions that support MMS. The settings for MMS is supplied by your service provider and can be sent to you automatically via SMS.
English (US) 2. 3. 4. 5. Select MMS and press OK. Type your message, see Entering text , p. 7 , then press Options. Add items to your message from the options Add subject, Add picture, Add sound and Add video. Add recipients with To and Send when ready. Add subject 1. 2. Select Add subject and press OK. Type your subject, then press Done. Add picture 1. 2. 3. 4. 5. Select Add picture and press OK.
English (US) Add recipients (To) Select To and press OK to select recipient from Phonebook and press Add. Alternatively, select Enter number and press Select to add recipient manually and press Done. Select Add to add more recipient or select Send to send and then press OK. You can also modify the recipients by selecting one and press Options to Edit, Delete or Delete all. 1. 2. 3. Inbox, Sent, Outbox / SMS/MMS unread / SMS/MMS sent / SMS/MMS read / SMS/MMS unsent 1. 2. 3. 4.
English (US) Edit Edit the message, then press Send. Forward Forward a message. Edit the message (if desired), then press Send. Use number Displays all phone numbers contained in the message as well as the sender's number. Call Save Send SMS Send MMS Call the selected number. Save the number in the Phonebook. Write a new SMS message. Write a new MMS message. Save objects (MMS only) To save text and media objects such as pictures, sound recordings and video.
English (US) 3. Press settings: View Delete Delete all Save to dial the number or press Options for the following Show details for the selected call. Delete the call. Delete all calls in the Call log. Save the number in the Phonebook. Camera (take photos) To get sharp photos, wipe the lens clean with a dry cloth. 1. 2. 3. Press shortcut or press Menu, scroll to and press OK. Press to take photo. Press Options or Back (if you do not make any selection the picture is saved).
English (US) • Use the side buttons +/– to adjust EV/Light sensitivity. Note! Zoom may reduce image quality. For more camera settings, see Camera, p.38. Image viewer View your saved images. 1. 2. 3. Press Menu, scroll to and press OK. Select an image, then press Options. Select one of the following options and press OK. Image viewer, options View Single view. Press Back when done. Send Select an option, then press OK: Send by MMS Send by Bluetooth Send image as MMS.
English (US) Rename Rename image. Delete with Clear and press Done to confirm. Browse style You can change image view. Default is Large, you can also select List or Medium. In List the file name, the date and the size of the image is shown. Sort by Select if you want to sort your images by Name or Time. Storage Select where the phone should save files if you have memory card installed. Delete all Press OK to delete all images. Press Yes to confirm or No to return.
English (US) Drag and drop content between phone and a computer 1. 2. 3. Connect your phone to a computer using a USB cable. Wait until the phone/memory card appears as external disks in the file explorer. Drag and drop selected files between the phone and the computer. Note! When the phone/memory card is mounted to the computer, the phone cannot access the memory card. Some functionality and applications in the phone, such as the camera, may not be accessible.
English (US) 6. 7. Select Set date and press OK. Enter the date (DD/MM/YYYY), then press OK. Setting the time/date format 1. Press Menu, scroll to and press OK. 2. Select General and press OK. 3. Select Time & date and press OK. 4. Select Set format and press OK. 5. Select Time format and press OK. 6. Select 12 hours or 24 hours and press OK. 7. Select Date format and press OK. 8. Select the desired date format and press OK. Setting Auto time on/off 1. Press Menu, scroll to and press OK. 2.
English (US) Press Yes to change Language, Time & date, Ring tone, Volume, Text size or Themes. Press No if you don’t want to change. Owner number The phone numbers assigned to your SIM card are saved in Owner number if this is allowed by the card. To view/edit or the numbers: 1. 2. 3. Press Menu, scroll to and press OK. Select General and press OK. Select Owner number and press OK. See Phonebook, p.12 on how to add names/numbers.
English (US) Select network To view available network, press Select network. A list of available network operators is displayed (after a short delay). Select desired operator and press OK. Network mode To select another network, select Network mode and then select one of the following options. Automatic Manual Network is selected automatically. Network is selected manually. Use Select network to select desired operator. Services This menu may contain pre-programmed services from your network provider.
English (US) 3. 4. Select Phonebook picture and press OK. Select On or Off and press OK. Sound Note! Silent needs to be set to Off to access Tone setup, Volume, Alert type and Extra tone. See Silent, p.28. Audio setup If you use a hearing aid or have hearing difficulties when using the telephone in a noisy environment, you can customize the phone's audio settings. 1. 2. 3. 4. Press Menu, scroll to and press OK. Select Sound and press OK. Select Audio setup and press OK.
English (US) 4. Scroll / to change the ring volume, then press OK. Silent 1. 2. 3. 4. Press Menu, scroll to and press OK. Select Sound and press OK. Select Silent and press OK. Select On or Off and press OK. Tip: Press and hold shortcut button # to activate/deactivate Silent. Alert type Incoming calls can be signalled by a ring tone and/or vibration. 1. 2. 3. 4. Press Menu, scroll to and press OK. Select Sound and press OK. Select Alert type and press OK.
English (US) Display Wallpaper You can select different display backgrounds. 1. 2. 3. 4. 5. Press Menu, scroll to and press OK. Select Display and press OK. Select Wallpaper and press OK. Scroll / to display available wallpapers. Press OK to confirm or Back to discard changes. Text size You can customize the text size for messages and the phonebook. 1. 2. 3. 4. Press Menu, scroll to and press OK. Select Display and press OK. Select Text size and press OK. Select Normal or Large and press OK.
English (US) 1. 2. 3. 4. Press Menu, scroll to and press OK. Select Display and press OK. Select LCD backlight and press OK. Select 15 sec., 30 sec. or 1 min and press OK. Brightness You can customize the phone's brightness settings. 1. 2. 3. 4. Press Menu, scroll to and press OK. Select Display and press OK. Select Brightness and press OK. Select Level 1–Level 3 and press OK.
English (US) 5. Select Call voice mail and press OK to call the voice mailbox. Tip: Press and hold shortcut button 1 to call your voice mail. Speed dial A, B, C and the numerical keys 0 and 2–9 can be used for speed dialing. Adding speed dial numbers 1. Press Menu, scroll to and press OK. 2. Select Calls and press OK. 3. Select Speed dial and press OK. 4. Select A and press Edit. 5. Select an entry from the phonebook and press OK. 6. Repeat to add speed dial entries for buttons B, C, 0, 2–9.
English (US) 6. Press OK to save the selected entry, or press Back to discard changes. To delete a Top 10 entry, select the entry in the Top 10 list and press Options, then Delete. Call time During a call, the duration of the call is shown. You can check the duration of your calls. 1. 2. 3. 4. Press Menu, scroll to and press OK. Select Calls and press OK. Select Call time and press OK. Select one of the following options and press OK.
English (US) 4. 5. Select Caller ID and press OK. Select one of the following options and press OK. Set by network Hide ID Send ID Use default setting by the network. Never show your number. Always show your number. Call waiting You can handle more than one call at a time. An alert tone will be heard if there is an incoming call while talking. To put the current call on hold and answer the incoming call, press Options, select Answer and then OK. 1. 2. 3. 4. 5. Press Menu, scroll to and press OK.
English (US) No reply If busy Cancel diverts Diverts incoming calls if unanswered. Diverts incoming calls if the line is busy. Do not divert calls. Call barring Your phone can be restricted to disallow certain types of calls. Note! A password is needed to apply Call barring. Contact your service provider to get the password. 1. 2. 3. 4. 5. Press Menu, scroll to and press OK. Select Calls and press OK. Select Call setup and press OK. Select Call barring and press OK.
English (US) Write speed You can change the speed at which keypad characters repeat (before the cursor moves onto the next character). Select Fast, Normal or Slow and press OK. SMS settings Memory status Displays the percentage of memory space used on the SIM card and in the phone memory. Phone memory can store up to 200 messages. Storage 1. Select SIM (default) to store messages on the SIM card, or Phone to store messages in the phone memory. 2. Press OK.
English (US) Languages Channel settings Select language On/Off and press Done. Select from which channels you want to receive/subscribe messages. Use the options Subscribe, Cancel subscription, Add, Edit and Delete to define your channels. MMS settings Memory status Displays the percentage of memory space used in the phone memory. Phone memory can store up to 100 messages. MMS profile These settings are needed to use the MMS function.
English (US) User name Password 3. 4. 5. Add proxy user name. Add proxy password. Press OK and press Yes to save or No to exit without saving. Select your new profile and press Options. Select Activate and press OK. You can also activate/modify a MMS profile by selecting one and press Options to Activate/Edit/Delete the account. Note! Some service provider’s require you to send an MMS message before you will be able to receive one. Send a MMS with text only to activate the service.
English (US) Delete Select Inbox to delete all messages in Inbox. Press Yes confirm or No to discard changes. Select Outbox to delete all messages in Outbox. Press Yes confirm or No to discard changes. Select Sent to delete all messages in Sent. Press Yes confirm or No to discard changes. Select Delete all to delete all messages at the same time. Press Yes confirm or No to discard changes. Camera 1. 2. 3. Press Menu, scroll to and press OK. Select Camera and press OK.
English (US) On Normal On (3) Off To activate, press and hold button for approximately 3 seconds, or press 2 times within 1 second. To activate, press button 3 times within 1 second. Emergency button disabled. Number list The list of numbers that will be called when the Emergency button is pressed. 1. 2. 3. Select Empty and press Add. Select Phonebook to add a contact from the phonebook. Alternatively, press Manual. See Phonebook, p.12 on how to add names/numbers. Press OK.
English (US) Off The phone will dial the first number on the list. If the call is not answered within 25 seconds, the next number is dialed. Dialing is repeated 3 times or until the call is answered, or until is pressed. The function will work as above AND: If the receiver doesn’t press 0 within 60 seconds the call will be disconnected and the next number in sequence will be called.
English (US) 2. Select Bluetooth and press OK for the following settings: Function on/off Select On/Off and press OK to enable/disable Bluetooth. Visibility Select On/Off to make your phone visible/invisible to other devices. Note! To prevent other devices from finding your device, select Off. Even if you select Off, paired devices can still detect your device. Device name Enter the name your phone should appear with for other Bluetooth devices and press OK.
English (US) Security 1. 2. Press Menu, scroll to and press OK. Select Security and press OK. SIM lock The SIM card is protected with a PIN code (Personal Identification Number). The phone can be set to ask for the PIN code on startup. Select one of the following options and press OK. On Off Automatic PIN code activated, you need to enter the PIN code every time the phone is started. PIN code deactivated. Warning, if SIM card is lost/stolen it is unprotected.
English (US) On Off Remote configuration enabled. Remote configuration disabled. Number list You need to add the name and number of the people who are allowed to send information from their phone to your Doro PhoneEasy 612. ® 1. 2. 3. 4. 5. Select Number list and press OK. Select Empty and press Add. Select Phonebook to add a contact from the Phonebook. Alternatively, press Manual. Press . Enter the number and press OK. Repeat until you have 5 contacts (maximum).
English (US) 1. 2. 3. Enter the current code and confirm with OK. Enter a new code and confirm with OK. Enter the new code again and confirm with OK. Reset settings If you select Reset settings, the changes that you have made to the phone settings will be reset to default settings. Input the phone password and press OK to reset.
English (US) View (photos/images) Single view. Press Back when done. Send Select an option, then press OK: Send by MMS Send by Bluetooth Send by MMS. Press OK to create a message, see Creating and sending MMS, p.16. Send to other Bluetooth devices, see Bluetooth®, p.40. Details View detailed information about the file, e.g. date, size, copyright-protection. Use Select an option from the list, then press OK. Wallpaper Phonebook picture Save as display background. Press OK.
English (US) 2. 3. 4. 5. Select Select Select Select Phone/Memory card and press Options. Open and press OK. a folder, eg Photos and press Options. Paste and press OK. Additional functions Alarm 1. 2. 3. 4. 5. 6. 7. Press Menu, scroll to and press OK. Select On and press OK. Enter the alarm time using the keypad, then press OK. For a single occurrence, select Single and press OK. For a repeated alarm, select Repeated and press OK.
English (US) Jump to date Enter the date and press OK. View all Select a task and press Options for the following options: Edit Delete Delete all Edit selected task. Delete selected task. Delete all tasks. Note! The calendar will work even when the phone is switched off. Do not press Yes to power on if wireless phone use is prohibited or when it may cause interference or danger. 1. 2. 3. Daily reminder Enter time for the task, then press Enter subject. Press OK to save the task. .
English (US) FM radio The FM radio has a frequency range from 87.5 to 108.0 MHz and 9 preset channels. Turning the radio on 1. Connect the headset to the headset socket 2. Press Menu, scroll to and press OK. The radio is turned on. The tuned frequency is displayed. Select channel using or . Use the side keys +/- to adjust the volume. Press to return to standby mode. The radio will continue to play. 3. . Save frequency 1. 2. 3. 4. 5. 6. Press Menu, scroll to and press OK. Select channel using or .
English (US) Play Delete Edit Play the selected channel. Delete the channel. Press Yes to confirm or No to return to the channel list. Edit the channel name, then press to edit the frequency, use # to enter the decimal point. Press Save. Selecting channels Press keys 1-9 to quick-select a preset channel while the radio is playing. Manual input (changing search mode) 1. 2. 3. 4. Press Menu, scroll to and press OK. Select Options. Select Manual input and press OK.
English (US) Best grades Help Shows your best results. Press Back to return or Reset to reset the scores. Shows instructions for the game. Press Back to return. Settings Sound effect Use side buttons +/- to select On or Off, then press OK. Volume Use the side buttons +/– to adjust the sound volume, then press OK. Instructions for the REMOTE USER Sending remote control commands by text message. Activation must be set to On and the remote user must be entered in Number list on the Doro PhoneEasy 612.
English (US) *#phonebook#Jeff Jackson#0700393939#0462805011#046280 5083# The number will be saved in the 612 Phonebook as: Jeff Jackson 0700393939 0462805011 0462805083 Note! Only use numerals for parameters 2, 3 and 4. If you use letters in these parameters it will be stored as empty/blank in the Phonebook. Contacts already saved in the Phonebook, will not be replaced. They will be duplicated. This is to avoid unintentional removal of contacts from the Phonebook.
English (US) alert c confirm with “0” 0/1 0=Off 1=On alert s signal type 0/1/2 0=High 1=Low 2=Silent Example: You want to activate the emergency function. *#alert#a#1# You want Jeff Jackson to be stored in Number list in position one (1) with phone number: 0700-393939. *#alert#n#1#Jeff Jackson#0700393939# You want the SMS message to be sent out when the emergency button is pressed. Example of content in text message: This is an emergency message. Please take appropriate actions.
English (US) Setting the one touch memories Command P1 P2 P3 memorykey a A key Name max length=20 number max length=40 memorykey b B key Name max length=20 number max length=40 memorykey c C key Name max length=20 number max length=40 Example: You want to set Jeff Jackson’s mobile number in memory key A in Doro PhoneEasy 612. ® Martha Thomson in memory key B and Steve Lewis in memory key C.
English (US) Safety instructions CAUTION The unit and the accessories can contain small parts. Keep all of the equipment out of the reach of small children. The mains adapter is the disconnect device between the product and mains power. The mains socket outlet must be close to the equipment and easily accessible. Network services and costs Your device is approved for use on the GSM 850/1800/1900 MHz networks. To use the device, you need a subscription with a service provider.
English (US) pacemaker to avoid potential interference with the pacemaker. Persons with pacemakers: • • • Should always keep the phone more than 6 inch from their pacemaker when the phone is turned on. Should not carry the phone in a breast pocket. Should use the ear opposite the pacemaker to minimize the potential for interference. If you have any reason to suspect that interference is taking place, turn the phone off immediately.
English (US) Vehicles Radio signals can affect electronic systems in motor vehicles (for example, electronic fuel injection, ABS brakes, automatic cruise control, air bag systems) that have been incorrectly installed or are inadequately protected. Contact the manufacturer or its representative for more information about your vehicle or any additional equipment. Do not keep or transport flammable liquids, gases or explosives together with the unit or its accessories.
English (US) • • • • • automobile drivers. You should therefore check the status of such laws in your area and in locations to which you travel by car, whether or not you otherwise follow the preferred safety practice of routinely using a hands-free device.For SMS text messaging, it is a recommended safety practice that you never send or view received text messages while driving; in California, and likely other states in the future, SMS messaging by a driver is also a legal violation.
English (US) TTY compatibility This unit does not support TTY signaling. If you intend to connect a TTY to the unit, this unit should not be purchased and, if already purchased, it should be returned for a refund. RF exposure information (SAR) This model phone meets the government’s requirements for exposure to radio waves. This phone is designed and manufactured not to exceed the emission limits for exposure to radio frequency (RF) energy set by the Federal Communications Commission of the U.S.
English (US) methods and procedures specified in IEEE 1528 and IEC 62209. This equipment should be installed and operated with minimum distance 1.5 cm between the radiator and your body.This device and its antenna(s) must not be co-located or operating in conjunction with any other antenna or transmitter. Disclaimer and Limitation of Liability Doro AB and its affiliates, licensees and retailers assume no responsibility for any damage or loss resulting from the use of this guide.
English (US) • Consult the dealer or an experienced radio/TV technician for help. The FCC or Industry Canada can require you to stop using your unit if such interference cannot be eliminated. Doro has not approved any changes or modifications to this device by the user. Any changes or modifications could void the user’s authority to operate the equipment. Care and maintenance Your unit is a technically advanced product and should be treated with the greatest care. Negligence may void the warranty.
English (US) • • • Battery usage by children should be supervised. Avoid dropping the phone or battery. If the phone or battery is dropped, especially on a hard surface, and the user suspects damage, take it to a service center for inspection. Improper battery use may result in a fire, explosion or other hazard. The advice above applies to the unit, battery, mains adapter and other accessories. If the phone is not working as it should, please contact the place of purchase for service.
English (US) QUALITY OR FITNESS FOR PARTICULAR PURPOSE, INCLUDING ANY AND ALL WARRANTIES AND CONDITIONS FOUND IN APPLICABLE LEGISLATION. Support For assistance, please contact: Website: www.dorocanada.com Telephone: 1-888-611-3676 Specifications Network: GSM 850/1800/1900 MHz Dimensions: 101 mm x 52 mm x 20 mm Weight: 103 g (including battery) Battery: 3.7 V / 800 mAh Li-ion battery Bluetooth® is a registered trademark of Bluetooth SIG, inc. eZiType™ is a trademark of Zi Corporation.
English (US) 63
PhoneEasy 612 (4011) FCC ID: WS5DORO612 IC ID: 8175A-DORO612 LAST PAGE English (US) Version 1.0 © 2012 Doro AB. All rights reserved. www.doro.