
Operation Manual
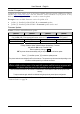
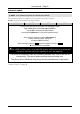
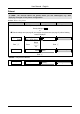
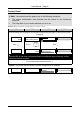

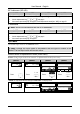

Table Of Contents
- Copyright
- Warranty
- Declaration of conformity
- Safety instructions
- Disposal of the product
- Hardware Components
- User Interfaces
- User and Administrator Mode
- Documentation
- Phone Installation
- Phone Initialization
- Registration
- Idle Screen
- Phone User Interface
- Web User Interface
- General Configuration Tasks
- Display Configuration Tasks
- Audio Configuration Tasks
- SIP Identity Configuration Tasks
- Function Key Configuration Tasks
- Maintenance Tasks
- Outgoing Calls
- Extension (SIP identity) for Outgoing Calls
- Making Calls
- Auto Completion (Number Guessing)
- Call Completion
- Call Termination
- Redial
- Call Indication
- Accepting Incoming Calls
- Call Waiting
- Denying Incoming Calls
- Denying Incoming Calls Automatically
- DND (Do Not Disturb) Mode
- Call Forwarding
- Audio Operation Modes
- Mute / Unmute
- Multiple Speaker Mode
- Hold and Resume
- Call Transfer
- Conference
- Call Recording
- Logoff All Users (Extensions/SIP Identities)
- Logon New User (Extension/SIP Identity)
- Access
- Access
- Availability
- Access
- Changing the Presence State
- Contact Presence
- Acoustical Indication
- Visual Indication
- Retrieve New Messages
- Busy Lamp Field (BLF) feature
- “Calls” List
- Call Pickup

User Manual - English
48
Automatic update
L Note: This method requires an internet connection.
The automatic update is conducted via the phone’s web user interface.
Action: Conduct an automatic firmware update
ip810c ip820c ip830c ip840c
For further information read the instructions in our administrator manual.
http://www.doro.com/voipsupport/ip8X0c/
Copy the link of the appropriate update method
(recommended “Update once to current official firmware release”):
Access the phone’s web user interface (below Version 7):
Setup Advanced Update Setting URL
and paste the link into that field.
Save the change by clicking on Save and start the update by clicking on Reboot
The phone reboots automatically
1 Warning: Any power interruption during the following process will most likely
lead to a flash memory error. As a result the system cannot boot up anymore and
the phone must be sent in for repairing at your own expense.
The phone automatically loads the necessary software from Doro’s web server
successively. The whole update process may take some time.
The phone will be initialized using the previously stored phone configuration.
Result: The firmware is updated. You can verify the successful update as described in chapter
“Version Check” on page
46.