
Operation Manual
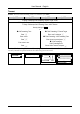
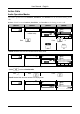
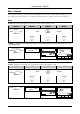
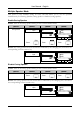
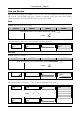
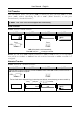
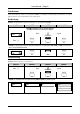
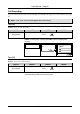
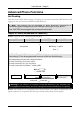
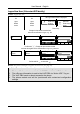
Table Of Contents
- Copyright
- Warranty
- Declaration of conformity
- Safety instructions
- Disposal of the product
- Hardware Components
- User Interfaces
- User and Administrator Mode
- Documentation
- Phone Installation
- Phone Initialization
- Registration
- Idle Screen
- Phone User Interface
- Web User Interface
- General Configuration Tasks
- Display Configuration Tasks
- Audio Configuration Tasks
- SIP Identity Configuration Tasks
- Function Key Configuration Tasks
- Maintenance Tasks
- Outgoing Calls
- Extension (SIP identity) for Outgoing Calls
- Making Calls
- Auto Completion (Number Guessing)
- Call Completion
- Call Termination
- Redial
- Call Indication
- Accepting Incoming Calls
- Call Waiting
- Denying Incoming Calls
- Denying Incoming Calls Automatically
- DND (Do Not Disturb) Mode
- Call Forwarding
- Audio Operation Modes
- Mute / Unmute
- Multiple Speaker Mode
- Hold and Resume
- Call Transfer
- Conference
- Call Recording
- Logoff All Users (Extensions/SIP Identities)
- Logon New User (Extension/SIP Identity)
- Access
- Access
- Availability
- Access
- Changing the Presence State
- Contact Presence
- Acoustical Indication
- Visual Indication
- Retrieve New Messages
- Busy Lamp Field (BLF) feature
- “Calls” List
- Call Pickup

User Manual - English
76
Logon New User (Extension/SIP Identity)
Action: Logon new user
The Logon Wizard screen is displayed:
Welcome!
Press a key
to log on.
time
Welcome!
Press a key to
log on.
No
Logon
Wizard
screen
No
Logon
Wizard
screen
Press a key.
Change the input mode as needed and
enter the new extension to log on, e.g. 100
Account:
123
100
Account: 123
100
——— Account ———
100
123
Account time
100
1>>a
C<<
<< >>
Confirm with . Change the input mode as needed
and enter the registrar of the new extension to log on, e.g. test.com
Registrar:
test.com
Registrar: 123
test.com
——— Registrar ———
test.com
abc
Registrar time
test.com
a>>A
C<<
<< >>
Confirm with Ok or abort with
Result: The phone attempts to register the new user (see page 18).
L Note: The enhanced functionality requires the following steps:
1. The log off information is sent to the VoIP PBX via “Action URL” <Log off>
2. The new user information is sent to the VoIP PBX via “Action URL” <Log on>
3. The VoIP PBX sends a reboot request to the phone
4. The phone restarts and will be provisioned with customized configuration
settings
Logo
Logo