® Doro Liberto 650 English
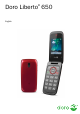
1 16 2 3 4 5 6 7 12 11 10 9 8 17 13 14 18 19 15 20 The items supplied with your phone might vary depending on the software and accessories available in your region or offered by your service provider. You can obtain additional accessories from your local Doro dealer. The supplied accessories provide the best performance with your phone.
English 1. Earpiece 2. Left selection button 3. Navigation buttons 4. Call button 5. Voice mail 6. International prefix /Symbols 7. Lanyard hold (lanyard not included) 8. Microphone 9. Input method/Silent 10. End call/Power on/off 11. OK/Camera button 12. Right selection button 13. 14. 15. 16. 17. 18. 19. 20.
English Contents Congratulations on your purchase ............................................................... 1 Get started..................................................................................................... 1 Insert SIM card, memory card and the battery ................................... 1 Charge the phone.................................................................................. 2 Get to know your phone .........................................................................
English Create and send picture message (MMS) .........................................22 Create and send voice message ........................................................23 Create and send e-mail.......................................................................23 Inbox, Outbox and Sent....................................................................... 24 Message settings ................................................................................25 Camera.................................
English More .............................................................................................................45 FM radio ...............................................................................................45 Calculator.............................................................................................46 Games.................................................................................................. 47 Status ...........................................................
English Congratulations on your purchase Enjoy an elegant camera phone made simple, with convenient ways to communicate and enjoy access to e-mail and the Internet for staying connected everywhere. Share photos and listen to your favourite MP3 music or FM radio. Other practical features include weather, reminders, wakeup alarm, vibrating ringer and more. For more information about accessories or other Doro products please visit www.doro.com.
English IMPORTANT! Use only compatible memory cards for use with this device. Compatible card type: microSD, microSDHC. Incompatible cards may damage the card itself, the device and corrupt data stored on the card. Depending on the market some phones may have a pre-installed memory card. Charge the phone CAUTION Only use batteries, charger and accessories that have been approved for use with this particular model.
English Get to know your phone Assistive functions Use the symbols below to guide you through supporting sections in the manual. Seeing Handling Hearing Safety Turn the phone on and off 1. 2. Press and hold on the phone to turn it on or off. Confirm with Yes to power off. If the SIM card is valid but protected with a PIN code (Personal Identification Number), PIN is displayed. Enter the PIN code and press OK ( upper left corner of keypad). Delete with Clear ( upper right corner of keypad).
English Tip: You can run the start-up wizard later if you want. From standby mode, press Menu Settings General Start-up wizard. Phone indicators Lights on the phone will: • Flash green when you have a new message or a missed call. After reading the new message/missed call, the flashing will stop. Flash red when the battery is running low and during charging. • Navigate the phone Standby (idle mode) When the phone is ready to use, and you have not keyed in any characters, the phone is in standby.
English ® To perform the example on your Doro Liberto 650 you should do the following: Example 1 (use the selection buttons) 1. Press Menu, scroll to Phonebook and press OK. 2. Select -New contact- and press Add. Example 2 (use the navigation buttons) 1. Press 2. Select -New contact- and press , scroll to Phonebook and press . to confirm. Enter text Enter text manually Select character • Press a numerical key repeatedly until the desired character is shown.
English Example 1. 2. 3. 4. Press 3, 7, 3, 3 to write the word “Fred”. Complete the word before looking at the suggestions. Use / to view the suggested words. Press Select and continue with the next word. Alternatively, press 0 to continue with the next word. If none of the suggested words are correct, use manual input mode. Note! See Predictive text, p.25 for more information. Input mode Press # to change input mode. The icon on the top left of the display indicates the input mode.
English Headset When a headset is connected, the internal microphone in the phone is automatically disconnected. If available, use the answer key on the headset to answer and end calls. CAUTION Using a headset at high volume may damage your hearing. Adjust the volume level carefully when using a headset. Phone settings Time & date Set the time and date 1. Press Menu Settings General Time & date: • Set time to enter the time (HH:MM). • Set date to enter the date (DD/MM/YYYY). 2. Press OK to confirm.
English 2. 3. Use / to select a language. Press OK to confirm. Block function 1. 2. 3. Press Menu Settings General Block function. Select each function you want to disable and press Off. Press Done to confirm. PIN code options 1. Press Menu Settings Security SIM lock: • On to activate the PIN code. You need to enter the PIN code every time the phone is started. • Off to deactivate the PIN code. IMPORTANT! If enabling Off-mode and the SIM card is lost or stolen, it is unprotected. • 2.
English Calls Make a call 1. 2. 3. Enter the phone number including the area code. Delete with Clear. Press to make a call. Press Abort to cancel the call. Press to end the call. Tip: For international calls, always use + before the country code for best operation. Press * twice for the international prefix +. Call from the phonebook 1. 2. 3. 4. Press Name to open the phonebook.
English Call options During a call the selection buttons1 ( functions. ) give access to additional Options (left selection button) • • • • • • Hold/Retrieve to hold/retrieve the current call. End single call to end the current call (same as New call to call another number (Conference). Phonebook to search the phonebook. Messages to write or read text messages. Mute to disable the microphone. ).
English SOS calls As long as the phone is switched on, it is always possible to place an SOS call by entering the main local emergency number for your present location followed by . Some networks accept calls to emergency numbers without a valid SIM card. Contact your service provider for more information. Call log Received, missed and made calls are saved in a combined call log. 20 calls of each type can be stored in the log.
English 2. • Received calls to show the elapsed time of all received calls. • Reset all Yes to reset all. Press OK to confirm. Answer mode 1. Press Menu Settings Calls Answer mode: • 2. Open to answer On to answer incoming calls by opening the flip. • Any key On to be able to answer incoming calls by pressing any button (exemption ). Press OK to confirm. Caller ID Display or hide your phone number on the recipient's phone when you call. 1. 2.
English Call divert You can divert calls to an answering service or to another phone number. Set up which calls should be diverted. Select a condition and press OK, then select Activate, Deactivate or Query status for each. 1. 2. Press Menu Settings Calls Call setup Call divert: • Voice calls to divert all voice calls. • Unreachable to divert incoming calls if the phone is turned off or out of range. • No reply to divert incoming calls if unanswered.
English Note! A password is needed to apply fixed dial. Contact your service provider to get the password. 1. Press Menu Settings Security Fixed dial: • • 2. Mode On to enable or Off to disable. Fixed numbers Add and enter the first allowed number. Alternatively, select an entry and press Options Add, Edit or Delete. If needed, enter PIN2 and press OK to confirm. Note! You can save parts of phone numbers. For example, if you save 01234, allows calls to all numbers starting with 01234.
English Tip: For international calls, always use + before the country code for best operation. Press * twice for the international prefix +. Manage phonebook contacts 1. 2. Press Menu Phonebook. Select a contact, then press Options: • View to show details for the selected contact. Phone = storage set to Phone and SIM = storage set to SIM, see Phonebook storage, p.16. • Edit to edit the contact. Use / to scroll. Delete with Clear. Press Save when done.
English 3. • As e-mail, see Create and send e-mail, p.23. Press OK to confirm. Phonebook settings Owner number The phone number assigned to your SIM card is saved as Owner number if this is allowed by the card. You can also select to add additional numbers. Add numbers 1. Press Menu Phonebook Owner number 2. Enter name and number, see Enter text , p.5. 3. When done, press Save. Empty Add. Phonebook storage 1. 2.
English network service and you may need to subscribe to it first. For more information and for the voice mail number, contact your service provider. 1. 2. Press Menu Settings Phonebook Voice mail: Select Empty Add: • Phonebook to add a contact from the Phonebook. Press OK to confirm. • Manual and enter name and number. 3. Press OK to confirm. To edit or delete an existing entry, select it and press Options Edit or Delete. Call voice mail • Press and hold shortcut button 1.
English 1. 2. 3. Press Menu Phonebook ICE. Use / to scroll the list of entries. Press Edit to add or edit information in each entry, see Enter text p.5. Delete with Clear. ID , • Name: enter your name. • Birth: enter your date of birth. • Height: enter your height. • Weight: enter your weight. • Address enter your home address. • Language: enter your preferred language. • Insurance: enter your insurance provider and policy number.
English The assistance button allows easy access to contact your predefined help numbers (Number list) should you need help. Make sure that the assistance function is activated before use, enter recipients in the numbers list and edit the text message. Make an assistance call 1. 2. 3. When help is needed, press and hold the assistance button for 3 seconds, or press it twice within 1 second. The assistance call begins after a delay of 5 seconds.
English Activation Select how to activate the assistance function using the assistance button. 1. 2. Press Menu Settings Assistance Activation: • On Normal to press and hold the button for approximately 3 seconds, or press it twice within 1 second. • On (3) to press the button 3 times within 1 second. • Off to disable the assistance button. Press OK to confirm. Number list Add numbers to the list that is called when the assistance button is pressed.
English Create assistance message 1. 2. 3. Press Menu Settings Assistance SMS Select Edit and write the message, see Enter text Press OK to confirm. Message. , p.5. Note! You must write a message if you activate the SMS function. Assistance settings Confirm with "0" You can activate the Confirm with "0" function. This is especially recommended if there is a risk that the assistance call is answered by a voice mail or answering service.
English 2. 3. 4. 5. Write your message, see Enter text , p.5, then press To. Select a recipient from Phonebook. Alternatively, select Enter number to add recipient manually and press Done. Press Add to add more recipients. You can modify the recipients by selecting one, press Options Edit, Delete or Delete all. Press Send to send. Note! If you choose to add multiple recipients, you will be charged for each recipient (maximum 10).
English 6. 7. Press Add to add more recipients. Press Send to send. Create and send voice message A voice message uses the same technology as a picture message. Both you and the recipient must have subscriptions that support picture message. The settings for picture message are supplied by your service provider and can be sent to you automatically via text message. If not, see MMS settings, p.26 on how to set your MMS profile. 1. 2. 3. 4. 5. 6. Press Menu Messages. Select Create new Voice message.
English 9. • My pictures to select a file. • Take picture to use the camera to take a picture. You can also Add sound and Add video using the Options menu. Press Send to send. Switch between accounts If you create more than two e-mail accounts, you can switch between them. 1. 2. Press Menu Messages Accounts. Use / to select account. Download e-mail • Press Menu Messages E-mail Change account E-mail Inbox.
English • 5. • Options Save To SIM or To phone. • Options Write e-mail to write a new e-mail. Use number to display all phone numbers contained in the message as well as the sender's number. • Options Call to call the selected number. • Options Save to save the number in the phonebook. • Options Send SMS to write a new text message. • Options Send MMS to write a new picture message. • Save objects (MMS only) to save text and media objects such as pictures, sound recordings and video.
English Memory status 1. From SMS settings, select Memory status to display the memory space used on the SIM card and in the phone memory. Phone memory can store up to 450 messages. 2. Press Back to return. Storage 1. From SMS settings, select Storage: • SIM (default) to store messages on the SIM card. • Phone to store messages in the phone memory. 2. Press OK to confirm. SMS centre 1. From SMS settings, select SMS centre Edit. 2. Enter the service centre number. Press Clear to delete. 3.
English 2. Press Back to return. Storage Picture messages are saved by default in the phone memory. When the memory becomes full you will need to either delete a picture message (see Inbox, Outbox and Sent, p.24) or select to save your picture messages to the memory card. When the memory is full you will see a message when you try to send or receive a picture message. Note! Make sure to insert a compatible memory card before saving to it (see Insert SIM card, memory card and the battery, p.1).
English • Proxy port to add proxy port. • User name to add proxy user name. • Password to add proxy password. 2. Press OK to confirm. 3. Press Yes to save or No to exit without saving. 4. Select your new profile and press Options Activate. 5. Press OK to confirm. To edit or delete an existing entry, select it and press Options Delete. Edit or Note! Some service providers require you to send a picture message before you will be able to receive one.
English 2. 3. • Gmail • Hotmail • Yahoo Enter your E-mail address and your Password. Press OK to confirm. Set up other accounts Follow the steps below if your service provider is not in the list. Contact your service provider for correct settings. 1. 2. From E-mail Select: Select Other e-mail accounts. • Enter E-mail address. • Select POP3 or IMAP4. • Enter Incoming server. • Enter Outgoing server. • Enter User name. • Enter Password. • Enter Account name. 3. Select Check interval. • Off is default.
English 3. Press OK to confirm. Note! If Alert type is set to Ring only the phone will not vibrate. Reminder The reminder alerts you once if you haven't checked your messages or listened to your voice mail within 10 minutes from receipt. When notified, press to end the notification and no more reminder is heard. 1. 2. 3. Press Menu Settings Messages Select On to enable, or Off to disable. Press OK to confirm. Reminder.
English 4. • Use Wallpaper to save as display background. Phonebook picture to save as phonebook contact. • Use Press Back to take a new photo. If you do not make any selection the picture is saved. Camera adjustments • • Use / to zoom in and out. Use the side buttons +/– to adjust EV/Light sensitivity. Note! Zoom may reduce picture quality. For more camera settings, see Camera settings, p.32. Video camera To get sharp videos, wipe the lens clean with a dry cloth. 1. 2. 3. 4.
English 2. 3. Use / or / to select a picture or video. Press Options: • View for single view. Press Back to return. Use / to play and stop the video (video only). • Send Send by MMS to send as picture message. See Create and send picture message (MMS), p.22. • Send Send by Bluetooth to send to a Bluetooth device, see Bluetooth , p.33. • Send As e-mail, see Create and send e-mail, p.23. • Delete to delete. Press Yes to confirm or No to return. • Use (picture only) Wallpaper to save as display background.
English 2. • Shutter sound Press OK to confirm. Off, Low or High. Note! With higher quality, less pictures or videos can be stored in the internal memory. If you insert a compatible external memory (micro SD) card into your Doro Liberto 650, you can change the default storage location, see Storage, p.27. This allows you to save more files on your device, like pictures and videos.
English Search for available Bluetooth audio devices. 1. 2. Press Menu Settings Bluetooth Search device. Select a device from the list and press Bond to connect. If Bluetooth is not enabled, press Yes to activate. 3. When connecting to another Bluetooth device you need a shared password. Enter the password and press OK. My devices Add new devices or view saved. 1. 2. Press Menu Settings Bluetooth My devices.
English Follow the steps below if your service provider profile is not in the list. Contact your service provider for correct settings. 1. 2. 3. Press Menu Settings Connectivity Internet profile. Use / to select a profile. Press Options Edit to enter settings for your service provider: • Account name to enter the account name. • APN to enter the APN address. • User name to enter user name. • Password to enter password. • Connection type select HTTP/WAP. • Proxy address to enter proxy address.
English 1. Press Menu Settings counter. • Sent. • Received. • Reset all. Connectivity Mobile data Data Data roaming Your phone automatically selects your (service providers) home network if within range. If not within range, you can use another network, provided your network operator has an agreement that allows you to do so. This is called roaming. Contact your service provider for more information. 1. 2. 3. Press Menu Settings Connectivity roaming. Select On to enable, or Off to disable.
English IMPORTANT! If you set your phone to use GSM only or 3G only, you will not be able to make any calls, including emergency calls, or use other features requiring a network connection, if the selected network is unavailable. Network information • View your current network settings. Services This menu may contain pre-programmed services from your network provider depending on network support and subscription. • Press Menu Settings General Services.
English Sound & Display Note! Silent needs to be set to Off to access Tone setup, Volume, Alert type and Extra tone. Audio setup If you use a hearing aid or have hearing difficulties when using the device in a noisy environment, you can adjust the audio settings. 1. 2. Press Menu Settings Sound Audio setup: • Normal for normal hearing in normal conditions. • Medium for mild hearing impairment or use in a noisy environment. • High for moderate hearing impairment or use in a very noisy environment.
English 3. Press OK to confirm. Silent 1. 2. 3. Press Menu Settings Sound Select On to enable, or Off to disable. Press OK to confirm. Silent. Tip: Press and hold shortcut button # to activate or deactivate silent mode. Alert type Select to use ringtone and/or vibration for incoming calls. 1. 2. Press Menu Settings Sound Alert type: • Ring only for ringtone only. • Vib. only for vibration only. • Vib. and ring for vibration and ringtone. • Vib.
English Wallpaper 1. 2. 3. Press Menu Settings Display Wallpaper. Use / to display available wallpapers. Press OK to confirm. Text size You can adjust the text size for the menu and messages. 1. 2. 3. Press Menu Settings Display. Select Text size Normal or Large. Press OK to confirm. Idle display In standby mode the display can show clock only, clock and the service provider, or all information. 1. 2. 3. Press Menu Settings Display. Select Idle display Clock only, Clock & Operator or All info.
English 2. 3. Select Brightness Level 1, Level 2 or Level 3. Press OK to confirm. ® Doro Experience ® Create an Doro Experience account to get the most out of your phone. Access the phone using any web browser, www.doro.com. Easily view and share your photos or videos. Note! You need to have Internet access to use most of the features in Doro Experience . Depending on how you use your phone, it can use up a lot of Internet bandwidth really quickly, and it can be costly.
English • 2. Minimal synchronisation to synchronise your contacts, calendar and phone settings. • Full synchronisation to synchronise the same content as above and photos. • Information to view more information. Press OK to confirm. Sync. intervals You can select different synchronisation intervals. 1. 2. Press Menu Settings Doro Experience Sync. intervals: • Manual to synchronise manually. No automatic synchronising. • Every 15 minutes to synchronise automatically every 15 minutes.
English Supported video format: AVI/MP4/3GPP. Only playback is possible. 1. 2. 3. 4. Press Menu Settings File manager. Select Phone/Memory card Open. Select a folder, eg Photos and press Open. Select a file and press Options: • Play (audio/video/music), press to Play or to Stop. • View (photos/images) for single view. • Send Send by MMS to send as picture message (Create and send picture message (MMS), p.22)/Send by Bluetooth to send to a Bluetooth device (Bluetooth , p.33).
English Use the web browser 1. 2. Press Menu Internet. Press Accept to accept the End User License for using the Opera Mobile browser. If not, press Exit. ™ Navigate the web browser • Use the navigation buttons to navigate the browser. The blue frame shows the selected area. Press OK to select. Enter website address (URL) • Select www. and press Edit. Enter a website address (URL) and press Go. Search • Select , located to the right of the screen, to search the web. Enter your search and press Search.
English Tip: Select the browser speed dial and press Open to view. More The More menu contains: FM radio Games Calculator Status FM radio The FM radio has a frequency range from 87.5 to 108.0 MHz and 9 preset channels. To listen to the radio, you need to connect a compatible headset which acts as an antenna. Turning the radio on 1. 2. 3. Connect a headset to the headset socket . Press Menu FM radio. The radio is turned on. The tuned frequency is displayed. Select channel using or .
English 2. 3. Use or to adjust the sound volume. To turn off, select Off. Channel list (editing the channel list) 1. 2. 3. Press Menu FM radio Options Channel list. Select the channel you wish to edit and press Options: • Play to play the selected channel. • Delete to delete the channel. Press Yes to confirm or No to return to the channel list. • Edit to edit the channel name, then press to edit the frequency, use # to enter the decimal point. When done, press Save. Press OK to confirm.
English Games The 1. 2. Games menu contains 2 games. Press Menu More Games Tetris or Boxman: • Continue to continue game. • Restart level to restart game at the same level as before. • Start game to start a new game. • Game level to select difficulty level. • Best grades to view your best results. Press Back to return or Reset to reset the scores. • Help to view instructions for the game. Press Back to return. • Settings Sound effect to enable or disable by using / to select On/Off.
English • 3. For a repeated alarm, select Repeated. Scroll through the list of days and press On to enable or Off to disable the alarm for each day. Press Save to confirm. Snooze or turn off • When the alarm goes off a signal will sound. Press Stop to turn off the alarm or press Snooze to repeat the alarm after 9 minutes. Note! The alarm will work even when the phone is switched off. Do not press Yes to power on if wireless phone use is prohibited or when it may cause interference or danger.
English Daily reminder 1. 2. 3. 4. Press Menu Organiser Daily reminder Enter time, then press . Enter subject, see Enter text , p.5 Press OK to confirm. Add. Snooze or turn off • When the reminder alarm goes off a signal will sound. Press Stop to turn off the alarm or press Snooze to repeat the alarm after 9 minutes. Note! The reminder will work even when the phone is switched off. Do not press Yes to power on if wireless phone use is prohibited or when it may cause interference or danger.
English Weather settings 1. 2. 3. 4. Press Menu Settings Weather. Select City and enter the name of the city. Use or to select the city in the list. Select Wallpaper and select On (to view the weather in standby mode). 5. Press OK to confirm. For more options select an existing entry, and press Options Edit or Delete.
English Warning Speaker on Query Speaker off Done (confirmed) Incoming call New message Outgoing call Battery level low vCard message Call ended Missed call. Press Read to see the missed calls. Call on-hold Volume control SOS calls only Processing, please wait Assistance button call Searching / SMS/MMS unread / SMS/MMS read / SMS/MMS unsent / SMS/MMS sent / E-mail without and with attachment unread / E-mail without and with attachment read Reset settings 1. 2. 3.
English Troubleshooting Phone cannot be switched on Battery charge low Battery incorrectly installed Connect the power adapter and charge the battery for 3 hours. Full battery capacity is reached after the battery has been charged 3–4 times. Check the installation of the battery. Failure to charge the battery Battery or charger Check the battery and charger. damaged Battery should only be Improve the charging environment.
English SIM card error SIM card damaged SIM card incorrectly installed SIM card dirty or damp Check the condition of the SIM card. If it is damaged, contact your service provider. Check the installation of the SIM card. Remove the card and reinstall it. Wipe the contact surfaces of the SIM card with a clean cloth. Failure to connect to network SIM card invalid No coverage of GSM service Contact your service provider. Contact your service provider.
English Network services and costs Your device is approved for use on the WCDMA 900/2100 MHz, GSM 850/900/1800/ 1900 MHz networks. To use the device, you need a subscription with a service provider. Using network services may result in traffic costs. Some product features require support from the network, and you may need to subscribe to them.
English where you are normally requested to turn off your car engine. In these areas, sparks can cause explosion or fire which can lead to personal injury or even death. Turn off the unit at filling stations, and any other place that has fuel pumps and auto repair facilities. Follow the restrictions that apply to the use of radio equipment near places where fuel is stored and sold, chemical factories and places where blasting is in progress.
English Vehicles Radio signals can affect electronic systems in motor vehicles (for example, electronic fuel injection, ABS brakes, automatic cruise control, air bag systems) that have been incorrectly installed or are inadequately protected. Contact the manufacturer or its representative for more information about your vehicle or any additional equipment. Do not keep or transport flammable liquids, gases or explosives together with the unit or its accessories.
English This guarantee will not apply to a fault caused by an accident or a similar incident or damage, liquid ingress, negligence, abnormal usage, non-maintenance or any other circumstances on the user’s part. Furthermore, this guarantee will not apply to any fault caused by a thunderstorm or any other voltage fluctuations. As a matter of precaution, we recommend disconnecting the charger during a thunderstorm. Batteries are consumables and are not included in any guarantee.
English Doro does not provide a warranty for or take any responsibility for the functionality, content, or end-user support of third-party apps provided with your device. By using an app, you acknowledge that the app is provided as is. Doro does not make any representations, provide a warranty, or take any responsibility for the functionality, content, or enduser support of third-party apps provided with your device.
English 59
Liberto 650 (1051) English Version 1.1 ©2014 Doro AB. All rights reserved. www.doro.