® Doro Secure 580IUP Installation guide English
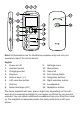
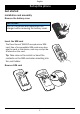
3 2 1 4 15 5 6 7 8 9 14 13 12 16 11 10 Note! All illustrations are for illustrative purposes only and may not accurately depict the actual device. English 1. Power on/off 2. Headset socket 3. Charging socket 4. Earpiece 5. Volume keys (+/-) 6. Left selection button 7. Call key 8. Speed dial keys (A-D) 9. 10. 11. 12. 13. 14. 15. 16.
English Contents Set up the phone........................................................................................... 1 Get started............................................................................................. 1 Installation and assembly............................................................. 1 Turn the phone on and off ............................................................ 2 Navigate the phone .......................................................................
English Areas with explosion risk ............................................................ 27 Li-ion battery ................................................................................ 27 Protect your hearing .................................................................... 27 Emergency calls...........................................................................28 Vehicles........................................................................................28 Care and maintenance ........
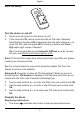
English Set up the phone Get started Installation and assembly Remove the battery cover IMPORTANT! Turn off the phone and disconnect the charger before removing the battery cover. Insert the SIM card ® The Doro Secure 580IUP accepts micro SIM card. Use of incompatible SIM cards may damage the card or the device, and may corrupt data stored on the card. Tip: Take care not to scratch or bend the contacts on the SIM card when inserting into the card holder.
English Insert the battery Turn the phone on and off 1. 2. Press and hold 1 to turn the phone on/off. If the inserted SIM card is protected with an PIN code (Personal Identification Number) PIN is displayed. Use the side buttons +/– to enter the PIN code and press OK to confirm or delete with Clear ( upper right corner of keypad). Tip: It is recommended to use Automatic SIM lock in order to ease the use, see SIM lock (PIN code option), p.11.
English • • To confirm an action, press OK. To select an item, scroll or highlight the item using press OK. / and then Example (6 seconds). 1. Press and hold 2. Select Settings Sound Audio setup. 3. Select an option and press OK. Enter text • Use the side buttons +/– to select a character from the list. Wait a few seconds before entering the next character. Phonebook Add number 1. 2. 3. 4. 5. Press and hold . Select Phonebook A-D Empty Add. Use the side buttons +/– to enter a name.
English • Weight: enter weight. • Address: enter home address. • Language: enter preferred language. • Insurance: enter insurance provider and policy number. Contacts • Contact 1: enter name and number. If possible, add your relationship. • Contact 2: enter name and number. If possible, add your relationship. • Doctor: enter name and number. Important info. • 5. Condition: enter any medical conditions/medical devices (e.g. diabetic, pacemaker). • Allergies: enter any known allergies (e.g.
English 4. When done, press Save. ® Tip: Use Doro Experience Manager to edit the emergency number using a computer, see My device, p.18. Phone settings See Idle display Select what information is shown in standby mode. 1. Press and hold . 2. Select Settings Display Idle display. 3. Select Clock only, Clock & Operator or All info. 4. Press OK to confirm. Themes The themes use different contrasts between text and the background mixing colours for optimised readability. 1. Press and hold . 2.
English Hear Audio setup Customise the audio settings if using a hearing aid or having hearing difficulties when using the device in a noisy environment. 1. 2. 3. Press and hold . Select Settings Sound Audio setup: • Normal for normal hearing in normal conditions. • High for moderate hearing impairment or use in a very noisy environment. • HAC mode for use with hearing aid in T-mode. Press OK to confirm. ® Tip: Use Doro Experience Manager to programme audio setup using a computer, see My device, p.18.
English • • • • 3. Ring only for ringtone only. Vib. only for vibration only. Vib. and ring for vibration and ringtone. Vib. then ring to start with vibration and adds ringtone after a short while. • Silent for no sound or vibration, the display light is lit. Press OK to confirm. Note! Selected alert type is visible in the status bar. Extra tone Set warning and error tones to alert of low battery power, phone and SIM card errors, etc. 1. 2. 3. 4. Press and hold .
English 4. Press OK to confirm. ® Tip: Use Doro Experience Manager to set language using a computer, see My device, p.18. Start-up wizard When starting the phone for the first time, you can use the Start-up wizard to set some basic settings. • Press Yes to change or No if you do not want to change. Tip: You can run the start-up wizard later if you want. Press and hold General Start-up wizard. then select Settings , Block function 1. Press and hold . 2. Select Settings General Block function. 3.
English Select to activate auto answer to answer incoming calls from contacts saved in the number list in handsfree/speakerphone mode. 1. 2. 3. 4. 5. 6. 7. Press and hold . Select Settings Calls Auto answer Activate Select an option. Select Number list Empty Add. Use the side buttons +/– to enter the number. Press Done to confirm. Repeat until you have 20 contacts (maximum). Set answer time 1. Press and hold . 2. Select Settings Calls 3. Select an option. 4. Press OK to confirm. Auto answer On.
English In order to send any text messages, a message centre number is needed. The number is supplied by your service provider and is usually set on the SIM card. Press and hold . Select Settings Messages SMS settings. Select SMS centre Edit. Use the side buttons +/– to edit the service centre number. Press Clear to delete. 5. Press OK to confirm. Cell broadcast Depending on service provider, it is possible to receive messages on various topics, such as weather or traffic conditions in a particular region.
English Select text message vibration alert. 1. 2. 3. Press and hold . Press Menu Settings • Short (4 seconds) • Long (12 seconds) Press OK to confirm. Messages Vibration: Note! If Alert type is set to Ring only the phone will not vibrate. Delete 1. Press and hold . 2. Select Settings Messages Delete Delete Inbox?. 3. Press Yes to delete all messages. Auto reply Select to automatically send an auto reply for all received text messages. 1. 2. 3. 4. Press and hold .
English WARNING If the SIM card is lost/stolen it is unprotected. • 4. Automatic to start the phone without the PIN code. The phone remembers it automatically, but if the SIM card is moved to another phone (lost/stolen) the PIN code needs to be entered when the phone is started. Press OK to confirm. Change PIN code (passwords) 1. Press and hold . 2. Select Settings Security Passwords. 3. Select PIN. 4. Enter current PIN code and press OK. 5. Enter new PIN and press OK. Repeat to confirm.
English Note! You can save parts of phone numbers. For example, if you save 01234, it allows calls to all numbers starting with 01234. It is always possible to place an SOS call even when fixed dial is activated. When fixed dial is activated you are not allowed to view or manage any phone numbers saved on the SIM card. Reset settings 1. Press and hold . 2. Select Settings Security. 3. Select Reset settings to reset the phone settings.
English 2. Select Settings Connectivity Bluetooth Visibility On. Note! To prevent other devices from finding your device, select Off when not pairing. Even if you select Off, paired devices can still detect your device. Device name 1. Press and hold . 2. Select Settings Connectivity Bluetooth Device name. 3. Use the side buttons +/– to enter the name that should appear for other Bluetooth devices. If Bluetooth is not enabled, press Yes to activate. 4. Press Options Done to confirm.
English ® 3. Bluetooth headset • Connect to connect. • Rename to change the name of the device. • Delete to delete the device from the list. • Delete all to delete all devices from the list. Press OK to confirm. Bluetooth beacon Bluetooth beacons are devices using Bluetooth to determine position. Pair once with the unit. After pairing, you can select to turn off Bluetooth in your phone to improve the battery performance. The unit is still connected to the phone.
English 5. 6. • Proxy address to enter proxy address. • Proxy port to enter proxy port. • User name to enter user name. • Password to enter password. Press OK, and press Yes to save or No to return. Select your new profile and press Options Activate. Tip: You can also activate/modify a profile by selecting one and press Activate/Edit/Delete. Options Data roaming The phone automatically selects the (service providers) home network if within range.
English 4. 5. set on the SIM card. If not, you can enter the number yourself, see My number, p.4. Use the side buttons +/– to enter a password and press . Re-enter the password in the field below and press OK. Log in 1. 2. 3. 4. Press and hold . Select Settings Doro Experience This service helps you to handle and manage your Doro Experience device. Log in. Use the side buttons +/– to enter your phone number as user name. Use the side buttons +/– to enter your password and press Log in. Sync.
English ® Doro Experience Manager ® Remotely manage the Doro Secure 580IUP with a computer. Log in 1. On a computer: Go to www.doroexperience.com. 2. Select Doro Secure 580IUP as device. 3. Enter your user name (phone number) and password. See Create account, p.16. 4. Press Log in. My device 1. Select My device: • General to set language used on the phone. See Language, p.7. • Sound to set audio setup. See Audio setup, p.6. • Emergency number, if needed change the emergency number. 112 is set by default.
English • Birthday to enter birthday (DD/MM/YY). • Height • Weight • Blood type • Language for Doro Experience Manager • Address to enter address. Select Contacts: • Name to enter name. • Number to enter number, including the area code. Select Medical information: • Insurance • Condition • Allergies • Medication • Vaccination • Other information When done, select Save. ® 2. 3. 4. Tip: See ICE (In Case of Emergency), p.3 for more info. Whitelist numbers 1.
English 1. Select My device Auto answer: • Activation to set as on or off. • Time to set time, maximum 60 seconds. • Number to enter number for the predefined contacts to be allowed to make calls to Doro Secure 580IUP, maximum 20. When done, select Save. ® 2. Tip: See Auto answer, p.8 for more info. GPS request GPS request: 1. Select My device • Number to enter number for the predefined contacts to request position, maximum 5. 2. When done, select Save. Tip: See Request position, p.25 for more info.
English IMPORTANT! Information to the recipient of an assistance call, when Confirm with "0" is activated. 1. After receiving the assistance message, each number in the Number list is called sequentially. 2. To confirm the assistance call, the recipient needs to press 0. • • If the recipient doesn’t press 0 within 60 seconds (after answering) the call will be disconnected and the next number in the sequence will be called.
English IMPORTANT! Always inform recipients in the Number list that they are listed as your assistance contacts. 1. 2. 3. 4. Press and hold . Select Settings Assistance Number list Empty Add. Use the side buttons +/– to enter number and press OK to confirm. Repeat until you have 5 contacts (maximum). Tip: To edit or delete an existing entry, select it and press Options Edit/Delete. ® Tip: Use Doro Experience Manager to edit Assistance settings using a computer, see Assistance, p.18.
English Position SMS IMPORTANT! You may need an Internet connection to use this service. Contact your service provider for detailed subscription costs before activating. ® The Doro Secure 580IUP can also be used as a GPS receiver. The current location of the Doro Secure 580IUP user can be determined with the help of the satellite controlled GPS (Global Positioning System) or with the help of AGPS (Additional Global Positioning System).
English 3. • Manual to send position when pressing the Assistance button. • 2 hours between new search interval. • 30 minutes between new search interval. Press OK to confirm. ® Tip: Use Doro Experience Manager to edit Assistance settings using a computer, see Assistance, p.18. Confirm with "0" Enable this function if there is a risk that the assistance call is answered by a voicemail/answering service.
English Request position The request position function allows to receive the current position of the Doro Secure 580IUP. Only numbers saved in the Number list can request position. ® Numbers list 1. Press and hold . 2. Select Settings Assistance Request position Empty Add. 3. Enter number and press OK to confirm. 4. Repeat until you have 5 contacts (maximum). Number list Tip: To edit or delete an existing entry, select it and press Options Edit/Delete. Request position 1.
English 2. 3. 4. Select Settings Safety Timer Sound. Select On to enable, or Off to disable. Press OK to confirm. ® Tip: Use Doro Experience Manager to set safety timer information using a computer, see Safety timer, p.19. General information Safety instructions CAUTION The unit and the accessories can contain small parts. Keep all of the equipment out of the reach of small children. The mains adapter is the disconnect device between the product and mains power.
English facilities instructing you to turn off the unit while you are there, you should comply. Hospitals and other health care facilities sometimes use equipment that can be sensitive to external radio signals. Implanted medical devices To avoid potential interference, manufacturers of implanted medical devices recommend a minimum separation of 15.3 cm between a wireless device and the medical device. Persons who have such devices should: • Always keep the wireless device more than 15.
English WARNING Excessive exposure to loud sounds can cause hearing damage. Exposure to loud sounds while driving may distract your attention and cause an accident. Listen to a headset at a moderate level, and do not hold the device near your ear when the loudspeaker is in use. Emergency calls IMPORTANT! Mobile phones use radio signals, the mobile phone network, the terrestrial network and user-programmed functions. This means that connection cannot be guaranteed in all circumstances.
English • Do not drop the unit. Do not knock or shake it either. If it is treated roughly the circuits and precision mechanics can be broken. • Do not use strong chemicals to clean the unit. The advice applies to the unit, battery, mains adapter and other accessories. If the phone is not working as it should, please contact the place of purchase for service. Don’t forget the receipt or a copy of the invoice. Warranty This product is guaranteed for a period of 12 months from the date of purchase.
English granted or shall be implied for any other use. Additional information including that relating to promotional, internal and commercial uses and licensing may be obtained from MPEG LA, L.L.C. See www.mpegla.com. MPEG Layer-3 audio decoding technology licensed from Fraunhofer IIS and Thomson. Other product and company names mentioned herein may be the trademarks of their respective owners. Any rights not expressly granted herein are reserved.
English Declaration of Conformity ® Doro hereby declares that Doro Secure 580IUP conforms to the essential requirements and other relevant regulations contained in the Directives 1999/5/EC (R&TTE) and 2011/65/EC (RoHS). A copy of the Declaration of Conformity is available at www.doro.com/dofc.
Secure 580 (1011) English Version 1.1 ©2014 Doro AB. All rights reserved. www.doro.