CLASSICAL TURNTABLE WITH AM/FM RADIO, CASSETTE PLAYER & USB/SD SLOT MODEL: TR-19PCD Operating Instructions Manual 1
TO PREVENT FIRE OR SHOCK HAZARD, DO NOT USE THIS PLUG WITH AN EXTENSION CORD, RECEPTACLE OR OTHER OUTLET UNLESS THE BLADES CAN BE FULLY INSERTED TO PREVENT BLADE EXPOSURE. TO PREVENT FIRE OR SHOCK HAZARD, DO NOT EXPOSE THIS APPLIANCE TO RAIN OR MOISTURE. IMPORTANT SAFETY INSTRUCTIONS 1) Please read these instructions and keep them for future reference. 2) Pay attention to all warnings. 3) Follow all instructions. 4) Do not use this apparatus near water. 5) Clean only with a dry cloth.
Avoid installing this unit in radiating places exposed to direct sunlight or close to heat appliances such as electric heaters, on top of other stereo equipment that radiates too much heat, places lacking ventilation or dusty areas, places subject to constant vibration and/or humid or moist areas. Do not attempt to clean this unit with chemical solvents as this might damage the finish. Use a clean dry cloth.Operate controls and switches as described in the manual.
PROTECT YOUR FURNITURE This model is equipped with non-skid rubber 'feet' to prevent the product from moving when you operate the controls. These 'feet' are made from non-migrating rubber material specially formulated to avoid leaving any marks or stains on your furniture. However certain types of oil based furniture polishes, wood preservatives, or cleaning sprays may cause the rubber 'feet' to soften, and leave marks or a rubber residue on the furniture.
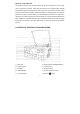
11) Delete button 21) Skip up 12) USB socket 22) Stop 13) SD/MMC card slot 23) Play/Pause 14) LCD display screen 24) Cassette Player Slot.
42) Program button 43) Repeat button 44) Mode button 45) Skip down button 46) Play/Pause button 47) Record button 48) Stop 49) Skip up button button 50) Folder up button 51) Folder down button NOTE: All the buttons on the remote control just use for CD/USB/SD function. OPERATING INSTRUCTIONS Listening to radio 1. Turn the volume knob in a clockwise direction to turn the equipment on. 2. Use the function selector to select TUNER mode. 3.
FM and FM-stereo mode FM mode: use the radio band selector to select the FM band. Programs are received in mono mode. Use this mode when stereo reception is weak. FM-Stereo mode: use the radio band selector to select FM-ST for receiving stereo programs. Once a stereo signal is received, the ST icon will light up on the display. AM/FM Radio memorization for preselected channel 1.Turn the volume knob clockwise to turn the equipment on. 2.Use the function selector to select TUNER mode. 3.
lower the tone arm and start playback. 10. To adjust the volume level, turn the volume knob to the right or left. 11. At the end of the record, move the lift lever towards the back to raise the tone arm and move it back to the tone arm park, and then move the lift lever towards the front to lower the arm onto its rest. 12. Alternatively, lift the tone arm off the record and return it to the arm rest manually. 13.
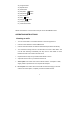
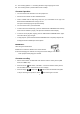
The recording speed is 1:1. Recording will take as long as playing the record. The recording format is preset at MP3 bit rate 128 kbps. Cassette Operation 1. Turn the volume knob clockwise to turn the equipment on. 2. Use the function selector to select TAPE/AUX mode. 3. Insert a cassette with the tape facing away from you, as illustrated on the right. The EJECT/FAST FORWARD button will pop out and the system will start playing the tape automatically. 4. Turn the volume knob to your desired level. 5.
(You can skip this step if only a USB drive or an SD/MMC card is inserted.) 4. The system will start the encoding mode after a few seconds. Insert your cassette into the playback slot. During encoding, the USB or SD icon will be flashing on the display. 5. To finish encoding, press the stop button. The display will show “END” and return to TAPE/AUX mode. NOTE: The recording format is preset at MP3 bit rate 128 kbps. The recording speed is 1:1. Recording will take as long as playing the record.
“END” and return to CD/USB/SD mode. NOTE: The recording speed is 1:1. Recording will take as long as playing the record. The recording format is preset at MP3 bit rate 128 kbps. The USB Port and SD Card Slot Playback of music in MP3/WMA format via USB device or memory card The system is able to decode and playback all MP3/WMA files stored in the memory media connected to the USB port or SD/MMC card slot. 1. Turn the volume knob clockwise to turn the equipment on. 2.
Playback controls PLAY/PAUSE Press this button once to stop playing, press it again to continue. STOP Press this button to stop audio playback, the display will then show the total number of MP3/WMA files. SKIP UP Press this button once to play the next file, press and hold this button to fast forward through the files/tracks. SKIP DOWN Press this button once to play the previous file, press and hold this button to fast reverse through the files/tracks.
2. Press the program PROG button, MEM will be flashing on the LC display, and it will indicate the program number and digits for the track number to be programmed. 3. Press the SKIP UP or SKIP DOWN button to select a desired track. 4. Press the program PROG button to store the track into the memory. 5. Repeat steps 3 and 4 to enter additional tracks into the memory. 6. When all desired tracks have been programmed, press the PLAY/PAUSE button to play the tracks in the assigned order. 7.
4. The USB or SD icon will be flashing on the display while the system is copying the folder. 5. When the folder has been copied, the USB or SD icon will stop flashing on the display. Copying all files/tracks 1. Insert a USB storage device and SD card, then select USB/SD mode (as described previously). When the system has recognised the device, press the stop 2. Press the record the SKIP UP Press the record button. REC button: “ONE” will be flashing on the display.
1. Insert a USB storage device and SD card, then select USB/SD mode (as described previously). When the system has recognised the device, press the stop button. 2. Turn the tuning knob to select the desired folder for deleting. 3. Press the delete DEL button: “ONE” will be flashing on the display. Press the SKIP UP or SKIP DOWN button to select “DIR” (directory) on the display. Press the delete DEL button again to confirm. 4.
Listening to a CD (or other auxiliary input) 1. Turn the volume knob clockwise to turn the equipment on. 2. Use the function selector to select TAPE/AUX mode, then connect the external audio device (such as a CD player) to the AUX IN socket at the front of the equipment. The audio signal from the external audio device will now be played through the system. 3. If an external audio device is connected to the AUX IN socket, playing of the auxiliary device takes priority over cassette playback.
may help you solve the problem. If you cannot solve the problem by yourself, contact our after sales support line for advice. Do not attempt to open, repair or modify the equipment yourself. Problems with sound Clockwise rotate the power/volume knob to increase the volume. Make sure the unit’s power cord is connected to an appropriate electrical outlet. Make sure the wall socket is switched on. Make sure the function switch is set to your desired function: PHONO, USB/SD, TUNER, TAPE/AUX.
FCC Warning Statement Changes or modifications not expressly approved by the party responsible for compliance could void the user’s authority to operate the equipment. This equipment has been tested and found to comply with the limits for a Class B digital device, pursuant to Part 15 of the FCC Rules. These limits are designed to provide reasonable protection against harmful interference in a residential installation.