
User Manual

7
Installing Camera Bracket
Axis 214 PTZ
1. Install the Axis 214 PTZ camera onto the
D2 Camera Bracket with (3) m3-.5 screws,
(3) m3 external lock washers, and (3) m3 1/8"
washer that are included.
2. The Axis 214 PTZ camera requires a 2.25"
spacing for optimal fit and operation. Use (1)
1.5" standoffs and (1) .75" standoffs that are
provided to create a 2.25" standoff. You will
need to create 4 of these with the included
hardware.
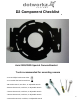
Required components (see component
checklist): Part # 1,3,5,12,14,15,& 16
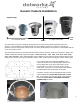
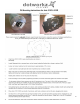
3. The 2.25" standoffs will be inserted
on the upper portion of the D2.
1.5"
.75"
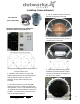
4. Now slide the camera bracket with
the camera into place to line up with 4
screws holes from the standoffs.
5. Use (4) #8-32 screws (Phillips head)
to secure the bracket into place.
Again, make sure the camera
bracket is facing the right
direction.
This edge nests in arch at front of D2
This edge of the bracket faces back of the D2 enclosure
Tip: Insert (2) #8-32 screws in the front two
standoffs to provide a guide to slide the
camera bracket into. The last two corner
holes should line up and be secured last.
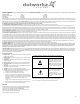
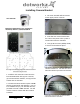
Picture represents camera bracket orientation & how it is
secured. Don’t’ forget to mount your camera to the D2
camera bracket based on instructions.
Picture represents standoff location & orientation. Height
of standoffs will vary depending on camera used.