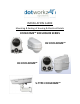
INSTALLATION GUIDE Mounting & Sealing of Housing & Electrical Details COOLDOME™ ENCLOSURE SERIES D2 COOLDOME™ D3 COOLDOME™ S-TYPE COOLDOME™
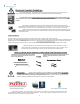
PRODUCT INSTALLATION PRECAUTIONS – WARNINGS – ADDITIONAL INFORMATION (RETAIN THIS DOCUMENT) IMPORTANT SAFEGUARDS 1 Read Instructions - All the safety and operating instructions should be read before the unit is operated. 2 Retain Instructions -The safety and operating instructions should be retained for future reference. 3. Heed Warnings - All warnings on the unit and in the operating instructions should be adhered to. 4. Follow Instructions -All operating & user instructions should be followed. 5.
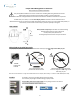
Electrical Conduit Guidelines For optimal performance, your Dotworkz Enclosure is designed to be Air & Water Tight to eliminate any moisture, dust, and insect damage, safety, performance, reliability, and maintenance related issues. Use of Electrical Conduit, without sealing the entry ports/ inside wire feeds within Camera Enclosure, will subject the inside of your enclosure to possibility of condensation driven moisture, dust, and insect contamination hazards.
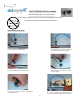
VENT STOPPER PLUGS for Conduit Foam Conduit Feed Plugs for ½” I.D. (PG-13) Conduit Prevents Humid Air exchange from venting thru electrical conduit into Dotworkz sealed enclosures, Thus eliminating condensation issues within Dotworkz sealed enclosures. QUICK INSTALLATION GUIDE 1) Pull wires to final installed length. 4) Push plug into conduit mouth with finger tips till it flush with outside of fitting 2) Open Vent Stop Plug and install over wire.
COOLDOME™ Wiring NO 18 gg Dotworkz CD Series Operate using DC low voltage only, and creates ample currents when cooler is engaged. 18 gg wire is Not recommended for cooler wiring. Follow relevant Cable Gauge Guidelines provide in this document applicable to your product model. CD’s are Dedicated 12 VDC or 24 VDC models Only. Use Step Down Power supply Included in CD Package to power from high voltage line supply.
Proper Cable Management to Enclosure Avoid common Installation Mistakes Only Use Qualified Installation or Service Technician for Installing & Servicing Dotworkz Enclosures. Power Must be disconnected and kept off while installing or Servicing Enclosure. Follow All Local and Applicable Electrical Codes and Standards for Installation of Electrical components. All Cable Ports, wire feeds, or Conduit must be fully sealed to eliminate moisture within Enclosure.
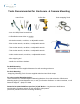
Tools Recommended for Enclosure & Camera Mounting Hand Tools Drill & Bits Pole Strapping Tools - #1 & #2 Phillips head screw driver -#1 Flat Blade screw driver or smaller - 3/8 Socket wrench, nut driver, or adjustable wrench - 5/16 Socket wrench, nut driver, or adjustable wrench - 7/16 Socket wrench, nut driver, or adjustable wrench - 7/32 Socket wrench, nut driver, or adjustable wrench - 11/32 Socket wrench, nut driver, or adjustable wrench - Wire stripping tool - Caulk Gun & Silicone Sealant For Wall M
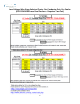
Low Voltage Line Drop Wire Gauge Tables See 12 VDC & 24 VDC Low Voltage Wire Gage Selector – Appendix Chart 6
7
Low Voltage Wire Gage Selector Charts- Per Conductor Pair, Per Cooler (D3 COOLDOME uses Dual Coolers – Requires Two Pair) 8
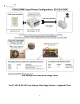
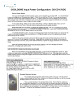
COOLDOME Input Power Configuration: D3-CD-12VDC Turn Off Power or leave power disconnected during Installation of All Wiring. Follow all local and relevant electrical codes & standards. Test all Wiring and confirm correct voltages before wiring up & powering up COOLDOME.
COOLDOME Input Power Configuration: D3-CD-12VDC Warning!!!: COOLDOME Enclosure runs on 12 VDC only! If high voltage is applied directly to COOLDOME enclosure, you will damage housing, void warranty, and create electrocution hazard that can be harmful or fatal. Do not start wiring until you have fully read and understand these installation instructions. External Power Supply: Model SP-500 The step down power supply provided with each D3 COOLDOME must be mounted outside of the D3 enclosure.
COOLDOME™ Input Power Configuration: ST-CD-12VDC Site Power Available Provided P/S Must be Housed Indoors, or in a Nema Electrical Enclosure LOW VOLTAGE RUN 12 VDC Cable to COOLDOME 110 – 220 VAC Power Source Single Phase Only 250 watt Step Down P/S High Voltage to 12 VDC Turn Off Power or leave power disconnected during Installation of All Wiring. Follow all local and relevant electrical codes & standards. Test all Wiring and confirm correct voltages before wiring up & powering up ST COOLDOME.
COOLDOME™ Input Power Configuration: ST-CD-12VDC Warning!!!: COOLDOME Enclosure runs on 12 VDC only! If high voltage is applied directly to COOLDOME™ enclosure, you will damage housing, void warranty, and create electrocution hazard that can be harmful or fatal. Do not start wiring until you have fully read and understand these installation instructions. External Power Supply The output of the S-250-12 external power supply, can be adjusted up and down 10%.
D2 & D3 Mounting Detail 13
S-Type Strong-Arm Mount Wall Mounting Pattern Not to Scale 14