
Installation Manual

10
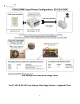
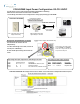
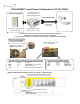
COOLDOME Input Power Configuration: D3-CD-12VDC
Warning!!!: COOLDOME Enclosure runs on 12 VDC only! If high voltage is applied directly to COOLDOME enclosure,
you will damage housing, void warranty, and create electrocution hazard that can be harmful or fatal. Do not start
wiring until you have fully read and understand these installation instructions.
External Power Supply: Model SP-500
The step down power supply provided with each D3 COOLDOME must be mounted outside of the D3 enclosure. This
power supply is must be mounted indoors or in an environmentally protective enclosure. The power supply can be powered by 95-
264 VAC, single phase source voltage. It is self-ranging, so no switch adjustment is needed if you power it from a 110 VAC source,
or 220 VAC source voltage (single phase). Optional outdoor rated, sealed power supplies are available sold separately.
The output of the SP-500 is rated up to 40 amps peak output @ 12VDC. Output 12 VDC can be tuned up or down 10% to
optimize regulated output, via a small nylon adjustment to left of 12V output terminals on face of power supply . It is
recommended to tune the voltage at power supply between 12.0 VDC – 13.5 VDC in unloaded condition. A higher voltage setting
may create premature fan failure, and settings above 15VDC may cause costly failure to main cooling components. Use voltage
meter to confirm all voltages before connecting COOLDOME to power supply. Firmly tighten all screw terminal connections and
check there are no stray wire strands that can create short between wires and terminals.
Wiring Guidelines:
Dotworkz recommends wiring the low voltage 12VDC outputs so that there are two pairs of wires from the SP-500
P/S outputs, to power each cooler independently, to reduce the need for very heavy wire gages on low voltage wiring run, thus
eliminating voltage drop issues. Dotworkz recommends to keep all low voltage wiring runs, as short as possible, by installing step
down power supply near to COOLDOME.
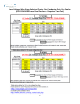
Dotworkz recommends using 12gg copper wire, or thicker, even on shortest wire runs of 20 ft or less, wired between
coolers and step down power supply (per cooler). SJOOW 12-4 type cable provides a stranded 4 conductor round bundle ideal for
under 20 ft low voltage cabling, when using our stock cable gland ports, creating a good waterproof seal around cabling to
enclosure.
Follow wire gage recommendation on table provided found on prior page, for proper wire gage minimums based on
distance between step down power, and COOLDOME. Voltage drop is based on fully loaded “cooler engaged” conditions (and
camera powered, allowing up to 3 amps) at typical ambient temperatures of 100F.
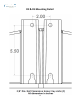
Inside D3 CD at rear of upper on enclosure will be two pairs of color coded screw terminal blocks to conveniently
and securely attach low voltage wiring. Always check voltage to assure 12VDC is properly wired into enclosure, and observe
proper polarity.
Each of the Coolers on the D3 are set up for independent operation, and therefore will switch on and off at slightly
different set points, when properly powered and wired. This adds fail safe redundancy to system, as well as electrical efficiency;
as second cooler only engages only at higher thermal loads.
Fully Seal Enclosure
D3 COOLDOME is engineered to operate in fully sealed conditions only. Failure to fully seal wire ports and all seals will
allow unsatisfactory cooling, and condensation to form within enclosure.
Always completely seal wire ports when completing wiring installation, especially when using conduit; even within inside
wire feeds. See Conduit guideline section in this manual for proper conduit installation.
Always create a Drip Loop on wiring that comes from overhead the enclosure, to reduce the risk of water entering
enclosure at wire seal ports.
Only use one round cable per provided wire port seal / cable gland. Attempting to run multiple separate wires thru one
cable gland will create air and water leaks, and will not seal properly. Use of flat cable or zip cord will not allow cable gland ports
to seal properly, creating leaks and product damage.
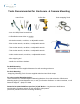
Humidity Control Pack
A Humidity control pack is provided to eliminate humidity in trapped air within COOLDOME. Each COOLDOME product
includes a canister that contains 40 grams of silica gel. This will prevent moisture buildup inside of the CD housing.
Make sure to remove canister from its sealed foil packaging, and secure into enclosure prior to enclosure use. Double stick
tape, Velcro tape, large zip ties, or fine wire are common ways to secure the canister. Secure canister above camera- on top of
camera bracket, or where space provides. Be sure not to obscure holes on canister so as to allow it to operate effectively.
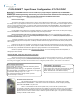
There is a small window on the canister (see white circle on image). Ensure that the crystals are blue. Occasionally,
especially in humid environments, the canister may need to be serviced. If so, the crystals in the window turn pink when silica gel
is saturated with moisture. The tin canister can be reactivated by being placed in an oven at 300F for three hours, or until crystals
turn blue again. The gel can be reactivated virtually and infinite number of times.