PRODUCT INSTRUCTIONS D3 SERIES ENCLOSURES
Intentionally Blank
Table of Contents Limited Warranty Info ..………………………………………………………………………………………………………………………………………………………………………………... 0 Product Installation Precautions, Warnings, and Installation Guidelines ......................................................................................................... 1 Conduit Guidelines .........................................................................................................................................................................................
LIMITED WARRANTY DOTWORKZ, INC. PRODUCTS DOTWORKZ SYSTEMS INC. Warrants this Product to be free from defects in material or workmanship, as follows: PRODUCT CATEGORY All Enclosures and Electronics Power Supplies Accessory Brackets PARTS LABOR One (1) Year One (1) Year One (1) Year One (1) Year One (1) Year One (1) Year During the warranty period, to repair the Product the Purchaser will deliver it to Dotworkz Systems Inc. San Diego, CA, or return the defective product, freight prepaid.
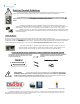
PRODUCT INSTALLATION PRECAUTIONS – WARNINGS – ADDITIONAL INFORMATION (RETAIN THIS DOCUMENT) IMPORTANT SAFEGUARDS 1 Read Instructions - All the safety and operating instructions should be read before the unit is operated. 2 Retain Instructions -The safety and operating instructions should be retained for future reference. 3. Heed Warnings - All warnings on the unit and in the operating instructions should be adhered to. 4. Follow Instructions -All operating & user instructions should be followed. 5.
Electrical Conduit Guidelines For optimal performance, your Dotworkz Enclosure is designed to be Air & Water Tight to eliminate any moisture, dust, and insect damage, safety, performance, reliability, and maintenance related issues. Use of Electrical Conduit, without sealing the entry ports/ inside wire feeds within Camera Enclosure, will subject the inside of your enclosure to possibility of condensation driven moisture, dust, and insect contamination hazards.
3
Component Check List For D3 Included Standard Hardware for Camera Mounting 20 20 24V Input Blue Bypass Cable In MVP models only 1 Optional Camera Mount Bracket for Larger Cameras #RP-AXBR (AB-1007) Optional RP-AXBR Bracket Direct Compatibility: (Available by special order) Axis 231D, & 232D DVTel 9840 Merit-LiLin PIH-7000/7600/7625 PiXORD P-463T Fast Speed Dome Pelco Spectra IV Sony SNCRH124, SNC-RS44N, SNC-RS46N Toshiba IK-DP30A 4
MVP Voltage Matrix: Enclosure Input – Camera Output Input Voltage to Enclosure The MVP Enclosures can be powered by Inputs of either High Voltage 110-220 VAC. Or Low Volt 24 VAC/ VDC Site Power Available 110 – 220 VAC Power Source – Single Phase Only Or Site Power Available 24 VAC/VDC Step Down Transformer High Voltage to 24 VAC Voltage Matrix for Input / Output Output Voltage to Power Camera MVP provides step down voltage to supply camera power for 12VDC, and 24V Cameras.
Input Power Configuration for 24 VAC/ VDC Inside all D3-MVP is a Chassis similar to shown Site Power Available 110 – 220 VAC Power Source Single Phase Only Step Down Transformer High Voltage to 24 VAC All Wiring Connections are to be made fully inside of D3 The MVP comes ready for 110-220VAC Input power For 24 VAC/VDC inputs; Installer must take a moment to allow input configuration for Low Voltage Input. Use Blue 24 VAC Bypass Cable To hook up Power inside D3 as shown below.
Input Power Configuration for 110 – 220 VAC * Shut off all power before and during wiring & servicing! *All Wiring must be done by a Qualified technician *Observe all local and applicable electrical codes Use Color coded terminals for High Voltage Input to hook up inside D3 Inside all D3-MVP is a Chassis similar to shown Site Power Available All Wiring Connections are to be made fully inside of D3 110 – 220 VAC Power Source – Single Phase Only The MVP comes ready for 110-220VAC Input power ! Use Single
Camera Power Setup (STANDARD 12VDC CONNECTOR) All D2 environmental enclosures come standard with a 12VDC Right Angle Barrel Plug (3.3mm x 5.5mm with a 1mm center pin) for majority of the IP cameras on the market. Right Angle Standard Inline version If you IP camera’s power connector is different but still accepts up to ~ 13VDC for power, please see our section on Camera Power Setup (NON-STANDARD CONNECTOR) for instructions on how to power your camera.
Align camera on D3 camera bracket so as to center camera’s “pan” axis directly over center of camera plate provided. The D3 camera bracket has been pre-drilled with most of the popular camera mounting hole patterns. Align pre-drilled holes on camera plate to best fit your camera model. Use hardware provided to secure to D3 camera plate. On some camera models, new holes may need to be drilled by installer to secure to D3 camera bracket, or for installer to provide misc.
Steady Step Mounting System Steady Step Bracket Steps adjust in ¼” increments. To adjust 1/8” between step settings, add 1/8” brass male-male hex stand-off (ITEM NO. 6) shown in detail D (below), and provided in D3 hardware pack, by threading on top of movable slide bracket of steady step bracket system, then fastening camera bracket (CB-1007 or AB-1007).
11
COOLDOME Input Power Configuration: D3-CD-12VDC Turn Off Power or leave power disconnected during Installation of All Wiring. Follow all local and relevant electrical codes & standards. Test all Wiring and confirm correct voltages before wiring up & powering up COOLDOME.
COOLDOME Input Power Configuration: D3-CD-12VDC Warning!!!: COOLDOME Enclosure runs on 12 VDC only! If high voltage is applied directly to COOLDOME enclosure, you will damage housing, void warranty, and create electrocution hazard that can be harmful or fatal. Do not start wiring until you have fully read and understand these installation instructions. External Power Supply: Model SP-500 The step down power supply provided with each D3 COOLDOME must be mounted outside of the D3 enclosure.
D3 High Voltage Power Supply Specifications D3 COOLDOME SP-500-12 Power Supply D3 MVP Models – High Voltage Inputs 14
D3 Exploded Detail 15
D3 Mounting Detail 16