USER’S MANUAL ™ DoubleSight Dual 15” LCD Monitor (Model: DS-15xx Series) For the latest updates and more information, visit our website at www.doublesight.com.
Trademarks DoubleSight, DoubleSight Displays, the DoubleSight logo, and other DoubleSight trademarks are the property of DoubleSight Displays, LLC and may be registered in the United States and/or other countries. Microsoft, Windows, and the Microsoft logo are trademarks or registered trademarks of Microsoft Corporation in the United States and/or other countries. Apple and Macintosh are trademarks or registered trademarks of Apple Computer, Inc. in the United States and/or other countries.
Contents Contents ......................................................... i Notice to Users .............................................. 1 Important Safety Instructions ..................................... 1 Important Notices Regarding Power Cord ...................... 1 For the United States and Canada............................ For European Countries .......................................... For The United Kingdom ......................................... CE Conformity for Europe ..................
User’s Manual Setting Up Your Monitor............................... 11 Connecting the Display to Base Stand .........................11 Connecting the Monitor to a Computer ........................12 Setting Up Computer Display Properties ......................15 For Microsoft Windows Users ..................................15 For Apple Macintosh Users .....................................16 AUTO Setting .......................................................16 Removing Base Stand from the Display .......
User’s Manual Display................................................................31 Input Signals .......................................................31 Connections .........................................................31 User Controls .......................................................32 Power .................................................................32 Operating Conditions.............................................32 Physical Characteristics ........................................
User’s Manual (This page is left blank intentionally) iv Contents
Notice to Users Important Safety Instructions Please carefully read the following safety instructions as they are designed to reduce the risk of electric shock, personal injury or damage to the LCD monitor. WARNING This device must be operated with the original power supply, part number: HJC HASU05F. CAUTION: The socket-outlet should be installed near the equipment and should be easily accessible. CAUTION: Use a power cable that is properly grounded.
User’s Manual female receptacle of the cord set must meet IEC-60320 requirements and may look like (Figure A1 below): For the United States and Canada In the United States and Canada, the male plug is a NEMA5-15 style (Figure A2), UL Listed, and CSA Labeled. For units that are mounted on a desk or table, type SVT or SJT cord sets may be used. For units that sit on the floor, only SJT type cord sets may be used. The cord set must be selected according to the current rating for your unit.
User’s Manual WARNING This appliance must be grounded.
User’s Manual Additional Safety Information To prevent fire or shock hazards, do not expose this monitor to rain, moisture or liquids. Use only a properly grounded plug and receptacle. Do not use this unit’s polarized plug with an extension cord receptacle or other outlet unless the prongs can be fully inserted. DO NOT OPEN THE MONITOR. Opening or removing the monitor covers may expose the user to dangerous shock hazards or other risks. There are no user-serviceable parts inside.
User’s Manual • Do not cover or block the ventilation ports on the rear of the monitor to avoid breakdown or fire. • Do not install the monitor near heat sources, such as radiators or air ducts, or in locations exposed to direct sunlight, excessive dust, mechanical vibration or shock. • Do not place the monitor faced down to avoid damage to the TFT-LCD surface. • Do not clean the monitor using any abrasive materials or solvents, such as alcohol or benzene.
User’s Manual (This page is left blank intentionally) 6 Notice to Users
Introduction Congratulations on your purchase of DoubleSight, an innovative dual LCD monitor.
User’s Manual how you want to set up each LCD display. DoubleSight’s multiscreen control technology and industrial design employ a single controlling motherboard that seamlessly manages and adjusts the display of multiple monitors. By simply distributing or replicating signals to both display panels, you have the ability to display a different window on each monitor panel at the same time, or stretch windows across two monitors so you can see more information without scrolling.
User’s Manual DoubleSight Monitor Overview Front SELECT LED Indicator POWER LED Indicator SELECT The SELECT button is a single control function for selecting the On-Screen Display menu of left-side panel, right-side panel, or both panels. SELECT LED Indicator Green LEDs indicate the On-Screen Display menu’s operational mode for left-side panel, right-side panel, or both panels; Amber LEDs indicate power saving mode.
User’s Manual AUTO The AUTO button automatically adjusts the display settings. POWER The POWER button turns the monitor on and off. POWER LED Indicator A green LED indicates the monitor is on.
Setting Up Your Monitor Prior to setting up your DoubleSight monitor, it is important to select a location where it will be stable and protected, yet convenient to use. You will need a flat, hard surface, such as a sturdy desk or table, located near a power outlet. WARNING To allow sufficient airflow and prevent overheating, do not block the ventilation ports located on the rear of the monitor.
User’s Manual Holding the base stand handle, insert its three prongs (located on the handle’s reverse side) straight down into the three holes on the display’s back silver face plate. To secure the prongs into a locked position, push the stand forward until it connects to the display securely. Using both hands, firmly grip the combined display with stand and place upright on a desk with the monitor’s back panel facing you. Please ensure that the display and base are securely connected before moving.
User’s Manual WARNING Only use the correct power cord for your local voltage. The power adapter included in the box automatically supports 100V~240V. Depending on the configuration of your computer, there are different methods for connecting it to your DoubleSight monitor. If your computer already has two VGA ports, connect the opposite ends of the VGA 1 and 2 cables into each VGA port. If your computer has one VGA port and a DVI port, you will need a DVI-VGA connector.
User’s Manual NOTE If your computer does not specify VGA 1 and 2, you can change the order later using your computer display setting or monitor On-Screen Display setting. Refer to the “Setting Up Computer Display Properties” of this section and “Source Select” of “Key Function Controls” section of this User’s Manual. If your computer has only one VGA port, you will need to install an additional graphics card to support a dual monitor.
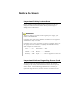
User’s Manual Setting Up Computer Display Properties For Microsoft Windows Users Click the Start button in Windows, then select Settings > Control Panel > Display. On the Settings tab, click the monitor icon that represents the monitor you want to extend your desktop to. Select the “Extend my Windows desktop onto this monitor” checkbox and click Apply or OK. Secondary display If you have an OUT OF RANGE message on the secondary display, you may need to adjust its refresh rate.
User’s Manual NOTE You can rearrange the position of display 1 and 2 without physically switching video adapter signal cables. Simply drag a monitor icon (1 or 2) to a desired position on the Settings tab of Display Properties Windows and select Apply or OK. For Apple Macintosh Users Choose System Preferences from the Apple menu and click Displays. Click the Arrange tab and follow the on-screen instructions to set up the secondary display.
User’s Manual Removing Base Stand from the Display If you need to disconnect the base stand from the display, use the bottom layer of foam packaging in the box as a secure material to protect the LCD panels. Using both hands, firmly grip each outer edge of the dual display frame and place face down on top of the foam packaging. Push the base stand handle backward with your left hand. The base stand will be released from the display.
User’s Manual (This page is left blank intentionally) 18 Setting Up Your Monitor
Key Function Controls DoubleSight features an intuitive, menu-driven On-Screen Display (OSD) that provides a full range of customizable tools to optimize your display. The OSD can be accessed anytime your computer is powered up. (Note: If your computer is in a power saving mode or is powered down, the OSD will be inaccessible.) Working with OSD Functions To work with OSD functions: 1. By pressing the SELECT button, you can control the left, right, or both panels of your DoubleSight monitor. 2.
User’s Manual 5. Press the MENU button to select a function. If more than one setting is listed, use the LEFT ◄ or RIGHT ► button to make your selection within the selected function. 6. Press the LEFT ◄ or RIGHT ► button to change the settings as described under each menu function in the following section. 7. Press the EXIT button to save your settings. 8. Press the EXIT button again until you completely exit the OSD. Source Select 1.
User’s Manual USEFUL TIP You can easily change video signal source by simply pressing the LEFT ◄ or RIGHT ► button without entering the OSD window. Just press the LEFT ◄ or RIGHT ► button anytime to switch video signal source between VGA1 and VGA2 for the corresponding panel. Brightness 1. Press the LEFT ◄ or RIGHT ► button until the Brightness icon is highlighted. 2. Press the MENU button to select the Brightness icon. 3. Press the LEFT ◄ or RIGHT ► button to set the brightness on the 0-100 scale. 4.
User’s Manual Contrast 1. Press the LEFT ◄ or RIGHT ► button until the Contrast icon is highlighted. 2. Press the MENU button to select the Contrast icon. 3. Press the LEFT ◄ or RIGHT ► button to set the contrast on the 0-100 scale. 4. Press the EXIT button to save settings. Color You can choose from two pre-defined color settings: 9300K for slightly bluish-white and 6500K for slightly reddish-white. The default factory setting is 9300K. To customize your display, select User Mode.
User’s Manual 1. Press the LEFT ◄ or RIGHT ► button until the Color icon is highlighted. 2. Press the MENU button to select the Color icon. 3. Press the LEFT ◄ or RIGHT ► button to move between the options. 4. Press the MENU button to change the setting. Notice the “Pointing hand” moves to the new selection. 5. Press the EXIT button to save settings and return to the function selection menu.
User’s Manual 4. Press the LEFT ◄ or RIGHT ► button to select the color category. 5. Press the MENU button to select the RED, GREEN or BLUE option. 6. Press the LEFT ◄ or RIGHT ► button to set each color as desired on the 0-100 scale. 7. Press the EXIT button to save settings and return to the User Mode menu. 8. Press the EXIT button to return to the function selection menu. Position Use this setting to fine-tune the display’s horizontal or vertical position on the monitor screen. 1.
User’s Manual 5. Press the EXIT button to save the settings and return to the Position menu. 6. Press the EXIT button to return to the function selection menu. Image Use the image settings to adjust the sharpness, white balance, and to fine-tune picture performance to compensate for drifts in the computer signal. PHASE adjusts the focus of the display image; CLOCK minimizes vertical stripes on the display background. 1. Press the LEFT ◄ or RIGHT ► button until the Image icon is highlighted. 2.
User’s Manual Misc Menu The Misc Menu lets you access sub-menus that include Reset, Language, OSD Position, and the read-only System Information screen. 1. Press the LEFT ◄ or RIGHT ► button until the Misc Menu icon is highlighted. 2. Press the MENU button to select Misc Menu. Reset Reset lets you return the display’s settings to the factory defaults. 1. Press the LEFT ◄ or RIGHT ► button until Reset is highlighted. 2. Press the MENU button to select Reset. 3.
User’s Manual 1. Press the LEFT ◄ or RIGHT ► button until Language is highlighted. 2. Press the MENU button to select Language. 3. Press the LEFT ◄ or RIGHT ► button to scroll through the languages shown. 4. Press the MENU button to select OSD language. 5. Press the EXIT button to save settings and return to the Misc Menu. OSD Position The OSD Position setting lets you change the location of the OSD window on your monitor. 1. Press the LEFT ◄ or RIGHT ► button until OSD Position is highlighted. 2.
User’s Manual (This page is left blank intentionally) 28 Key Function Controls
Recommended Use Placement Correct placement and adjustment of the monitor can reduce eye, shoulder, and neck fatigue. Check the following when you position the monitor: • Keep the top of the monitor screen at or slightly below eye level. Your eyes should look slightly downward when viewing the middle of the screen. It is recommended that you keep the screen below your eye level. • Position your monitor no closer than 16 inches and no further away than 30 inches from your eyes.
User’s Manual • Position the monitor at a 90° angle to windows and other light sources to minimize glare and reflections. Adjust the monitor tilt so that ceiling lights do not reflect on your screen. • Use a document holder placed close to the screen. • Position whatever you are looking at most of the time (the screen or reference material) directly in front of you to minimize turning your head while you are typing.
Technical Information Product Specifications (Model: DS-15xx) Display Panel Type Dual 15” TFT-LCD Viewable Area 608.2mm (24 inches) horizontal; 228.1mm (9 inches) vertical Resolution 2048 x 768 max. Colors 16M max. Brightness 250 cd/m² Contrast Ratio 400:1 Pixel Pitch 0.297mm Pixel Configuration R,G,B vertical stripe Response Time 25 ms (Tr+Tf) Viewing Angle -65~+65° horizontal; -45~+55° vertical Glass Treatment Anti-glare, hard coating Lamp Life 30,000 hours min.
User’s Manual User Controls Manual Control Buttons SELECT, MENU, ◄, ►, EXIT, AUTO, POWER On-screen Display Functions Select Source, Brightness, Contrast, Color, Position (horizontal/vertical), Image (phase, clock), Misc. Menu (reset, language, OSD position, system information) Power Voltage Input: AC 100~240V, 50~60Hz; Output: DC+12V, 4.0A max. Consumption 45W max.; 5W max.
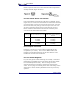
User’s Manual Application Video Timing VESA Modes Mode Resolution Total DOS 720x400@70Hz 900x449 800x525 640x480@60Hz VGA SVGA XGA Horizontal Nominal Frequency +/0.5KHz 31.500 31.469 Vertical Nominal Frequency +/1Hz 70.000 59.940 Nominal Pixel Clock (MHz) 28.322 25.175 640x480@72Hz 832x520 37.861 72.809 31.500 640x480@75Hz 840x500 37.500 75.000 31.500 800x600@56Hz 1024x625 35.156 56.250 36.000 800x600@60Hz 1056x628 37.879 60.017 40.000 800x600@72Hz 1040x666 48.077 72.
User’s Manual MAC Modes VGA 640x480@60Hz 800x525 Horizontal Nominal Frequency +/0.5KHz 31.469 SVGA 832x624@75Hz 1152x667 49.725 74.551 57.283 XGA 1024x768@75Hz 1328x804 60.241 74.927 80.000 Mode Resolution Total Vertical Nominal Frequency +/1Hz 59.940 25.175 Nominal Pixel Clock (MHz) NOTE The DS-15xx has two LCD panels that generate a 2048 x 768 resolution together; each panel can be set to a maximum of 1024 x 768.
Troubleshooting & Support Warning Messages Message OUT OF RANGE Solution The input signal is not acceptable by the monitor. - Please ensure that the video resolution and refresh rate of the graphics card in your computer are within specified ranges for the monitor. - Please check your computer’s display settings and change the screen refresh rate properly. For Windows users, press the Advanced button on the Settings tab of Display Properties Window.
User’s Manual CABLE NOT CONNECTED The VGA cable is not connected to the computer. - Check that VGA cable is connected to the computer tightly. Troubleshooting Checklist Symptom Computer has only one VGA port Check Items - You need to install an additional graphics card to enable a dual monitor configuration. Check our website at www.doublesight.com/support for recommendations and requirements of selected graphics cards.
User’s Manual Text is not solid - Ensure that the resolution of the video signal is 1024 by 768. Lower resolution may produce distorted display due to automatic expansion of the display. - Select the corresponding panel and press the AUTO button to run automatic adjustment. - Adjust Clock and Phase in the OSD menu to fine tune. (Please refer to the “Key Function Controls” section of this User’s Manual for details.
User’s Manual will need to provide the product serial number located on the back of your monitor and proof of purchase to verify your warranty status if you have not registered your monitor within 30 days of purchase. For technical support (in U.S.A. and Canada): • Technical Support Line: 1-877-TwoLCDs (1-877-896-5237) • Hours: 9:00 a.m. – 5:00 p.m.
Limited Warranty INTRODUCTION This Warranty covers DoubleSight Displays, LLC’s (“DSD”) DS15xx DoubleSight Dual 15” LCD Monitors (“Product”) sold by DSD or DSD’s authorized resellers. DSD provides a limited warranty for the originally purchased Products for use, not resale (“Original Purchase”), located in the United States. No DSD authorized reseller may claim any right or interest under this limited warranty.
User’s Manual WARRANTY EXCLUSIONS This warranty does not cover: 1. Any Product on which the serial number has been defaced, modified or removed. 2. Damage, deterioration or malfunction resulting from: A. Accident, disaster, misuse, neglect, fire, water, lightning, or other acts of nature, unauthorized product modification, or failure to follow instructions and environment specifications supplied with the Product. B. Repair or attempted repair by anyone not authorized by DSD. C.
User’s Manual C. Your address. D. The serial number of the product. E. A description of the problem. 3. Bring or ship the Product prepaid and insured in the original container, with the associated accessories, to the DSD depot repair site. All Products returned to the DSD depot repair site for service MUST have prior approval which may be obtained by calling the telephone number above.
User’s Manual AUTHORIZED RESELLER FOR THIS PRODUCT HAS BEEN ADVISED OF THE POSSIBILITY OF SUCH DAMAGES, OR FOR ANY CLAIM BASED ON ANY THIRD PARTY CLAIM. DSD LIABILITY WILL BE NO MORE THAN THE AMOUNT YOU PAID FOR THE PRODUCT THAT IS THE SUBJECT OF A CLAIM. THIS IS THE MAXIMUM AMOUNT FOR WHICH DSD WILL BE RESPONSIBLE. SOME STATES DO NOT ALLOW THE LIMITATION OR EXCLUSION OF LIABILITY FOR INCIDENTAL OR CONSEQUENTIAL DAMAGES SO THE ABOVE EXCLUSIONS OR LIMITATIONS MAY NOT APPLY TO YOU.
Regulatory Information FCC Compliance This device complies with Part 15 of the FCC Rules. Operation is subject to the following two conditions: (1) This device may not cause harmful interference, and (2) this device must accept any interference received, including interference that may cause undesired operation. This equipment has been tested and found to comply with the limits for a Class B digital device, pursuant to Part 15 of the FCC Rules.
User’s Manual FCC WARNING To assure continued FCC compliance, the user must use a ground power supply cord and the provided shielded video interface cable with bonded ferrite cores. If a BNC cable is going to be used, use only a shielded BNC (5) cable. Any unauthorized changes or modifications not expressly approved by the party responsible for compliance could void the user’s authority to operate this device.
www.doublesight.com Part No.