
Operating Instructions and Installation Instructions


Lubrication
Although cast-iron is slightly self-lubricating, you will
still need to lubricate moving parts frequently.
Lubricate the moving parts (such as guide sys-
tems,hinge pins, latches and air slides) with heat
resistant grease that is available in the specialist
trade.
Touching up damaged paint
Small areas of damaged paint finish can be touched-
up with a spray can of special heat-resistant paint,
available from your supplier.
Touching up the enamelled surface
Enamelling is a process carried out by traditional meth-
ods, meaning that it is possible that small colour dif-
ferences and damage may occur. The appliances
undergo a visual inspection in the factory, that is to
say, the inspector looks at the surface for a period of
10 seconds from a distance of 1 metre.
Any damage that does not stand out is regarded as
OK. A special heat-resistant paint is supplied with the
stove to touch up any minor damage caused during
transport.
Apply the heat-resistant paint in thin layers and leave
to dry well before using the appliance.
Some enamel colours are temperature-sensitive. It
can happen that the colour changes during use.
The original colour will return when the stove has
cooled down.
If enamelled surfaces become very hot, hairline
cracks can occur. This is a normal phenomenon
and has no impact on the functioning of the stove.
Ensure that the stove is not overburdened. If it
does become overburdened then the surface
gets very hot possibly resulting in lasting dam-
age to the enamel.
Checking the seal
Check whether the door sealing rope is still in good
condition and works well. The sealing rope is sub-
ject to wear and will need to be replaced over time.
Check the appliance for air leaks. Close any
chinks with stove sealant.
Allow the sealant to harden fully before lighting
the stove, as any moisture in the sealant will
form bubbles, resulting in a new air leak.
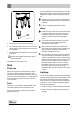
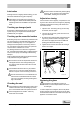
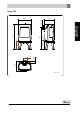
Adjust door closing
Check if the door closes properly. If required, the clos-
ing of the door can be set looser or tighter by adjusting
the distance between the locking cam and the door.
Proceed as follows:
1. Open the door. The locking cam (2) is now freely
accessible; see next figure.
2. Unscrew the two screws (1) with which the lock-
ing cam is attached.
3. By removing the packing plate (3) behind the lock-
ing cam (2), the door closes more tightly. If the
door closes too tightly then insert an additional
packing plate behind the locking cam.
4. Tighten the two screws and check the closing of
the door once again.
09-20021-024
123
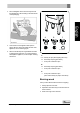
Replacing the glass
If the glass in the appliance is broken or
cracked, it must be replaced before the stove
is used again.
In order to replace the side glass, all the inner panels
and the air guide must first be removed. The air guide
is attached with a M8 nut in the middle at the top of the
appliance. Proceed as follows:
Subject to change because of technical improvements
17