
Operating Instructions and Installation Instructions


Check the appliance for air leaks. Close any
chinks with stove sealant.
Allow the sealant to harden fully before lighting
the appliance, as any moisture in the sealant
will form bubbles, resulting in a new air leak.
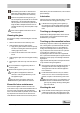
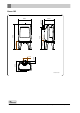
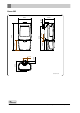
Adjust door closing
Check if the door closes properly. If required, the clos-
ing of the door can be set looser or tighter by adjusting
the distance between the locking cam and the door.
Proceed as follows:
1. Open the door. The locking cam (2) is now freely
accessible; see next figure.
2. Unscrew the two screws (1) with which the lock-
ing cam is attached.
3. By removing the packing plate (3) behind the lock-
ing cam (2), the door closes more tightly. If the
door closes too tightly then insert an additional
packing plate behind the locking cam.
4. Tighten the two screws and check the closing of
the door once again.
09-20021-024
123
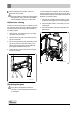
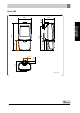
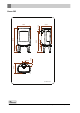
Replacing the glass
If the glass in the appliance is broken or
cracked, it must be replaced before the stove
is used again.
In order to replace the side glass, all the inner panels
and the air guide must first be removed. The air guide
is attached with a M8 nut in the middle at the top of the
appliance. Proceed as follows:
1. Unscrew the two glass fixings with parts (1) and
(2) and remove the glass (3), see following figure.
2. Check the glass seal and, if necessary, fit a new
sealing rope.
3. Place the new glass in the grove and tighten the
glass fixings.
09-20021-025
1
2
3
22
Subject to change because of technical improvements