
Instruction Manual
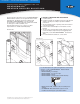

2. INSTALL WEATHERMATE
™
SILL PAN
a. Position one corner piece along the base of
window rough opening, lapping over water-
resistive barrier.
b. Press fi rmly against corner of window opening.
Nail or staple in place, following embossed
instructions on product.
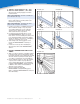
c. Position second piece, overlapping fi rst piece
with a minimum overlap of 2" (5 cm). Press
second piece fi rmly into corner of window
opening. Nail or staple in place, following
embossed instructions on product.
d. For window openings wider than 5' (1.5 m),
install WEATHERMATE
™
Sill Pan in corners,
then cut the corner off a third piece, taking care
not to damage backdam. Center this straight
length over the two corner pieces, overlapping
each piece a minimum of 2" (5 cm).
e. Seal overlap seam and top edge of corner
pieces with WEATHERMATE
™
Flashing, as
shown.
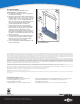
f. If shims are necessary when installing the
window, place them under WEATHERMATE
™
Sill Pan.
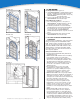
3. INSTALL WINDOW/DOOR AND FLASH
JAMBS
a. Apply a continuous bead of compatible sealant
to the back side of the mounting fl ange, along
the header and sides of the window/door. Install
windows and doors plumb, level and square,
according to manufacturer recommendations.
b. Ensure substrate surface is clean, dry and free
of grease, dust or debris. A spray adhesive,
such as 3M Hi-Strength 90, is recommended
if applying WEATHERMATE
™
Flashings directly
to OSB or other surfaces where additional
adhesion may be required.
c. Remove release liner and apply
WEATHERMATE
™
Straight Flashing along
jambs, overlapping WEATHERMATE
™
Sill Pan or
other sill fl ashing.
2. INSTALL WEATHERMATE
™
SILL PAN
®™Trademark of The Dow Chemical Company (“Dow”) or an affi liated company of Dow
Figure 2a Figure 2b
Figure 2c Figure 2e
Figure 3a
NOTE: WEATHERMATE
™
Sill Pan is suitable for
use in window sills only.
NOTE: WEATHERMATE
™
Sill Pan works best
when the sill is sloped to the exterior.
2