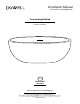
Installation Manual Dowell Freestanding Bathtub Freestanding Bathtub Installation Manual TWO PERSONS REQUIRED Please read notices on following page PRODUCT SPECIFICATIONS ARE SUBJECT TO CHANGE WITHOUT NOTICE. www.dowellusa.
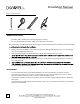
Installation Manual Acrylic Freestanding Bathtub Materials and Tools Required PENCIL TAPE MEASURE LEVEL SILICONE GENERAL INSTRUCTIONS • • Read this guide carefully and completely before proceeding. It is recommended that you wear safety glasses during the installation. Before installing a new Dowell bathtub, we strongly recommend following the installation checklist and hiring 1. Visually inspect the bathtub to make sure it has not been damaged during transport.
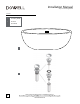
Installation Manual Acrylic Freestanding Bathtub Contents 1 Freestanding Bathtub 2 A110 Drain (Not Included) 1 2 3 PRODUCT SPECIFICATIONS ARE SUBJECT TO CHANGE WITHOUT NOTICE. www.dowellusa.
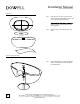
Installation Manual Acrylic Freestanding Bathtub Preperation Step 1. Installation area should be cleaned. Use a spirit level to ensure the ground area is level for the bathtub. Positioning Bathtub Step 2. Place the freestanding bathtub in the exact location desierd. Then trace the outline of the freestanding bathtub with a pencil or any marking that is erasable. 4 PRODUCT SPECIFICATIONS ARE SUBJECT TO CHANGE WITHOUT NOTICE. www.dowellusa.
Installation Manual Acrylic Freestanding Bathtub Preperation Step 3. Using a drop cloth, carboard or any smooth protective surface, turn the freestanding bathttub on its side so that the unit is supported duing drain installation. taking measurements of the drain and waste location underneath the unit. Step 4. NoteL Drain, waste locations, and trim options vary by model. Step 5.
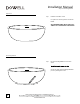
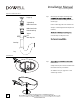
Installation Manual Acrylic Freestanding Bathtub Preperation of Drain Tail Piece Step 6. Pop up cap Waste drain pipe must always be installed agreeing to placement of the bathtub before drilling the hole for the waste drain pipe. Top Drain Body Rubber Drain Gasket Install 1 1/2” rubber slip gasket over the drain waste vent. Cut tailpiece to desired length (will need to adjust for each installation).