
Installation & Assembly

Top-Mount / Under-Mount Sinks
INSTALLATION GUIDE
Page 3 of 4
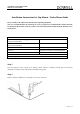
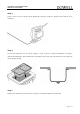
Step 6
Attach and space the clips around the underside of the sink. Number of clips varies between models. Be sure to
arrange spacing evenly around the sink. Apply sealant around the sink rim to serve as a watertight seal.
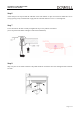
Step 7
Lower the sink into the hole carefully and tighten the clips evenly with the screwdriver.
(Left is top-mount installation and right is under-mount installation)
Step 8
Wipe away the excess sealant and allow to dry. Make the drain connections. Run water through the sink and check
for leaks.