
Installation Guide


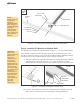


Step 3: Install the Module Rails to the Strongback
Module Rails run in an E-W direction and are secured to the mounting tabs of the
Strongback using 3/8” x 1” bolts and hardware. There are six Rails to install.
The orientation of the Module Rails to the Strongback is critical to the successful
installation of the PV Modules. In Figure 3-1, the location and orientation of the
Module Rails are identified using the numbers 1, 2, 3, 4, 5 & 6. Match the Rail
number within Figure 3-1 to properly orient the Module Rails to the Strongback.
A. Referring to Figure 3-1 for orientation of the Module Rails, position and
align the Module Rail mounting holes with the holes of the Strongback
mounting tabs and secure with 3/8” x 1” bolts and hardware. Finger-tighten
for now. (See also Figure 3-2)
Start by installing the inboard sections of Module Rail first and work outward
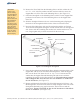
Figure 2-3: Securing Support Bar to Mounting Sleeve
5 of 9
3 Bolt/8” or 1/2” x 1-3/4”
Flat Washer
Pivot Tab
Flat Washer
Lock Washer
Support Bar
3/8” or 1/2” Hex Nut
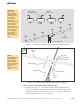
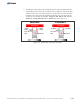
Figure 2-4: Tighten and Torque the Pivot Bolt
Strongback
Towers
No Gaps
No Gaps
Pivot
Bolt
Strongback
Towers
Visible
Gaps
Visible
Gaps
Pivot
Bolt
WRONG
CORRECT
Assembly Instructions, Top-of-Pole Mount for 9 Modules (TPM9) For Module Types C, D, E, F, G & H, (Version 2, Rev E)