
Operation Manual


7
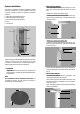
Ä Installation of the exhaust unit
Remove the following parts of the exhaust unit (E) from
package 4:
- Ceiling plate (17) with integral central fan and
operating panel (18)
- Exhaust duct (19) with two bypass hoses (20)
These two parts must be bolted together. To do this,
remove the pre-assembled bolts (21) from the ceiling
plate (17), place the exhaust duct with its attachment
holes in position on the ceiling plate, and then refit the
bolts (21) (Fig. 12).
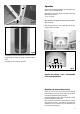
Fig. 12
21
20
19
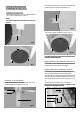
Fig. 13
17
18
Note: The operating panel (18) must not be bolted to the
lower plate yet!
The complete exhaust unit is now lifted onto the tanning
elements (Fig. 13).
Now place the attachment holes in the exhaust unit over
the matching holes in the tanning elements.
Use 6 hex-head bolts (22) with washers (23) from the
accessory pack to bolt the exhaust unit in place (Fig. 14)
23
22
Fig. 14
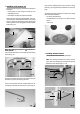
Now bolt the operating panel (18) to the lower ceiling
plate (Fig. 13), using the bolts provided in the accessory
pack.
The following auxiliary elements are built into to ceiling
plate of the TAN CAN 8000
- 2 air jets for the head area
- 2 loudspeakers for connection to an external audio
system
- control unit
Fig. 15
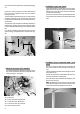
Å Installing the door element
Remove the door element (C) from package 3.
Note: The retaining bolt (25) for the castor, and the
upper and lower bearings (27) and (32) are already
fitted to the door element (Figs. 16 - 18).
Fig. 16
26
25
Fig. 17
24
27
8
12