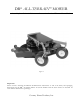
DR® ALL-TERRAIN™ MOWER Assembly, Installation & Maintenance Instructions for the 42" Lawn Mower Deck Figure 1 Important! Please read the Assembly, Installation & Maintenance Instructions as well as the Safety and Operating Instructions for the DR© All Terrain Mower to become familiar with the basic features of the DR® 42 Lawn Mower Deck before operating it. Country Home Products, Inc.
Safety Information We want you to enjoy years of productive use from your DR® 42 Lawn Mower. We don't want you to get injured, so please take a few moments to read the following guidelines for safely operating your new machine. Dress Appropriately • Wear safety glasses while mowing to protect your eyes from thrown objects. • Wear shoes with non-slip treads when using your DR® 42 Lawn Mower. If you have safety shoes, we recommend that you wear them.
• ALWAYS shut off the engine and remove the spark plug wire prior to making any adjustments to the machine. If you have to stop to remove grass or debris from the underside of the deck, always disconnect the spark plug wire first. • The exhaust area on the engine becomes very hot. Allow the engine to cool before doing maintenance or making adjustments. • Keep combustible substances away from the engine when it is hot.
Safety/Operation Labels Always replace damaged or missing safety and operation labels immediately.
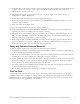
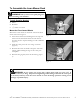
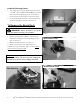
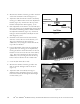
To Assemble the Lawn Mower Deck WARNING! Always remove the spark plug wire before servicing your machine. Tools & Supplies Needed: • Pliers • • Hammer ½" socket or wrench Mount the Front Caster Wheels Mount the caster wheels on the front arms of the deck frame as shown in Figure 1. • Insert the 4 black castor bushings into the top and bottom of the lawn deck frame for both castors. You may need to tap the bushings in with a hammer (Figure 2).
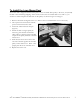
Install the Discharge Chute 1. If your lawn mower deck shipped separately from your DR® ALL-TERRAIN™ MOWER, you'll also need to install the discharge chute. From below, insert the bolts up through the holes in the deck. 2. Set the discharge chute in place, fit the bracket over the bolts and tighten with the nuts (Figure 4). To Remove the Brush Deck WARNING! Always disconnect the spark plug wire before servicing your machine. 1.
To Install the Lawn Mower Deck Your lawn deck is shipped with the belt in place on the two blade drive pulleys. However, occasionally the belt comes off during shipping. If this occurs remove the two smaller belt covers with a ½" in wrench or socket and place the belt back on the pulleys as shown in Figure 9 on Page 8. 1. Remove the black rectangular belt cover. Remove the two smaller black covers if necessary. 2. Line up the lawn mower deck with the power unit and mount the deck. 3.
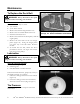
Maintenance To Replace the Deck Belt WARNING! Always disconnect the spark plug wire before servicing your machine. Tools Needed: • 7/16" wrench and/or socket • 1/2" wrench • 3/16" Allen wrench 1. Remove the black rectangular belt cover. For illustration purposes, belt is shown above 2. Remove the two smaller black belt covers. springs, etc. Actual installation will be below. 3. Push the belt release lever. 4. Remove the belt from the deck pulleys and the Figure 9 engine pulley. 5.
To Remove the Blades WARNING! Always disconnect the spark plug wire before servicing your machine. Tools Needed: • 9/16" wrench or socket • Rag or gloves to handle the blade Note: You may want to block the blade with a piece of wood between the blade and the deck to hold it while turning the nut. 1. Remove the blade bolt, lock washer and blade washer. Caution: Be aware of the sharp blade when pushing or pulling the wrench. 2. Remove the blade. 3. Repeat with the other blade. To Replace the Blades 1.
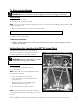
• Measure the distance from the ground to the deck at the front and back of the deck (Figure 13). • Adjust the deck from front to back as needed by moving to a different hole in the rear adjustment bracket (Figure 14). Each hole in the top of the bracket will adjust the deck height by 1/16". • Fine adjustment of the front to rear deck tilt (less than 1/4" change) is accomplished by moving both front bracket-mounting bolts to different holes in the adjustment brackets (Figure 15).
Adjusting the Cutting Height You can adjust the cutting height of the mower in 1/2" increments by moving the lever on the side of the deck (Figure 16). Mowing Tips for Best Performance Turns • Use a low gear when turning. This will give you better control and a Figure 16 cleaner cut. Slopes • Use a low gear on slopes for better control, and avoid shifting gears until you're on flatter terrain. Be ready to use the brake, if necessary.
42" Lawn Mower Deck Parts List Ref# Part# Description Ref# Part# 1 2 151501 157141 3 4 5 6 7 8 9 10 11 12 13 14 15 16 17 18 19 20 21 22 23 24 25 26 27 28 29 30 31 32 33 34 35 36 151551 151491 151541 151531 157191 151631 151561 151591 123761 151701 150721 151481 151471 151271 151641 179311 157221 143661 151611 151621 110971 151601 150691 151711 165121 165161 101891 151681 151691 165141 151921 160281 110961 126851 LAWN DECK FRAME, 42" LAWN DECK HEIGHT ADJUSTMENT PLATE LAWN DECK SHAFT HANGER HANGER ROD
Frame Assembly DR® ALL-TERRAIN™ MOWER Assembly, Installation & Maintenance Instructions for the 42" Lawn Mower Deck 13
Deck Assembly 14 DR® ALL-TERRAIN™ MOWER Assembly, Installation & Maintenance Instructions for the 42" Lawn Mower Deck
Height Adjuster Assembly DR® ALL-TERRAIN™ MOWER Assembly, Installation & Maintenance Instructions for the 42" Lawn Mower Deck 15
COUNTRY HOME PRODUCTS® Meigs Road, P.O. Box 25, Vergennes, VT 05491 1-800-DR-OWNER (376-9637) • www.dr-owner.com ©2004 CHP, Inc.