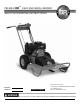
PREMIER DR® FIELD AND BRUSH MOWER SAFETY & OPERATING INSTRUCTIONS Serial No. Order No. Original Language DR® Power Equipment Toll-free phone: 1-800-DR-OWNER (376-9637) Fax: 1-802-877-1213 Web site: www.DRpower.com Read and understand this manual and all instructions before operating this PREMIER DR FIELD AND BRUSH MOWER.
Table of Contents Chapter 1: General Safety Rules 3 Chapter 2: Setting Up Your PREMIER DR FIELD and BRUSH MOWER 7 Chapter 3: Operating Your PREMIER DR FIELD and BRUSH MOWER 11 Chapter 4: Maintaining Your PREMIER DR FIELD and BRUSH MOWER 15 Chapter 5: Troubleshooting 20 Chapter 6: Parts Lists, Schematic Diagrams And Warranty 22 Conventions used in this manual This indicates a hazardous situation, which, if not avoided, could result in death or serious injury.
Chapter 1: General Safety Rules Read this safety & operating instructions manual before you use the PREMIER DR FIELD and BRUSH MOWER. Become familiar with the operation and service recommendations to ensure the best performance from your machine. If you have any questions or need assistance, please contact us at www.DRpower.com or call toll free 1-800-DR-OWNER (376-9637) and one of our technical support representatives will be happy to help you.
Safety for Children and Pets Tragic accidents can occur if the operator is not alert to the presence of children and pets. Children are often attracted to the machine and the mowing activity. Never assume that children will remain where you last saw them. Always follow these precautions: Keep children and pets at least 100 feet from the working area and ensure they are under the watchful care of a responsible adult. Be alert and turn the machine off if children or pets enter the work area.
Slope Operation Slopes are a major factor related to slip and fall accidents, which can result in severe injury. All slopes require caution. If you feel uneasy on a slope, do not mow it. Always take the following precautions when using this machine on slopes: ALWAYS: Mow across the face of slopes; never up and down. Exercise extreme caution when changing direction on slopes. Remove objects such as rocks, tree limbs, etc. Watch for holes, ruts, or bumps. Tall grass can hide obstacles.
The mower must be operated safely to prevent or minimize the risk of minor or moderate injury. Unsafe operation can create a number of hazards for you. Always take the following precautions when operating this mower: Keep in mind that the operator or user is responsible for accidents or hazards occurring to other people, their property, and themselves. Use ear protectors or earplugs rated for at least 20 dba to protect your hearing. Wear long pants while mowing.
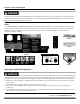
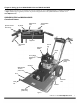
Chapter 2: Setting Up Your PREMIER DR FIELD and BRUSH MOWER It may be helpful to familiarize yourself with the controls and features of your PREMIER DR FIELD and BRUSH MOWER as shown in Figure 1 before beginning these procedures. If you have any questions at all, please feel free to contact us at www.DRpower.com.
Specifications MECHANICAL SPECIFICATIONS Engine Series Max. HP Fuel Capacity Oil Capacity Tire Size Cutting Height Cutting Width Cutting Capacity Blade Tip Speed Blade Drive Blade Material Deck Material Frame Material Drive Belts Machine Width, Length, Dry Weight Operating Weight Briggs and Stratton Intek 12.5 (9.3 kW)/3600 rpm .75 Gal (2.84 L) 48 oz. (1.42 L) 14.5" Pneumatic 4" 24" 4' High Grass, 8' High Weeds and Brush, 2" Dia.
Wear gloves and be very careful when handling the deck. The blade is very sharp, and may spin as you maneuver the deck. 5. Remove the Blade Protector from the Blade. (See CAUTION note above). Adding Oil and Gasoline You must add oil before starting the engine. This machine is shipped without oil. Traces of oil may be in the reservoir from factory testing, but you must add oil before starting the engine. Fill the reservoir slowly, checking the level frequently to avoid overfilling.
Check the Tire Pressure Do not over inflate the tires. Inflate to the manufacturer’s recommended pressure found on the tires. Tools Needed: Tire Pressure Gauge Air Compressor Valve Stem Protective Cap Figure 3 1. Remove the Valve Stem Protective Cap (Figure 3) and check the tire pressure with a tire pressure gauge. 2. If the pressure is too low, add air through the Valve Stem with an air hose. 3. Replace the Valve Stem Protective Cap when finished.
Chapter 3: Operating Your PREMIER DR FIELD and BRUSH MOWER It may be helpful to better familiarize yourself with the features of your Mower by reviewing Figure 1 in Chapter 2 before beginning the steps outlined in this chapter. The Pre-Start Safety Check Your PREMIER DR FIELD and BRUSH MOWER is fitted with an Operator Presence System to prevent the blade from turning without an operator in the proper position at the controls.
Before Starting the Engine 1. Check the oil level every time you use the machine. See Figure 2 on page 9. 2. Check the gas level. Starting 1. Move the Shift Lever to N (Neutral) (Figure 5). 2. Move the Throttle to the RUN position. NOTE: If the engine is cold, push the Throttle to “Choke”. 3. Turn the Key to START. 4. Grasp the recoil starter handle and slowly pull until you feel resistance. Let the cord retract a little bit, then pull the cord rapidly to start the engine.
Engaging the Blade NOTE: If the Throttle is not set to the RUN position, the Engine might stall when the Blade is engaged. 1. Hold down the Operator Presence Control Lever (Figure 5 on page 12). 2. Engage the Blade by pulling up on the Blade Control Knob. NOTE: If you pull up on the Blade Control Knob before holding down the Operator Presence Control Lever, the engine will shut off. Always disengage the blade of the PREMIER DR FIELD and BRUSH MOWER before shifting into reverse. Stopping the Blade 1.
Slopes When operating the PREMIER DR FIELD AND BRUSH MOWER over uneven terrain or slopes, use extreme caution not to tip over the machine. Never use the PREMIER DR FIELD AND BRUSH MOWER on slopes greater than 20 degrees (figure 6). Doing so could result in serious injury or damage to your machine. 1. If you have to mow on sloping terrain, mow across the slope, not up and down, for better control. 2. To avoid “free-wheeling”, shift into a lower gear before going down a slope.
Chapter 4: Maintaining Your PREMIER DR FIELD and BRUSH MOWER Regular maintenance is the way to ensure the best performance and long life of your machine. Please refer to this manual and the engine manufacturer's owner's manual for maintenance procedures. Service intervals listed in the checklist below supersede those listed in the engine manufacturer's owner's manual. Shut down the engine, remove the spark plug wire and wait 5 minutes before performing any maintenance procedure or inspection on the Mower.
Removing the Engine Oil Supplies Needed: SAE 30 Oil Oil Drain Container (at least 50 oz. capacity) Shut down the engine, remove the spark plug wire and wait 5 minutes before performing any maintenance procedure or inspection on the Mower. Manually: 1. Remove the Oil Filler Cap (see “Adding Oil and Gasoline” in Chapter 2) and position a suitable oil drain container under the machine near the Oil Drain Valve.
Knob 1. Remove the Belt Guard by unscrewing the black Knob and pulling the Guard up off the Stud (Figure 9). Belt Guard 2. Remove the top nut from the Tensioner Spring Bolt (Figure 10) with a 9/16" Wrench. Remove the Tensioner Spring from the Bolt Threads by gripping the Spring with your gloved hand, pulling the Spring toward the Bolt, and lifting up off of the Bolt Threads. 3. Remove the Belt from the Electric Clutch Pulley below the machine and then remove it from around the Blade Pulley. 4.
5. Remove the two Bolts, Spacers, Flat Washers and Lock Washers that guide the Belt onto the Transaxle Pulley with a 7/16" Wrench (Figure 13). 6. Remove the Belt from the Pulleys and re-install the new Belt by reversing the above procedure. Installing a New Clutch Drive Belt Bolt, Spacer, Lock Washer and Flat Washer Figure 13 Shut down the engine, remove the spark plug wire and wait 5 minutes before performing any maintenance procedure or inspection on the Mower.
Removing the Wheels Tools needed: Needle Nose Pliers 1. Block the machine so the Wheel you are removing is off the ground. 2. Remove the Retaining Ring with the Pliers. 3. Remove the Shim and slide the Wheel off the Axle (Figure 16). 4. Replace the Wheel in the reverse order as above. NOTE: Make sure the Retaining Ring in fully locked onto the Axle when installing Wheels. Wheel Retaining Ring and Shim Figure 16 CONTACT US AT www.DRpower.
Chapter 5: Troubleshooting Most problems are easy to fix. Consult the Troubleshooting Table below for common problems and their solutions. If you continue to experience problems, contact us at www.DRpower.com or call 1-800-DR-OWNER (376-9637) for support. Shut down the engine, remove the spark plug wire and wait 5 minutes before performing any maintenance procedure or inspection on the Mower. Troubleshooting Table SYMPTOM POSSIBLE CAUSE Recoil will not pull out or is difficult to pull.
Troubleshooting Table (Continued) Shut down the engine, remove the spark plug wire and wait 5 minutes before performing any maintenance procedure or inspection on the Mower. SYMPTOM POSSIBLE CAUSE Engine smokes. Machine is hard to get into reverse. If you find it difficult to shift into reverse, lightly pull the Clutch Lever as you pull the Shift Lever into Reverse then quickly release the Clutch Lever. If the difficulty persists, Visit us at www.DRpower.com.
Chapter 6: Parts Lists, Schematic Diagrams And Warranty Parts List - HANDLEBAR ASSEMBLY NOTE: Part numbers listed are available through DR Power Equipment. Ref# Part# Description Ref# Part# Description 1 2 3 4 5 6 7 8 9 10 11 12 13 14 15 Switch w/Key, Snap-in Key, Ignition Switch Switch, Push/pull TPDT Screw, 8-32 x 1/2" Pin, Spring, 3/16" x 1-3/4" Arm, Shift Upper Grip, Shift Handle Bolt, HCS, 5/16-18 x 1.
Schematic – HANDLEBAR ASSEMBLY 042810 CONTACT US AT www.DRpower.
Parts List – TRANSAXLE AND WHEEL ASSEMBLY NOTE: Part numbers listed are available through DR Power Equipment. Ref# Part# Description Ref# Part# Description 1 2 3 4 5 6 7 8 9 10 11 12 13 14 15 16 Nut, Nylon Lock, 5/16-18 Washer, Flat, 1/4", USS Guide, Belt Bolt, HCS Shoulder, 3/8-16 x 2-1/2 Bolt, HCS, 5/16-18 x 3/4, Gr5, zp Nut, Nylon Lock, 3/8-16 Bolt, HCS, 3/8-16 x 2-1/2", Gr5, zp Washer, Flat, 3/8 USS Pulley, Flat Idler, 3" Arm, Idler Bushing, .39ID x .62OD x 1.
Schematic – TRANSAXLE AND WHEEL ASSEMBLY 042810 CONTACT US AT www.DRpower.
Parts List – BRUSH DECK ASSEMBLY NOTE: Part numbers listed are available through DR Power Equipment. Ref# Part# Description Ref# Part# Description 1 2 3 4 5 6 7 8 9 10 11 12 13 14 15 16 17 257051 143661 110751 101621 112391 150611 247451 180121 150691 123211 110761 257061 129601 246771 257031 101771 234021 Cover, Deck, w/ Labels Knob, handlebar, 5/16-18 Nut, Nylon Lock, 3/8-16 Spring, E, .750OD, .105wire, 5.0L, zp Washer, Flat, 3/8, USS Arm, Idler, Traction Drive Bushing, Idler Pulley, Flat Idler, 3.
Schematic – BRUSH DECK ASSEMBLY 042810 CONTACT US AT www.DRpower.
Parts List – ENGINE AND CLUTCH ASSEMBLY NOTE: Part numbers listed are available through DR Power Equipment. Ref# Part# Description Ref# Part# Description 1 2 3 4 5 6 7 8 9 10 11 12 13 Engine, 12.5Hp, B&S m/s IntekVert Nut, Nylon Lock, 5/16-18 Wire Harness, 12.5 B&S Nut, Finish, 5/16-18, zp Frame, Rear Bolt, HCS, 5/16-18 x 1-3/4, Gr5, zp Washer, Flat, 10-24, USS Washer, Split Lock, 1/4, zp Spacer, .25 ID x .375OD x 1L Bolt, HCS, 1/4-20 x 1-1/2, Gr2, zp Key, Square, .250 x 2.
Schematic – ENGINE AND CLUTCH ASSEMBLY 042810 CONTACT US AT www.DRpower.
Notes: 30 PREMIER DR® FIELD AND BRUSH MOWER
PREMIER DR® FIELD and BRUSH MOWER 2-Year Limited Warranty Terms and Conditions The PREMIER DR FIELD and BRUSH MOWER is warranted for two (2) years against defects in materials or workmanship when put to ordinary and normal consumer use; ninety (90) days for any other use. For the purposes of all the above warranties, “ordinary and normal consumer use” refers to non-commercial residential use and does not include misuse, accidents or damage due to inadequate maintenance.
Daily Checklist for the PREMIER DR FIELD and BRUSH MOWER Shut down the engine, remove the spark plug wire and wait 5 minutes before performing any maintenance procedure or inspection on the Mower. To help maintain your PREMIER DR FIELD and BRUSH MOWER for optimum performance, we recommend you follow this checklist each time you use your Mower.