
Instruction manual


5
[
1
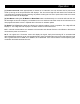
] (CH-UP) button: Increments current tuned channel to the next higher channel. Holding this button down
will fast scroll through the channels. Channel display will blink to indicate displayed channel is in selection
and has not been entered. Press ENT button to confirm. If 5 seconds pass without pressing the ENT button,
the display will return to its last programmed state and stop blinking.
[2] (CH-DN) button: Decrements channel to next lower major channel. Holding this button down will fast scroll
through the channels. Channel display will blink to indicate displayed channel is in selection and has not been
entered. Press ENT button to confirm. If 5 seconds pass without pressing the ENT button, the display will
return to its last programmed state and stop blinking.
NOTE: The DTS860 requires the actual RF Channel setting, not the virtual channel number.
Most broadcasters maintain their analog channel identity by utilizing the new digital channel’s PSIP (Program
and System Information Protocol) feature. It may also be referred to as the “tune to” (NAB) or as a “virtual”
channel. Digital TV’s along with digital demodulators such as Drake's DAV860 use the virtual channel number to
tune to the particular program that in most cases is transmitted over a completely different channel number. This
is not the case with the DTS860. To find the actual RF channel, use the following website: www.antennaweb.org
[3] Two Digit Channel Display: Used to identify program channel. The decimal point will always be lit. For
channels above 99, the +100 LED will be lit.
[4] One Digit Channel Display: Indicates the current frequency/channel plan.
S = STD (CATV)
I = IRC (CATV)
H = HRC (CATV)
A = Off Air (Broadcast UHF/VHF)
[5] +100 LED: For channels above 99, the +100 LED will be lit. For example, for standard CATV channel
125 the +100 LED will on and number 25 will display on the 2-digit display "S" on the 1-digit display.
[6] Lock LED: Lights when set for QAM input mode.
NOTE: If the unit is not locked to the incoming channel, the LED will flash.
[7] ENT button: Must be pressed to confirm channel selection, RF mode, and baud rate.
[
1
] [
2
]
[
3
]
[
4
]
[
10
]
[
11
]
[
5
]
[
6
]
[
7
]
[
8
]
[
9
]
Front Panel Controls & Indicators