For Models: HD-52G886 HD-52G786 HD-56G886 HD-56G786 Illustration In the spaces below, enter the model at the rear of the television cabinet). inside Keep cove[ reference. of this guide, Keep Model Number: Serial Number: the carton and serial Staple this user's and original of HD-56G886 number your guide packaging of your sales receipt and RM-C14G television or invoice in a convenient for future (located to the P!ac e for future use.
RISK OF ELECTRIC SHOCK DO NOT OPEN CAUTION: To reduce the risk of electric shock. Do not remove cover (or back). No user serviceable parts inside. Refer servicing to qualified service personnel. The lightning flash with arrowhead symbol, within an equilateral triangle is intended to alert the user to the presence of uninsulated "dangerous voltage" within the product's enclosure that may be of sufficient magnitude to constitute a risk of electric shock to persons.
This product incorporates copyright protectio n techno!ogy that is protected by U.S, patent s I and other intellectual property rights. Use of this Copyright protection technology must be authorized bY Macrovisi0nl and is intended for home an d Other limited viewing Uses only unles s otherwise authorized by Macrovision: Reverse engineering or disassembly is I proh b ted: 1) Read these instructions. 2} Keep these instructions. 3) Heed all warnings.
13) Unplug this apparatus 14) Refer all servicing to qualified service personnel. Servicing is required when the apparatus has been damaged in any way, such as power-supply cord or plug is damaged, liquid has been spilled or objects have fallen into the apparatus, the apparatus has been exposed to rain or moisture, does not operate normally, or has been dropped. during 15) Apparatus shall not be exposed to dripping vases, shall be placed on the apparatus.
Normally, light dusting with a soft, non-scratching duster will keep your TV clean. If you wish to wipe down the television, first unplug it. Then wipe gently with a soft cloth, slightly moistened with water. You can add a few drops of mild liquid detergent to the water to help remove spots of oily dirt. • • • • DO DO DO DO NOT NOT NOT NOT allow liquid to enter the TV through the ventilation slots. use strong or abrasive cleaners on the TV. spray liquids or cleaners directly on the TV's surface.
Thank you for purchasing JVC's model HD-52G886, HD-52G786, HD-56G886 or HD-56G786 HDTV-ready projection television which uses the high-quality HD-ILA projection system. This is one of the highest quality and most technologically advanced televisions available today. It is recommended that you read this instruction manual before using your television in order to learn about it's many features.
4. The television requires a lot of electrical power It is recommended that the television is connected directly to the wall socket, and not to another device. When connecting the television to a wall socket that is being used by another device, or when using an extension cord, be careful not to exceed the electrical capacity of the socket.
."[o] ! I a[o |__'T'_i !! F:'t .......... ri1_ldilliTi__ _q_i] _4:1_,'1"=4 ;il u°............ 114 Unpacking your TV ............ TV Models ................ TV Remote Control ........... 10 12 14 Getting Started ............. The Remote Control .......... Connecting Your Devices ....... Interactive Plug In Menu ........ 15 15 16 30 _(_ i IEOl_ _ a[o[i I a[':l i II i II I aTo, Setting CATV, VCR and DVD Codes CATV or Satellite Codes ........ VCR Codes .............. DVD Codes ..............
L]t;Ti_7I-_o i, .......... Digital Setup ............. Antenna Level ............. 78 78 Digital Sound ............. Aspect Ratio ............. Cable Card Application ......... i.LINK Auto Play ........... Software Update ........... 79 79 80 80 80 Digital CH D/A (DigitallAnalog) Sub Channel ............. i.LINK Menu ............... Controller ............. Device .............. Timer ............... Reservation .............. Timer Edit .............. Guide ...............
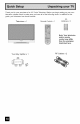
Thank you for your purchase of a JVC Color Television. Before you begin setting up your new television, please check to make sure you have all of the following items. In addition to this guide, your television box should include: AA Television x 1 Remote Control x 1 Batteries x 2 Note: Your television and/or remote control may differ from the examples illustrated here.
Once YOU have unpa0ked yourtelevision, thenextstepis toconnect ittoyourantenna! I cable orsatellite sYstem andtoconnect theaudiQ/yideo devices yOU want tousewithy0ur te ev s on-To make these connect 0ns you w use pugs ke the ones ustrated be 0w: Used to connect an external antenna or cable TV system to your TV. _._v_ _,j [o,_"t __ Used to connect audio/ video devices like VCRs, DVD players, stereo amplifiers, game consoles, etc. r_*\vJ [l_.].i ,], i!1_ ._ [e,Fl.'1[:.
NOTE: Before you connect your television to another device, please refer to the proper diagrams for your specific TV and remote. These will help assist you in understanding how to connect your television to another device, as well as use the remote to set up your television. Ir,.l':"-_"f'i I".,_"1_I'_ I Im]_'._L_l Jlt MODELS: HD-52G886 HD-52G786 HD-56G886 HD-56G786 SERVrCE ONLY © Note: The terminal labeled "SERVICE ONLY", is exclusively used to update the software version.
Ii'll ".,_ • For information MODELS: Im]F_J_1J_1 on the LED, see page 92. HD-52G886, HD-52G786, HD-56G886, HD-56G786 HD-56G886, HD-56G786 [,:']_L'_Ji'.
MODELS: HD-52G886 HD-52G786 HD-56G886 HD-56G786 • For information on remote control buttons, see pages 67 - 77 and 81 - 86. • i.LINK MENU, TIMER, SUB CHANNEL, FAVORITE and GUIDE buttons are for digital channels. If your TV is connected to an ATSC antenna or Digital Cable, you can use these buttons.
[,,_'_;h"Ti FA_I/ These quick setup pages will provide you, in three easy steps, with the basic information you need to begin using your new television right away. If you have questions, or for more detailed information on any of these steps, please consult other sections of this manual. Before you can operate your remote control, you first need to install the batteries (included). Slide the cover on the back of the remote down towards the bottom of the remote control.
Tomake these connections, youwilluseplugs liketheones illustrated below. [,,,'_SvJt'; L'_'_ [*,_"t __ Used to make video connections with S-Video VCRs, Camcorders and DVD players. Used to connect audio/video devices like VCRs, DVD players, stereo amplifiers, game consoles, etc. Notes: • These connections are examples. • After you are finished connecting outlet and turn on the TV.
VCR Connection Notes: • Green, blue and red are the most common colors for DVD cables. Some models may vary colors. Please consult the user's manual for your DVD player for more information. • Be careful not to confuse the red DVD cable with the red audio cable. It is best to complete one set of connections (DVD or audio output) before starting the other to avoid accidentally switching the cables. • You may also connect the DVD player to Input 1. Diagram #1 CaMe or Antenna VCR Output R I.
Diagram #2 Cable or Antenna Output VCR Two=Way Two-Way Splitter Splitter (Attachment) TV Rear Panel TV Rear Panel TV Rear Panel Green B_ue Red DVD Player (OPTIONAL)
Connecting to Monitor/Recording TV Rear Output Terminal Panel ioo_® ® ®=@ Notes: • When you make this connection, set the Video-1 Monitor Out menu to ON. See page 57. • If you are receiving ATSC/Digital Cable signal, it can be outputted to the S-Video output terminal or Video (composite video) terminal. • If you are receiving Analog TV signal, it can not be outputted to the S-Video output terminal.
Connecting to JVC AV Compu Link JVC's AV CompuLink feature makes playing wdeo tapes or DVDs totally automatic. S,reply insert a pre-recorded tape into your JVC brand VCR or DVD into your JVC DVD player and the device Will automatically turn on and begin playback. At the same time, using the AV CompuLink the VCR or DVD player sends a signal to the television telling it to turn or and switch to the proper video input.
Connecting to a Camcorder You may connect a camcorder, gam e console Or other equipment to you r television by using the side input jacks (Input 4) located on the side of the television. You can also connect I these us ng the te ev s On s rear nput jacks, us ng the same nstruct ons. CAMCORDER 1) Connect a yellow composite cable from the camcorder VIDEO OUT, into the VIDEO IN on the side of the TV, OR connect an S-Video cable from the side of the TV to the camcorder.
Connecting In multi-channel to the Surround Amplifier sound such as5,1 channel, the Speech characters are played back fr°m the center speaker, A center speaker in a movie theater is set in back of the screen so it Can recreate a conversation Scene in the movie more natura!ly, By Using Your TV!s SPeake r as th e center speaker, you can obtain the same SOUnd effect as in a movie theater in yOU home theate r sound system.
Connecting to an amplifier using your optical output You can connect an amplifier that has an optical digital input terminal by using an optical digital cable from the optical output. The signal that is output can be PCM or Dotby Digital. TV Rear Pane] Amplifier 1) Connect the optical cable from the back of the TV to the back of the amplifier. Notes: • This terminal can only output digital audio. • In order to use the optical output connection, the Digital Setup Menu. See page 79.
Connecting to a Digital TV Receiver By connecting a Digital TV Receiver, high definition pictures can be displayed on your TV in their digital form. TV Rear DTV Panel Decoder HDMI to DVI /_f_er the collllectiolls tightell the screw CaMe have to secure beer_ made. the cables 1) Connect the HDMI to DVI Cable from the DIGITAL OUT on the back of your DTV decoder the DIGITAL-IN on the back of your television.
Connecting to an HDMI Compatible Device By connecting an HDMI compatible device, high definition pictures can be displayed on your TV in their digital form. Some HDMI devices can include DVD players, D-VHS or any HDMI compatible devices. HDMI (High Definition Multimedia Interface) is the first industry supported, uncompressed, all digital audio/video interface.
Connecting to an AV Receiver V1 Smart Input using your television's By connecting your AV Receiver to your television's V! Smart Input, you can watch picture sources from many different devices, without having to change or use the other input connections on your TV. This allows you to free up the other input connections so you can connect more devices to your television. AV Receiver _S MONITOR _ Pb I TV RearPane! 1) Connect an S-Video Cable from the AV Receiver's on the back of your television.
Connecting an LLINK your television compatible device to the back of i.LINK is a digital serial interface that allows devices equipped with an i.LINK connector to exchange digital video signals, digital audio signals and device control signals bi-directionally over a single cable. (For example, a JVC D-VHS VCR). i.LINK refers to the IEEE1394-1995 industry specification is used for products compliant with the i.LINK standard. and extensions thereof.
Connecting This TV connect want to connect to the computer can be used as a computer screen. Use a commercially available D-SUB cable to the TV's PC INPUT terminal to the computer's analog RGB output terminal. If you listen to the sound from the computer, use a commercially available RCA cable to the INPUT-3 audio input terminal to the computer's audio output terminal. TV Rear Pane] Notes: • Refer to your computer manual for a detailed explanation computer.
Table of signals for each type of computer Resolution 640 x 480 Vertical Horizontal Frequency (Hz) Frequency (kHz) 600 31 5 600 484 (VGA) 1024 x 768 (XGA) • Only the above formats are supported. • Even with the above formats at 60 Hz, some problems may be experienced depending on the quality of the synchronous signal. (Depending on the quality, some pictures may not be displayed correctly). • Apple Macintosh* computers are not supported.
When you turn your television on for the first time the interactive plug-in menu will appear. The plug-in menu helps you to get your TV ready to use by letting you set your preferences for: • The language in which you want the onscreen menus to appear. • Setting the TWs clock to the correct time so your timer functions will work properly. You can choose "AUTO" or "MANUAL" for setting the clock. • The auto tuner setup of which channels you wish to receive. We recommend television.
Auto Clock Set Before you use any of your TV's timer functions, you must first set the clock. You may precisely set your clock using the XDS time signal broadcast by most public analog broadcasting stations. If you do not have this in your area, you will have to set the clock manually. See manual clock set below. To set the clock using the XDS signal: • IMODE I_ To select your time zone: (Atlantic, Eastern, Centrat, Mountain, Pacific, Alaska or Hawaii) _AUTO!, "riME ZONE liME A "/: • D.S.T.
Auto Tuner Setup In auto tuner setup, the TV automatically scans through all available channels, memorizing the active ones and skipping over blank ones or channels with weak signals. This means when you scan (using the CHANNEL+/-- buttons) you will receive only clear, active channels. There are two tuner modes to choose from, ANALOG or DIGITAL.
" I You can program your remote to Operate your Cable box, Satellite receiver, VCR or DVD player by Using the instructions ancl Codes listed below. If the equipment does not respond to any Of the Codes listed be!0w 01 t0 the code search functi0n, use the [emote €0ntr0! supplied by the manufacturer_ [_1_ ['_11 :_)'_[.ld _',r_l_lllitl [61t_ The remote control is programmed with cable box and satellite codes for power on/off, channel up/down, and 10 key operation.
The remote control is programmed with VCR codes for power on/off, play, stop, fast-forward, rewind, pause, record, channel up/down operation. 1) Find the VCR brand from the list of codes shown below. 2) Slide the first 2-way selector switch to "TV" and the other 2-way selector switch to "VCR". 3) Press and hold down the DISPLAYbutton, then enter the first code number listed with the 10 key pad. 4) Release the DISPLAYbutton, and confirm the operation of the VCR.
The remote control is programmed with DVD codes for power on/off, play, stop, fast-forward, rewind, previous/next chapter, tray open/close, and still/pause operation. 1) Find the DVD player brand from the list of codes shown below. 2) Slide the first 2-way selector switch to "TV" and the other 2-way selector switch to "DVD". 3) Press and hold down the DISPLAYbutton, then enter the first code number listed with the 10 key pad. 4) Release the DISPLAYbutton, and confirm the operation of the DVD player.
Cable/Satellite Search Codes Function 1) 2) 3) 4) Slide the first 2-Way Mode Selector switch to CATV. Press the POWERand RETURN+/TV buttons. Hold for at least three seconds and release. Press the POWERbutton on the remote, and see if the cable or satellite box responds. If there was a response, press RETURN+/TV. The codes are now set. If there was no response, repeat Step 3. If you repeat Step 3 a total of 80 times without a response, use the remote control that came with your equipment.
Certain symbols areused throughout thisguide tohelpyoulearnabout thefeatures ofyour newtelevision. Theones youwillseemost frequently are: J.V Up and buttons • Move • Move • Move • Back • Scan Down arrows mean press the CH+ or CH- buttons.
Your television comes with JVC's onscreen menu system. The onscreen menus let you make adjustments to your television's operation simply and quickly. Examples of the onscreen menus are shown on the next page. Detailed explanations on using each menu follow later in this guide. For information about the interactive plug-in Menu, see pages 30 - 32. To open the onscreen menu system, press the MENU button on the remote control.
_) Press theMENU button TO INITIAL SETUP 03 PREVIOUS ISET _ PREVIOUS CLUCK ON/OFF LAMP _ TIMERi TIMER RESET _ • V]D_U]'" _ TV _QFF SPEAKER AUDIO D_G_TAL _ON_ OUT _ VAR] 4N 4 S_ZE1 DIGITAL-IN _NEXT PAGE "NEXT CLOCK/TIMERS INITIAL SETUP 04 _ D_GITAL Dlt POW_._ PAGE (5/5) _ NFXT INITIAL SETUP 05 ) I (1/5) V,'DFO _NPUT_NPUT LABFL v1 SMART NEXT r _ I INITIAL SETUP 01 Dlt D tD AUDIO PAGE k _ON ,'CATOR 4 OFF PAGE SOUND ADJUST INITIAL SETUP 02 D tD I eo .
r-,T!1_i _ G,'l_m,j The auto tuner setup function is described on page 32 as the interactive plug-in menu. need to run the auto tuner setup again, follow the steps below. If you Press the MENUbutton a.V To AUTO TUNER SETUP • I_ To operate a.V To TUNER MODE (IN ANALOG) • I_ To choose CABLE, AIR or SKIP a.
Channel summary allows youtocustomize theline-up ofchannels received byyour TV. Regarding analog channels, youcanaddordelete channels fromtheline-up orprevent any unauthorized viewers fromwatching anyorall191channels. Regarding digital channels, the onlychannels thatwillappear aretheones thatarebroadcasting. (_ Press theMENU button AV ToCHANNEL SUMMARY I_ Tooperate TheChannel summary screen willnowbedisplayed with thechannels settoscan marked withan%".
How to set the channel label. (This is only for analog broadcasting.) Press the MENU button J.y • I_ J.V To CHANNEL SUMMARY To operate To the ID column (_ Press the OK button to enter • I_ Ay To select the character you want To move to the next space CHANNEL ...
When aviewer attempts towatch aguarded channel, thefollowing message appears: Towatch achannel thatyouhave locked, enter the Lock Code using the!0keypad. Ifthewrong code isentered, themessage "INVALID LOCK CODEF wilIflash onthescreen. Thechannel cannot beaccessed untilthecorrect code isentered. Notes: • Once achannel hasbeen unlocked, itwillremain unlocked untilthetelevision isturned off. • Seealso"SetLock Code", page 49.
Unrated programming refers to any programming which does not contain a rating signal. Programming on television stations which do not broadcast rating signals will be placed in the "Unrated Programming" category.
U.S. PARENTAL RATING SYSTEMS Programs with the following ratings are appropriate for children. TV Y is Appropriate for All Children Programs are created for very young viewers and should be suitable for all ages, including children ages 2 - 6. TV Y7 is for Older Children Most parents would find such programs suitable for children 7 and above. These programs may contain some mild fantasy violence or comedic violence, which children should be able to discern from reality.
f9 Press the MENUbutton I.V • • To V-CHIP To operate (lock icon _ [V-CH_P SET US -Iv [:b_,TIN G S appears) SET MOVIE SET CANADIAN RATINGS ENG _ CANADIAN RATINGS FRE _ 9 Press ZEROto access the V-Chip menu SET • • To turn V-Chip ON or OFF UNRATED J.V To move to SET US TV RATINGS • • To operate RATINGS _ ] J I _Vt_:W Line up the cursor in the column (TV PG, TV G, etc.) with the content row (V/FV, S, etc.) and press the J.V or •• to move the cursor to the correct location.
NR- NotRated Thisisafilmwhich hasnorating. Inmany cases these filmswere imported fromcountries which donotusetheMPAA ratings system. Other NRfilmsmaybefromamateur producers whodidn't intend tohave their filmwidely released. NR (Not Rated) Programming may contain all types of programming programming, foreign programs, or adult material.
E - Exempt Exempt programming includes: news, sports, documentaries and other information programming, talk shows, music videos, and variety programming. C - Programming Intended for Children Violence Guidelines: There will be no realistic scenes of violence. Depictions of aggressive behavior will be infrequent and limited to portrayals that are clearly imaginary, comedic or unrealistic in nature.
[,-1'_1111[_'4,ql:_ _ Channel guard and V-Chip settings are protected by a four-digit Iock code. Your TV comes preset with a lock code of "0000". You may change the code to any four-digit number you wish. To change the lock code, follow the steps below.
This function lets you preview the Dynamic Gamma demo. (_) Press the MENU button J.V • • To AUTO DEMO To turn AUTO DEMO ON or OFF PREVIOUS AUTO TUNER CHANNEL V-CH_P Note: SET • To stop auto demo, press the BACK button. Press the Menu button AV To LANGUAGE I2 I I CODE _ I {OFF } plug-in menu. If you need to PREVIOUS [ LANGUAGE • • I } DEMO The language function is described on page 30 as the interactive choose the language again, follow the steps below.
Many broadcasts now include an onscreen display of dialog called closed captions. Some broadcasts may also include displays of additional information in text form. Your television can access and display this information using the closed caption feature. To activate the closed caption feature, follow the steps below. There are three methods. When you are watching analog channels, you can perform Analog Setting of closed caption.
Digital Manual Setting Press the MENU button J.V To CLOSED CAPTION • I_ To enter AT • I_ J.V • I_ To To To To Type select Auto, Advanced or Basic Service select 1, 2, 3, 4, 5 or 6 J.V • I_ • I_ J.V • I_ To To To To To Appearance enter select Manual Font enter J.
Thisfunction automatically shuts offyourTVwhen there isnosignal fromthechannel the TVison. (_ Press theMENU button J.V • • To AUTO SHUT OFF To turn ON or OFF CLOSED AUTO (_ Press the MENU button when finished • If the channel that you have on does not receive a signal for more than one minute, the blinking text "NOT RECEIVING A SIGNAL AUTO SHUT OFF XDS CAPTION SHUT OFF ID _'NEXT PAGE (3/5) IN 9 MIN." appears on the screen, and starts the countdown.
This allows you to look the keys on the side of the TV, so that a child may not accidentally change your viewing preferences. Press the MENUbutton J.V i_ To FRONT PANEL LOCK To turn ON or OFF (_ Press the MENUbutton when finished PREVIOUS NOISE MUTING FRONT PANEL Vl SMART VIDEO • Unplug the power cord, and plug it back in. Do this if your batteries die, or you Iose your remote control.
This function is used to label video input connections (_ Press the MENUbutton AI'V To VIDEO INPUT LABEL "_ I1_ ,_'_ • I_ I2 12 for the onscreen displays.
I'.Z_'_'T r.,T_l_'_;_'i'T'_! Position adjustment allows you to adjust the position of the picture on the screen vertically when the aspect is set to panorama, cinema or full. (_ Press the MENUbutton Ay • • To POSITION ADJUSTMENT To enter Ay •• To adjust the position (_}) Press the MENUbutton to finish Notes: • To reset the adjustment OK button. to the center, press the • When the arrow disappears, maximum limit.
kVJt'; L_'511_v_ _7_Tfl;_"J'l[o]'!'ll This function allows you to set whether the signal, which comes from VIDEO-1 input terminal, should be output from MONITOR OUT terminal. If you select it from MONITOR OUT, set it to "ON".
The DIGITAL-IN option can only be displayed in the INITIAL SETUP menu when an HDMN80p picture signal is being input to the DIGITAL-IN terminal. This option adjusts the position when an HDMI or DVI 480p picture signal is being displayed on the screen. There are two types of HDMI480p picture signals: 640x480 and 720x480. If the displayed picture is slightly shifted, the position can be adjusted by selecting either SIZE1 or SIZE2. (_ Press the MENUbutton J.V • I_ To DIGITAL-IN To enter J.
[.]:l When you are using a surround system, you can substitute the speaker of this television for the center speaker of your surround system. Set CENTER CH INPUT to ON when you use the speaker as the center speaker of your surround system. The volume differs when the TV is being utilized as the Center Channel Input versus when it is not.
These settings allow youtochange andadjust thewaythepicture appears onyourtelevision. TINT Tintallows youtoadjust thelevels ofredandgreen inyourTVpicture. COLOR The color function lets you make all the colors in the TV picture appear either more vivid or subtle. PICTURE Picture allows you to adjust the levels of black and white on the TV screen, giving you a darker or brighter picture overall. BRIGHT You can adjust the overall brightness of the TV picture with the Bright control.
With digital noise clear, this helps take our static or noise from a channel that may not be coming in clearly. (_ J.V • • Press the MENUbutton To DIG. NOISE CLEAR To enter J.V To select the mode LOW, HIGH, AUTO or OFF (_ Press the MENUbutton when finished Note: • "AUTO" can only be displayed when you have NTSC and 480i picture signal being inputted. This TV supports the COLOR MANAGEMENT to produce natural hues. (_ J.V • • J.
[,,"]Ti_';!_".J-l_l!Ti'_ Smart Picture detects the APL (Average Picture Level) and adjusts the contrast suitable for what you are watching. Press the MENUbutton J.V • • AV To SMART PICTURE To enter To select the mode "ON" or "OFF" Press the MENUbutton when finished Note: • When you have "DYNAMIC" selected in the "VIDEO STATUS", Smart Picture is not selected.
_"_ I _'-_;;1'_ These settings allow you to change and adjust the sound on your television. BASS - You can increase or decrease the level of low-frequency the bass adjustment. TREBLE - Use treble to adjust the level of high-frequency sound in the TV's audio with sound in your TV's audio. BALANCE - Adjust the level of sound between the TV's left and right speakers with the balance setting. _'_j_ J.V • I_ J.
[,."_I[@t'_ t'l The set clock function is described on page 31 as the interactive plug-in menu. You can choose to set the clock automatically or manually. If you need to set the clock again, follow the steps below. J.V • • Press the MENU button To SET CLOCK To enter When you set the clock automatically, J.V • • choose AUTO by pressing the • or • arrows. To TIME ZONE To select your time zone _+A+LANT_C *--_EAS+ERN _CENTRAL_MOUNTAIN_ ] _"RAWAH _* ALASKA _ PACIFIC "+ I +.V JMODE To D.S.T.
[o]'TY£o]iin _ The on/off timer lets you program your television to turn itself on or off. You can use it as an alarm to wake up, to help you remember important programs, or as a decoy when yodre not home. (_ Press the MENUbutton a.
Thelamp replacement message willappear when youneed tochange thelamp.After you replace thelamp, youneed toreset thetimer which isbuiltintoyourtelevision. (_ Press theMENU button J.V To LAMP TIMER RESET • • To Enter PREVIOUS BET CLOCK ON / OFF T_MER The following message will appea_ NEXT PAGE Press the OK button while the above message appears on the television screen. The lamp timer has now been reset. Notes: • You can use the Lamp Timer Reset only after replacing the lamp.
Your television hastwokinds ofscreen: TWIN (2channels) andINDEX (12channels). Note:After youpress anymuItiscreen buttons, ifyoupress themenu button, onlythepicture adjust screen willappear. Activate thesplit-screen option bypressing TWIN on theremote control. Thechannel (orinput) youwere watching before pressing TWiN willappear ontheleft, thenewchannel willappear ontheright. Thesound willcontinue tocome fromthemain screen channel (orinput).
This allows you to quickly look at up to !2 channels at a time so that you can decide which one to watch. 1 2 3 4 5 6 7 8 11 12 9 10 Notes: • Only RF input signal will be displayed. • You can watch the channel added in channel summary. See page 41. Pressing the FREEZEbutton causes the screen to change to the split-screen display with the still picture displayed on the right. In order to return to the normal display, press the FREEZEbutton once again.
Turns theTVonoroff. Press thePOWER button Note: • Afterturning thepower on,youcannotturnthepower offforabout oneminute. I_[!1/11,'1'_'t I:I'rii[i[7_'#'41 1 [a][f'4_ ".,_"11_1 Use the number buttons on the remote controt to move directly to a specific channeI. For example, to move to channet 12: (_ O (Zero) 1 (One) (_) 2 (Two) Lets you decide the input channel and select it. After you press the number buttons on the remote, press the TUNE button.
I:_PlIII _iiv4 The RETURN+/TV button has three functions: Return - Returns to the channel viewed just before the channel currently onscreen. Return+ - Lets you program a specific channel to return to while scanning through the channels using the CH+ and CH- buttons. TV - Returns to the TV mode. (_) Press the RETURN+/TV and hold for three seconds The channel currently active has been programmed as your return+ channel. Now scan through the channels using the CHANNEL+/--buttons.
TheMUTING button instantly turns thevolume down completely when youpress it. Press MUTING andthevolume level wiIIinstantIy gotozero. Torestore thevolume toitsprevious IeveI, press MUTING again. TheVIDEO STATUS button gives youachoice offourTVpicture display settings, incIuding a display ofyourownpreferences. Standard - Resets thepicture display tothefactory settings. Dynamic -Gives avividpicture withbetter contrast when viewing in abrightly litroom.
The Sleep Timer can turn the TV off for you after you fall asleep. Program it to work in intervals of 15 minutes, for a total time of up to 180 minutes. I2 Press the SLEEPbutton _0 153045607590 105 120 135 150 165 180 _] Sleep Timer Message 20 seconds before the automatic shutoff, this message will appear: You then have 20 seconds to press the SLEEPbutton to delay the shut off for another 15 minutes.
The display screen shows the current status of timers, inputs and XDS ID.
The Favorite button allows you to select your favorite channels easily. the channels that you like. See how to register below. (_ Press the FAVORITEbutton The favorite channel list wil! appea_ J.V To select the channel you want to watch First, you must register PREVIOUS 101 CBS 102 (_ Press the OK button It wil! change to the channel you have selected. D103 PBS2 < D107 Register the favorite channel 8 Press the channel number you want to register The channel program wil! change.
Thisfeature willheIpyouadjust thepicture youarewatching togiveyouthebestpossible picture quaIity. PANORAMA -Withthisratio anormal 4:3aspect picture isstretched tofitthe dimensions ofthe16:9aspect screen. CINEMA -Thisratio"zooms in" on the REGULAR - The regular ratio is used when you want to watch a 4:3 broadcast or recorded program without modifying the original picture to fit the dimensions of your 16:9 screen.
Press the ASPECTbutton • By pressing the ASPECTbutton, you can change the size. When you change the aspect ratios, it is different from their broadcast or recorded program. NTSC, 480i, 480p HD (!080i, 720p) ATSC (!O8Oi, 720p) ATSC (480i, 480p) PC Notes: • You can also choose the size by pressing the J.V buttons. • When you change the aspect ratio or signal, reset the picture position to center.
Useeither thetelevision's owntuner oracable boxtoselect channels. Setthisswitch toTVto operate thetelevision's built-in tuner. Move theswitch toCATV tooperate acable box. Note: • Seepage33forinformation onprogramming yourremote forcable boxoperation. Youcancontrol aVCRorDVD player withthebuttons onthelower partoftheremote control. Move theslideswitch toVCRorDVD tooperate. Notes: • Theremote ispreset withthecode 000tocontrol JVC-brand VCR's.
Use this function when you are receiving a digital broadcast. (_ Press the MENUbutton J.V To DIGITAL SETUP • • To enter The onscreen will appear c_bl_cardAp_lio_J, Notes: • Software Update will only appear when the SD Card is inserted. • If you are watching an analog channel, you can still access the digital setup menu at anytime, while you are doing this, the background screen will turn blank. In this case, the tuner will switch to digital, since you are accessing the digital setup menu.
Youcanselect theoptical digital sound output, either PCM orDolby Digital when yourTVis connected toanamplifier thathasDolby Digital decoder. Ifyouselect Dotby Digital, youcan enjoy listening in5.1ch sound when watching digital broadcasts. (_ Press theMENU button J.
(_D Press theMENU button J.y • • To DIGITAL SETUP To enter J.V • • To Cable Card Application To enter (_ Press the OK button The application will perform i!!!l_l[f:fri_ I".,I_,i When playing a D-VHS tape, you can set it to the i.LINK input automatically, or manually. Press the MENU button AV To DIGITAL SETUP To enter AV To i.LINK Auto Play To select ON or OFF ON: Set to i.
m mIl_ll_ I_ -" ImTl-'ll mlIIL'_ll_ (l-'l'_'_'l(_r]f m The D/A button changes the analog and digital channel. Each time you press the D/A button, you can switch back and forth the analog and digital channels. Digital channels have a "D" in front of the channel number. Note: • If the cable card is inserted into the TV, you cannot use the D/A button. digital channel only.
1fi!Ial[4 hV_TT!l i.LINK has two menus - Controller and Device. By connecting a D-VHS VCR with an i.LINK cable, you can set the timer easily. Notes: • The i.LINK/Timer function will only work when you are receiving digital programming only. • As for the connection of a D-VHS VCR with the i.LINK cable, see page 27. • When operating the i.LINK, don't insert or disconnect the i.LINK cable. Controller You can operate a D-VHS VCR connected with an i.LINK cable by using this controller. Notes: • If the i.
Device To operate, select a device. AT To select your device connecting with i.LINK Press the OK button Notes: • If you do not select the device, you cannot use the i.LINK timer functions. • When one device is selected and you select controller, you will move to the Controller onscreen. • The devices listed on the device onscreen are only D-VHS and HD-MOVIE that have i.LINK, which can be recognized on this television. However, you can not record programs to HDMOVIE.
You can set the two timers: Record and view. The timer starts the recording or turns to the channel you set for it automatically.
Timer Edit When you want to confirm the timer you set or edited, or delete the timer setting, use this function.
Cancel the timer recording When you record a digital program now, you can cancel the recording. (_ Press the TIMERbutton iV To select the timer list you want to cancel the recording Press the OK button iiiiiiiiiiiiiiiiii///iTi7 _ _i" """_ iiiiiiiiiiii_ iiiiii_,_ i i 7f The message "Do you want to terminate current program ?" will appear.
L'A'L':'_I_t ,'4L_J,"T'tI This OSD warning appears when the digital channel that you have selected is too weak to receive or no signal is being detected for that channel. I_ I¢I'_] _1Jil If the TV channel you selected, or were watching is not receiving a signal, "NO PROGRAM" appears on the television screen. It appears when that channel is not receiving a signal and you have the Noise Muting function OFF and you have a single screen.
Cable card offers information back of the TV. when a cable card is inserted into the CABLE CARD slot on the Notes: • Please contact your local cable company regarding detailed information.
There is no power • Check for a blown fuse or circuit breaker or a power outage. • It is possible the fan is stuck or the inside temperature is rising Consult The POWLR LED and LAMP/PROGRAM abnormally your dealer.
There is no sound • The Center CH input from the TV's • The TV Speaker may be turned on. option may be turned See page 59.
LAMP. Touching the glass surface will deposit oils from your hand onto the !amp surface" When the lamp heats uP t° its °perating temperature' the °il will cause a I I differenc e in tempeJ-atur e 0nth e lamp surface that wi!! likelY cause th e !amp t0 break_ Replace the lamp with part numbe r TS-CL110U only! The television is designed t° work specifically with this lamp. Using a different !amp, or a third-party I manufacturer's I lamp could cause a malfunction and or damage to the television.
Before replacing the lamp, you will need to purchase a replacement kit, part number TS-CL110U. To purchase this kit, consult your dealer or call !-800-252-5722, or go to www.jvc.com. The replacement kit will include the following: 1 High-Pressure Mercury Lamp 1 Instruction Manual Because the lamp contains a small amount of mercury, it cannot be disposed normal trash. LAMP NEEDSTO BEREPLACED. of with If this message appears when you turn the TV on, you need to replace the lamp.
Please read these instructions fully before attempting to replace the lamp. If you feel unsure about replacing the lamp yourself, call a service technician. Please observe all safety warnings. 1) Turn off the television. Press the POWER button on the remote control or TV front panel. Wait until the picture has closed and the LAMP LED on the front panel has stopped blinking indicating the lamp coo! down is complete. Warning: The cool-down process cools the lamp from its operating temperature.
5) Install the new lamp unit. Holding the handle attached to the new lamp unit, slide and push the new lamp straight into the television and back into the lamp housing area. Do not forget to re-tighten the two screws. Note: If the lamp does not sit securely in the TV (flat in the lamp housing area), it won't turn on. Make sure the lamp sits securely and fiat in the housing area. WARNING! Remember it is very important that YOU DO NOT TOUCH THE LAMP SURFACE. read the warnings on page 91 again.
LvAv._'TTTTII'Tr_j In ;Im]l_V_ _[,_._1 While the power is on, and there is a problem with the TV, the TV changes to warning mode and informs you of the problem using the LED as follows. Then, the power turns off automatically and performs the cooling for approximately 90 seconds. The LAMP/PROGRAM LED blinks Condition: It may be a malfunction To correct: Keep the TV off for a while and then turn the power on again.
* jVC L_TED .k JVC COMPANY OF TO THE ORiGiNAL the date of original FOR DIREC%VIEW WARRANTY COLO_ TV1°1** AMERICA (JVC) warrants this product and all parts thereof, except as set forth below RETAIL PURCHASER to be FREE FROM DEFECTVE MATERIALS AND WORKMANSHP purchase for the period shown below. ("The Warranty Period") COLOR TELEVISION, PICTURE TUBE is covered for Two(2)years. 1 YEAR ._ TH_S L_M_TED WARRANTY _N THE COMMONWEALTH IS VAUD ONLY _N THE F_TY OF PUERTO R_CO.
TO OUR VALUED CUSTOMER THANK YOU FOR PURCHASING THIS JVC PRODUCT. WE WANT TO HELP YOU ACHIEVE A PERFECT EXPERRENCE. NEED HELP ON HOW TO HOOK UP? NEED ASSISTANCE ON HOW TO OPERATE? NEED TO LOCATE A JVC SERVICE CENTER? LiKE TO PURCHASE ACCESSORIES? ® IS HERE TO HELP! TOLL FREE: 1(800)252-5722 http://www.jvc.com Remember to retain your Bill of Same for Warranty Service= Do not attempt to service the product yourself Caution To prevent emectdcamshock, do not open the cabinet.
Model : HD-56G886 HD*56G786 HD-52G886 HD*52G786 HD ILA Device Projection l'ype NTSC, R ecep_ton Format Receptton Range BTSC System (MullbChannel Sound) A_ SC Terrestrial Dig_ta_ Cable VHF 2 to 13, UHF 14 to 69 CA rv 135 Sub, Mid, Super, Hyper and Ultra bands (191 channe_ frequency synthesizer system) • Reception of channel A5 ("95" of the TV set's on_creen numbers) is not recommended for your TV set Power Source AC 120V, 60 Hz 205W Power Consumptton Projectbn Source Screen 110W High Pressure
In
JVC COMPANY Division OF AMERICA of JVC Americas 1700 Valley Wayne, Corp. Road New Jersey, 07470 JVC CANADA, INC.