
Instruction manual


MADE IN U.S.A.
BY
R
D C I N P U T
ON OFF
12 VDC 250 mA
+
-
-
P O W E R
OFF C + L
L
R F O U T P U T
L I M I T I N G /
C O M P R E S S I O N
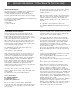
Installation, continued 5
To set the mode, press and hold both TUNE /
buttons until the mode ‘MONO’ or ‘STEREO’ flashes.
Press either TUNE / button to set the required mode.
TUNE
FMC 1000 FM STEREO MODULATOR
FREQUENCY
OVER MODULATION
LEFT
RIGHT
LEVEL
INPUT
MONITOR
MONITOR OUTPUT
107.9 MHz Stereo
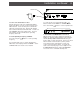
5. Set the INPUT and MONITOR Level Controls
With the audio source active, and the desired type of
limiting set, adjust the INPUT LEVEL control clockwise
until the (OVER) MODULATION LED indicators just
begin to light on audio signal peaks. Refer to the “Rear
Panel Controls and Connections” (Item 4) and the
“Front Panel Controls and Indicators” (Items 3,4)
sections of this manual for details. To monitor the
audio source material, plug a set of headphones into
the MONITOR OUTPUT jack. Adjust the MONITOR
Level control for a comfortable listening level.
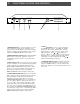
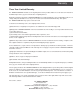
3. Connect the Transmitter to Power
Plug the DC power cord of the supplied AC Adapter
into the DC INPUT connector on the rear panel of the
FMC 1000 unit. Secure the DC power cord with the
adjacently located strain relief. Plug the AC Adapter
into a nominal 120 VAC, 60 Hz wall outlet. Set the rear
panel POWER switch to the ‘ON’ position. The front
panel display should now indicate the operating
frequency and mode.
4. Set the Operating Frequency and Mode
Press the front panel
/ button to set the operating
frequency.
If a monaural audio source is being supplied to the
FMC 1000, set the displayed mode to ‘MONO’. Set for
‘STEREO’ with stereo audio source material.
Switch to 'ON'
Strain Relief