
User`s guide


5-28
Monitoring at a Specified Time and Date
Monitoring at a Specified Time and Date
Schedule
monitoring
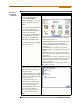
Follow these steps to set monitoring at a specified time and date.
Action... Result...
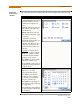
STEP 1: From the Automatic Setup
screen, press OK to start
monitoring (see page 5-3). The
Monitoring Menu screen will be
displayed.
OR
STEP 1: From the Start Menu
screen (see page 5-2), press
Monitor Same Circuit.
NOTE: The Monitoring Menu
screen will only be available after
setting up the instrument or from
reading a setup template from the
memory card.
OR
STEP 1: At the end of the Wizard
Setup, the Site Name/Memory Card
screen prompts users to press
Finish so as to start monitoring (see
page 5-21). The Monitoring Menu
screen will be displayed.
• To set monitoring at a specified
date and time, press Monitor
using Start and End times.
Proceed to Step 2.
For functional descriptions of the
other buttons, refer to Section C
Monitor Same Circuit - Turning
Monitoring On/Off on page 5-25.
MARK121
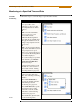
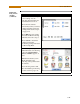
STEP 2: The PowerVisa will
monitor and collect data using
either of the following monitoring
schedules:
• Press Start & End time to
specify the date/time when the
unit will begin and end
monitoring. See page 5-29.
• Press Time Interval to specify
the length of the recording
interval for each file, and the
time/date to start monitoring
interval. See page 5-32.
• Press Cancel to quit and return
to the monitoring menu.
MARK125a