
User`s guide


9-4
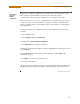
External Communication Interface, continued
Connection
setup via USB
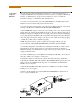
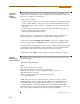
The following procedure and diagram describe how to connect the PowerVisa to a
computer via USB. Once the physical connection is done, see Chapter 4 Instrument
Settings - Communications on page 4-10 for instructions on how to enable the
PowerVisa settings to communicate with external devices.
1. Connect one end of the fiber optic cable (P/N 900406) into the Fiber Optic Serial
Data Port located on the left side panel of the PowerVisa.
2. Connect the other end of the fiber optic cable into the Fiber Optic Port on the plastic
housing of the 9-pin/RS232 Communication Module (P/N COMM-RS232).
3. Connect the 9-pin RS232 connector to the USB to RS232 Serial Adapter.
4. Install the software on the compact disc that came with your USB to RS232 Serial
Adapter. This will create a virtual COM port on your computer at the next available
serial port.
5. Connect the USB cable from a USB port on your computer to the USB socket of the
RS232 Serial Adapter.
6. Check the Device Manager in the Windows
®
control panel to identify the new COM
port number created by the USB - RS232 Serial device. Use this COM number to
connect the PowerVisa with NodeLink
®
.
7. Refer to the NodeLink
®
User’s Guide (P/N UG-NODELINK) for instructions on
how to set up a NodeLink site.
USB TO RS232
ADAPTER
DB9
TO PC
USB
PORT
FIBER OPTIC
CABLE
TO PowerVisa
OPTICAL
PORT
RS232 - FIBER OPTIC
ADAPTER