
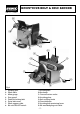
Owner`s manual


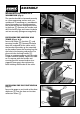

INSTALLING THE BACK STOP (Fig.7):
Fix the back stop ✰✌ in place on the
back of the sanding belt assembly and
adjust it with 1.5mm gap to allow
sawdust to flow under.
INSTALLING THE WORK SUPPORT
TABLE (Figs.8 & 9):
Bolt the support bracket ✱✌ to the
sanding belt assembly. Assemble the
table to the locking bracket ✲✌.
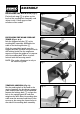
Slide the assembled guide onto the
support bracket and lock into place with
the locking knob. Use the engineers
square to adjust the guide so it is square
with the sanding belt.When in place
lock off with the securing screw.
NOTE: The angle adjustment is only to
be used as a guide.
VERTICAL SANDING (Fig.10):
For the sanding belt to be used in the
vertical position, the back stop, support
table and bracket must all be removed.
Loosen the locking bolt ✳✌and put the
belt in the upright position and then
retighten the bolt. Next the sanding disc
table must be removed and fitted in the
same way, but using the fixture holes in
the side of the sanding belt assembly.
ASSEMBLY
- 9 -
Fig.7
Fig.8
Fig.9
Fig.10
✳✌
✱✌
✰✌
✲✌