i Vigor3900 Series Quick Start Guide
Vigor3900 Series Quick Start Guide ii
Vigor3900 Multi-WAN Security Appliance Quick Start Guide Version: 1.5 Firmware Version: V1.0.
Copyright Information Copyright Declarations Copyright 2012 All rights reserved. This publication contains information that is protected by copyright. No part may be reproduced, transmitted, transcribed, stored in a retrieval system, or translated into any language without written permission from the copyright holders. The scope of delivery and other details are subject to change without prior notice.
Firmware & Tools Updates Please consult the DrayTek web site for more information on newest firmware, tools and documents. http://www.draytek.com European Community Declarations Manufacturer: Address: Product: DrayTek Corp. No. 26, Fu Shing Road, HuKou Township, HsinChu Industrial Park, Hsin-Chu County, Taiwan 303 Vigor3900 DrayTek Corp. declares that Vigor3900 of routers are in compliance with the following essential requirements and other relevant provisions of EC, Directive 2004/108/EC.
Vigor3900 Series Quick Start Guide vi
Table of Contents 1. Introduction........................................................................................................... 1 1.1 Panel Explanation ...................................................................................................................... 1 1.2 Package Content........................................................................................................................ 3 2. Installing Your Router..........................................................
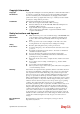
1. Introduction Vigor3900 series router is a Multi-WAN Security Appliance which allows the connection to multiple ISPs and provides multiple VPN tunnels for connecting different devices. With gigaLAN and gigaWAN feature, the router increases the performance of data transmission with highest speed which is more than 500Mbps. 1.1 Panel Explanation LED Explanation LED Status Explanation PWR On Off On/Blinking Off On Blinking Off The router is powered on. The router is powered off. The system is active.
Connectors Interface Description Console Provided for technician use. GigaLAN1 / 2 Connecter for local network devices. 3(SFP) Connecter for SFP module. GigaWAN1/2/3/4 Connecter for remote network devices. 5(SFP) Connecter for SFP module. Console Provided for technician use. USB1 / USB2 Connecter for the USB device. Factory Reset Used to restore the default settings. Turn on the router (ACT LED is blinking). Press the hole and keep for more than 5 seconds.
1.
This page is left blank.
2. Installing Your Router This section will guide you to install the router through hardware connection and configure the router’s settings through web browser. Before starting to configure the router, you have to connect your devices correctly. 1. Connect one end of an Ethernet cable (RJ-45) to one of the LAN ports of Vigor3900s. 2. Connect the other end of the cable (RJ-45) to the Ethernet port on your computer (that device also can connect to other computers to form a small area network).
This page is left blank.
3. Initialing Configuration The Quick Start is designed for you to easily set up for Internet access. You can directly access the Quick Start via Web Configurator. 3.1 Accessing Web Browser 1. Make sure your computer connects to the router correctly. Notice: You may either simply set up your computer to get IP dynamically from the router or set up the IP address of the computer to be the same subnet as the default IP address of Vigor router 192.168.1.1.
6. Now, the Main Screen will pop up. 3.2 Changing the Password The first job that you have to do is changing the user password. Follow the steps below to modify: 1. Go to System Maintenance page and choose Administrator Password. 2. Enter the login password on the field of Old Password. Type a new one in the field of New Password and retype it on the field of Confirm Password. Then click Apply to continue. 3. Now, the password has been changed.
3.3 Quick Start Wizard Quick Setup is a wizard which is designed for configuring your router accessing Internet with simply steps. In the Quick Setup group, you can configure the router to access the Internet with different modes such as Static, DHCP, PPPoE, or PPTP modes. Step 1 In the first page of Quick Start Wizard, please create a WAN profile. Available settings are explained as follows: Item Description Profile Use the drop down list to choose one WAN profile.
Item Description for you to assign any setting. (Host Name and Domain Name are required for some ISPs). PPTP - This mode lets user get the IP group information by a DSL modem with PPTP service from ISP. Your service provider will give you user name, password, and authentication mode for a PPTP setting. Click PPTP as the protocol. Type in all the information that your ISP provides for this protocol. If your ISP offers you PPTP (Point-to-Point Tunneling Protocol) mode, please select PPTP for this router.
Step 2 After clicking Next, you can see the following page which will vary according to the IPv4 protocol type selected in Step 1. z For Static type, the page will be displayed as follows: Available settings are explained as follows: Item Description IP Address Type the IP address of the router for the WAN profile. Subnet Mask Type the network mask of the router for the WAN profile. Gateway IP Address Use the default setting (0.0.0.0).
Item Description Add – Click this button to have a field for adding a new IP address. Save – Click this button to save the configuration. – click the icon to remove the selected entry. Previous Click it to return to previous setting page. Finish Click it to save the configuration and exit the dialog. Cancel Click it to discard the settings configured in this page. After finishing the above configuration, click Finish.
z For PPPoE type, the page will be displayed as follows: Available settings are explained as follows: Item Description Username Type in the username provided by ISP in this field Password Type in the password provided by ISP in this field. Previous Click it to return to previous setting page. Finish Click it to save the configuration and exit the dialog. Cancel Click it to discard the settings configured in this page. After finishing the above configuration, click Finish.
z For PPTP type, the page will be displayed as follows: Available settings are explained as follows: Item Description PPTP Over Usually ISP dynamically assigns IP address to you each time you connect to it and request. In some case, your ISP provides service to always assign you the same IP address whenever you request. In this case, you can fill in this IP address in the Fixed IP field. Please contact your ISP before you want to use this function. Static – Specify the IP address.
Item Description Add – Click this button to have a field for adding a new IP address. Save – Click this button to save the configuration. – click the icon to remove the selected entry. Previous Click it to return to previous setting page. Finish Click it to save the configuration and exit the dialog. Cancel Click it to discard the settings configured in this page. After finishing the above configuration, click Finish. Later, you can surf the Internet at any time.
3.4 Check the Connection Status After finishing the WAN connection, please check the connection status to ensure the network connection has been made successfully. Please open Online Status to display the information for all the WAN interfaces at the same time, including Device Information, System Information and IPv4/IPv6 configurations. From the above figure, wan1 connection for Internet has been built successfully for the word – up has been displayed on the field of Connection.
4. Trouble Shooting This section will guide you to solve abnormal situations if you cannot access into the Internet after installing the router and finishing the web configuration. Please follow below sections to check your basic installation stage by stage. ¾ Checking if the hardware status is OK or not. ¾ Checking if the Network Connection Settings on your computer is OK or not. ¾ Pinging the Router from your computer. ¾ Checking if the ISP Settings are OK or not.
4.2 Checking If the Network Connection Settings on Your Computer Is OK or Not Sometimes the link failure occurs due to the wrong network connection settings. After trying the above section, if the link is stilled failed, please do the steps listed below to make sure the network connection settings is OK. For Windows The example is based on Windows XP. As to the examples for other operation systems, please refer to the similar steps or find support notes in www.draytek.com. 1.
4. Select Obtain an IP address automatically and Obtain DNS server address automatically. For Mac OS 1. Double click on the current used MacOs on the desktop. 2. Open the Application folder and get into Network. 3. On the Network screen, select Using DHCP from the drop down list of Configure IPv4.
4.3 Pinging the Router from Your Computer The default gateway IP address of the router is 192.168.1.1. For some reason, you might need to use “ping” command to check the link status of the router. The most important thing for this command is that the computer will receive a reply from 192.168.1.1 for correct link. If not, please check the IP address of your computer. We suggest you setting the network connection as get IP automatically. (Please refer to the section 4.2).
21 Vigor3900 Series Quick Start Guide
4.4 Checking If the ISP Settings Are Correct or Not Open Online Status to check current network status. Be careful to check if the settings coming from your ISP have been typed correctly or not. If there is something wrong with the configuration, please go to WAN page and choose General Setup again to do the adjustment.
4.5 Backing to Factory Default Setting If Necessary Sometimes, a wrong connection can be improved by returning to the default settings. Try to reset the router by software or hardware. Warning: After pressing factory default setting, you will loose all settings you did before. Make sure you have recorded all useful settings before you pressing. The password of the factory default is null. Software Reset You can reset router to factory default via Web page.
Hardware Reset While the router is running (ACT LED blinking), press the Factory Reset button and hold for more than 5 seconds. When you see the ACT LED blinks rapidly, please release the button. Then, the router will restart with the default configuration. After restore the factory default setting, you can configure the settings for the router again to fit your personal request. 4.