VigorAP 700 Wireless Access Point User’s Manual Version 1.
COPYRIGHT Copyright ©2008/2009 by this company. All rights reserved.
FCC Caution This equipment must be installed and operated in accordance with provided instructions and a minimum 20 cm spacing must be provided between computer mounted antenna and person’s body (excluding extremities of hands, wrist and feet) during wireless modes of operation. This device complies with Part 15 of the FCC Rules.
EU Countries Intended for Use The ETSI version of this device is intended for home and office use in Austria, Belgium, Denmark, Finland, France, Germany, Greece, Ireland, Italy, Luxembourg, the Netherlands, Portugal, Spain, Sweden, and the United Kingdom. The ETSI version of this device is also authorized for use in EFTA member states: Iceland, Liechtenstein, Norway, and Switzerland. EU Countries Not intended for use None. This product is designed for 2.
Table of Content Chapter I: Product Information ................................................... 1 1-1 Introduction ................................................................................................... 1 1-2 Safety Information......................................................................................... 2 1-3 Package Contents......................................................................................... 3 1-4 Familiar with your new VigorAP 700 ..........................
2-11 Configuration Backup and Restore ........................................................... 51 2-12 Firmware Upgrade .................................................................................... 52 2-13 Restart ...................................................................................................... 53 Chapter III: Troubleshooting...................................................... 55 Appendix: Glossary....................................................................
Chapter I: Product Information 1-1 Introduction Thank you for purchasing this VigorAP 700! With this high cost-efficiency VigorAP 700, computers and wireless devices which are compatible with 802.11n can connect to existing wired Ethernet network via this VigorAP 700, at the speed of 300Mbps. Easy install procedures allows any computer users to setup a network environment in very short time - within minutes, even inexperienced users.
1-2 Safety Information In order to keep the safety of users and your properties, please follow the following safety instructions: z This access point is designed for indoor use only; DO NOT place this access point outdoor. z DO NOT put this access point at or near hot or humid places, like kitchen or bathroom. Also, do not left this access point in the car in summer. z DO NOT pull any connected cable with force; disconnect it from the access point first.
1-3 Package Contents Before you starting to use this access point, please check if there’s anything missing in the package, and contact your dealer of purchase to claim for missing items: □ VigorAP 700 (main body, 1 pcs) □ Antenna (2 pcs) □ Quick Start Guide (1 pcs) □ A/C power adapter (1 pcs) □ CD 3
1-4 Familiar with your new VigorAP 700 Front Panel LED Status Description On The device is powered on. Off The device is powered off. On Wireless WPS mode is enabled. Blinking Data is transmitting (sending/receiving). On LAN port is connected Off LAN port is not connected Blinking Data is transmitting (sending/receiving).
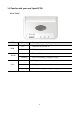
Back Panel Interface Description Antennas Two reserve SMA antenna connectors for screwing 3dBi detachable antennas enclosed with the product. PWR Connecter for a power adapter. Reset / WPS Restore the default settings. Usage: Turn on the VigorAP 700. Press the button and keep for more than 10 seconds. Then the AP will restart with the factory default configuration. Press the button and keep it less than 5 seconds, the WPS connection will be enabled. LAN Connecter for local networked devices.
This page is left blank.
Chapter II: System and Network Setup 2-1 Installing VigorAP 700 to your Network Please follow the following instruction to build the network connection between your new VigorAP 700 and your computers, network devices: 1. Connect VigorAP 700 to ADSL modem, router, or switch/hub in your network through the LAN port of the access point by Ethernet cable. 2. Connect a computer to ADSL modem, router, or switch/hub. Make sure the subnet IP address of the PC is the same as VigorAP700, e.g., 192.168.1.X. 3.
2-2 Connecting to VigorAP 700 by Using Web Browser After the network connection is built, the next step you should do is setup the access point with proper network parameters, so it can work properly in your network environment. Before you can connect to the access point and start configuration procedures, your computer must be able to get an IP address automatically (use dynamic IP address).
2. Select Specify an IP address, then input the following settings in respective field and click OK when finish. IP address: 192.168.1.9 Subnet Mask: 255.255.255.
2-2-2 Windows 2000 IP address setup 1. Click Start button (it should be located at lower-left corner of your computer), then click control panel. Double-click Network and Dial-up Connections icon, double click Local Area Connection, and Local Area Connection Properties window will appear. Select Internet Protocol (TCP/IP), then click Properties. 2. Select Use the following IP address, then input the following settings in respective field and click OK when finish. IP address: 192.168.1.9 Subnet Mask: 255.
2-2-3 Windows XP IP address setup 1. Click Start button (it should be located at lower-left corner of your computer), then click control panel. Double-click Network and Internet Connections icon, click Network Connections, and then double-click Local Area Connection, Local Area Connection Status window will appear, and then click Properties. 2. Select Use the following IP address, then input the following settings in respective field and click OK when finish: IP address: 192.168.1.9 Subnet Mask: 255.255.
2-2-4 Windows Vista IP address setup 1. Click Start button (it should be located at lower-left corner of your computer), then click control panel. Click View Network Status and Tasks, then click Manage Network Connections. Right-click Local Area Netwrok, then select ‘Properties’. Local Area Connection Properties window will appear, select Internet Protocol Version 4 (TCP / IPv4), and then click Properties. 2.
2-2-5 Connecting to Web Management Interface All functions and settings of this access point must be configured via web management interface. Please start your web browser, and input 192.168.1.2 in address bar, then press Enter key. The following screen should be shown: Please input user name and password in the field respectively. The default user name is admin and no password needed.
NOTE: If you can’t see the web management interface, and you’re prompted to input user name and password again, it means you don’t input username and password correctly. Please retype user name and password again. If you’re certain about the user name and password you type are correct, please go to 4-2 Troubleshooting to perform a factory reset, to set the password back to default value.
Here are descriptions of every item: System Uptime Displays the total passed time since the VigorAP 700 is powered. Hardware Version Displays hardware version. This information is helpful when you need online help from the dealer of purchase. Firmware Version Displays current firmware version. If you want to perform firmware upgrade, this number will help you to determine if you need such upgrade.
2-4 Select an Operating Mode for Wireless Access Point This access point can be operated in different modes; you can click Basic Setting on the left of web management interface to select an operating mode you want to meet for different needs. You can click Mode dropdown menu to select operating mode, and there are 6 operating modes available: AP Access point mode allows wireless clients to connect to access point and exchange data with the devices connected to the wired network.
to accept wireless clients while the access point is working as a wireless bridge. Universal Repeater This product can act as a wireless range extender that will help you to extend the networking wirelessly. The access point can act as Station and AP at the same time. It can use Station function to connect to a Root AP and use AP function to service all wireless clients within its coverage. Please select one wireless operating mode.
and 802.11g band will be able to connect to this access point. If you want to allow 802.11b, 802.11g, and 802.11 n clients to connect to this access point, select 2.4GHz (B+G+N). Main SSID Please input the SSID (the name used to identify this VigorAP 700) here. You can input up to 32 alphanumerical characters. PLEASE NOTE THAT SSID IS CASE SENSITIVE. Multiple SSID The access point supports multiple SSID function; up to four SSIDs can be set.
2-4-1-1 Multiple SSID This access point supports four SSIDs. Except the main SSID (it can be configured in Basic Setting page), you can configure another three of SSIDs here. With different SSIDs, you can separate the wireless networks with different SSID names, WMM, and VLAN settings. Note: If you want to configure the wireless security for different SSID, please go to ‘2-7 Wireless Security’ for more information. Here are descriptions of every setup item: No.
kinds of data, to give higher priority to applications which require instant responding. Therefore you can improve the performance of such network applications. VLAN ID (0:Untagged) If your network uses VLANs, you can assign the SSID to a VLAN on your network. Client devices that associate using the SSID are grouped into this VLAN. The VLAN ID range is from 1 to 4094. The VLAN ID is 0 by default, it means disabling the VLAN function for the SSID.
If you want to allow 802.11b, 802.11g, and 802.11n clients to connect to this access point, select 2.4GHz (B+G+N). Main SSID Please input the SSID (the name used to identify this VigorAP 700) here. You can input up to 32 alphanumerical characters. PLEASE NOTE THAT SSID IS CASE SENSITIVE. Site Survey When you use this access point as a wireless station for Ethernet network device to have wireless capability, you have to associate it with a working access point.
Here are descriptions of every setup item: Select Click the radio button to select the access point. Channel Display the channel number of the access point. SSID Display the SSID name of the access point. BSSID Display the BSSID (MAC Address) of the access point. Encryption Display the encryption setting of the access points. If you have selected the access point with security setting, you have to go to 2-7 Wireless Security to set the same security with the access point you want to associate.
2-4-3 AP Bridge-Point to Point Mode In this mode, this VigorAP 700 will connect to another VigorAP 700 which uses the same mode, and all wired Ethernet clients of both VigorAP 700s will be connected together. You can use this mode to connect a network to another network which is physically isolated. Please note that when you set your access point to this mode, it will not accept regular wireless clients anymore.
MAC address 1 Please input the MAC address of the VigorAP 700 you wish to connect. After you finish with setting, please click Apply, and the following screen will be displayed: When you see this message, the settings you made is successfully save. You can click Continue to return to previous page and continue on other setting items, or click Apply button to restart the VigorAP 700. The changes will take effect after about 30 seconds.
2-4-4 AP Bridge-Point to Multi-Point Mode In this mode, this VigorAP 700 will connect to up to four VigorAP 700s which uses the same mode, and all wired Ethernet clients of every VigorAP 700s will be connected together. You can use this mode to connect a network to other networks which is physically isolated. Please note that when you set your access point to this mode, it will not accept regular wireless clients anymore.
connect. After you finish with setting, please click Apply, and the following screen will be displayed: When you see this message, the settings you made is successfully save. You can click Continue to return to previous page and continue on other setting items, or click Apply button to restart the VigorAP 700. The changes will take effect after about 30 seconds.
Here are descriptions of every setup item: Band Please select the wireless band you wish to use. By selecting different band setting, you’ll be able to allow or deny the wireless client of a certain band. If you select 2.4GHz (B), 2.4GHz (N), or 2.4GHz (G), only wireless clients using the wireless band you select (802.11b, 802.11n, or 802.11g) will be able to connect to this access point. If you select 2.4GHz (B+G), then only wireless clients using 802.11b and 802.
After you finish with setting, please click Apply, and the following screen will be displayed: When you see this message, the settings you made is successfully save. You can click Continue to return to previous page and continue on other setting items, or click Apply button to restart the VigorAP 700. The changes will take effect after about 30 seconds. 2-4-6 Universal Repeater In this mode, the access point can act as a wireless repeater; it can be Station and AP at the same time.
If you select 2.4GHz (B), 2.4GHz (N), or 2.4GHz (G), only wireless clients using the wireless band you select (802.11b, 802.11n, or 802.11g) will be able to connect to this access point. If you select 2.4GHz (B+G), then only wireless clients using 802.11b and 802.11g band will be able to connect to this access point. If you want to allow 802.11b, 802.11g, and 802.11n clients to connect to this access point, select 2.4GHz (B+G+N).
After you finish with setting, please click Apply, and the following screen will be displayed: When you see this message, the settings you made is successfully save. You can click Continue to return to previous page and continue on other setting items, or click Apply button to restart the VigorAP 700. The changes will take effect after about 30 seconds. 2-5 WPS Setting Wi-Fi Protected Setup (WPS) is the simplest way to build connection between wireless network clients and this access point.
Here are descriptions of every setup item: Enable WPS Check this box to enable or disable WPS function. Wi-Fi Protected Setup Information All information related to WPS will be displayed here. They’re helpful when you’re setting up connections by WPS. WPS Status: Displays WPS status.
will be replaced by asterisk for security reason. If encryption is not set on this access point, nothing will be displayed here. Device Configuration Config Mode: There are Registrar and Enrollee modes for the WPS connection. When Registrar is enabled, the wireless clients will follow the access point’s wireless settings for WPS connection. When Enrollee mode is enabled, the access point will follow the wireless settings of wireless client for WPS connection.
2-6 Advanced Wireless Settings This VigorAP 700 has many advanced wireless features. Please note that all settings listed here are for experienced users only. If you’re not sure about the meaning and function of these settings, please don’t modify them, otherwise the wireless performance will be reduced. You can click Advanced Setting on the left to enter advanced settings menu.
Data Rate Set the wireless data transfer rate to a certain value. Since most of wireless devices will negotiate with each other and pick a proper data transfer rate automatically, it’s not necessary to change this value unless you know what will happen after modification. N Data Rate Set the data rate of 802.11n clients, available options are MCS 0 to MCS 15. It’s safe to set this option to Auto and it’s not necessary to change this value unless you know what will happen after modification.
When you see this message, the settings you made is successfully save. You can click Continue to return to previous page and continue on other setting items, or click Apply button to restart the VigorAP 700. The changes will take effect after about 30 seconds. 2-7 Wireless Security This VigorAP 700 provides many types of wireless security (wireless data encryption).
Note: If you have enabled Multiple SSID function, please select the SSID network you wish to configure in advance. Please remember it’s very important to set wireless security settings properly! Without a proper setting, hackers and intruders may gain access to your local network and do something bad to your computers and servers, which could cause serious problem. There are several things you can do to improve wireless security: 1. Always enable data encryption.
2-7-1 Disable Security Select the SSID you wish to configure. When you select Disable, wireless encryption for the network is disabled. After you finish with setting, please click Apply, and the following screen will be displayed: When you see this message, the settings you made is successfully save. You can click Continue to return to previous page and continue on other setting items, or click Apply button to restart the VigorAP 700. The changes will take effect after about 30 seconds.
Here are descriptions of every setup item: Key Length There are two types of WEP key length: 64-bit and 128-bit. Using 128-bit is safer than 64-bit, but it will reduce some data transfer performance. Key Format There are two types of key format: ASCII and Hex. When you select a key format, the number of characters of key will be displayed.
Authentication Section 2-7-5 for detailed instructions. After you finish with setting, please click Apply, and the following screen will be displayed: When you see this message, the settings you made is successfully save. You can click Continue to return to previous page and continue on other setting items, or click Apply button to restart the VigorAP 700. The changes will take effect after about 30 seconds.
After you finish with setting, please click Apply, and the following screen will be displayed: When you see this message, the settings you made is successfully save. You can click Continue to return to previous page and continue on other setting items, or click Apply button to restart the VigorAP 700. The changes will take effect after about 30 seconds. 2-7-4 WPA RADIUS WPA Radius is the combination of WPA encryption method and RADIUS user authentication.
address RADIUS Server Port Please input the port number of RADIUS authentication server here. Default value is 1812. RADIUS Server Password Please input the password of RADIUS authentication server here. After you finish with setting, please click Apply, and the following screen will be displayed: When you see this message, the settings you made is successfully save. You can click Continue to return to previous page and continue on other setting items, or click Apply button to restart the VigorAP 700.
After you finish with setting, please click Apply, and the following screen will be displayed: When you see this message, the settings you made is successfully save. You can click Continue to return to previous page and continue on other setting items, or click Apply button to restart the VigorAP 700. The changes will take effect after about 30 seconds.
2-8 Radius Server Comparing to other wireless security measures, radius server provides user-based authentication. If your wireless client supports 802.1x user authentication, you can use the Radius Server function to use the internal mini radius server to improve security and wireless user control. Note: Please note that the internal Radius server only supports MD5/PEAP method. You must check if your wireless client(s) supports it or not. The internal radius server supports 96 users and 16 IP addresses.
button to add the user to radius server database. You can click Cancel to clear the text you typed in above three fields. All current radius users will be listed here. If you want to delete one or more users, check the box of that user and click Delete Selected button. Or you can click Delete All button to delete all users in radius server database.
2-9 MAC Filtering Another security measure you can use to keep hackers and intruders away is MAC filtering. You can pre-define a so-called ‘white-list’, which contains MAC addresses of the wireless clients you trust. All other wireless clients with the MAC addresses which not in your list will be denied by this VigorAP 700. To setup MAC filtering, please click MAC Filtering on the left of web management interface and the following screen will be displayed: This page contains MAC filtering information.
a to f here, like 112233445566 or aabbccddeeff. Comment You can input any text here as the comment of this MAC address, like ROOM 2A Computer or anything. You can input up to 16 alphanumerical characters here. This is optional and you can leave it blank. However, it is recommended to use this field to write a comment for every MAC addresses as a memory aid. This is optional. Add When you finish inputting MAC address and (optional) Comment, click this button to add the MAC address to the list.
2-10 System Utilities This access point provides some control functions include password, IP address management, and DHCP server function. Please click System Utility on the left of web management interface to access these functions. Below are detailed descriptions of every control function. 2-10-1 Change Password You can change the password that used to enter the web configuration menu of this VigorAP 700.
2-10-2 IP Address of the Wireless Access Point You can change the IP address of this VigorAP 700 to make it becoming one part of your local network. Please remember this address, or you will not be able to connect the configuration menu of this VigorAP 700. Default IP address is: 192.168.1.2 / Subnet Mask 255.255.255.0. You can press and hold Reset/WPS button over 10 seconds to change the IP address back to default value if you forget the IP address you set.
2-10-3 DHCP Server This VigorAP 700 is capable to act as a DHCP server for your network. It is disabled by default. If you want to activate this function, please click System Utility on the left, and the following screen will be displayed: Here are descriptions of every setup item: Default Gateway IP Please input the IP address of default gateway of your network here. Domain Name Server IP Please input the IP address of domain name server (DNS) here.
When you see this message, the settings you made is successfully save. You can click Continue to return to previous page and continue on other setting items, or click Apply button to restart the VigorAP 700. The changes will take effect after about 30 seconds.
2-11 Configuration Backup and Restore You can backup all configurations of this access point to a file, so you can make several copied of access point configuration for security reason.
2-12 Firmware Upgrade If there is new firmware of this VigorAP 700 available, you can upload the firmware to the access point to change the firmware with new one to get extra functions. To perform firmware upgrade, please click Firmware Upgrade on the left of web management interface. The following screen will be displayed: Click Browse button first. You’ll be prompted to provide the filename of firmware upgrade file.
2-13 Restart When you think the access point is not working properly, you can use this function to restart the access point. This may help and solve the problem. This function is useful when the access point is far from you or unreachable. However, if the access point is not responding, you may have to switch it off by unplugging the power plug and plugginh it back again after 10 seconds. To restart your access point, please click Restart on the left.
This page is left blank.
Chapter III: Troubleshooting If you found the access point is working improperly or stops responding to you, don’t panic! Before you contact your dealer of purchaser for help, please read this troubleshooting first. Some problems can be solved by yourself within a short time! Scenario Solution Access point is not responding to me when I want to access it by web browser a. Please check the connection of power cord and network cable of this access point.
powered. I can’t locate my access point by my wireless client a. Check if Broadcast SSID is set to off. b. Is Antenna properly installed and secured? c. Are you too far from your access point? Try to get closer. d. Please remember that you have to input SSID on your wireless client manually, if SSID broadcast is disabled. File download is very slow or breaks frequently a. Try to reset the access point and see if it’s better after that. b. Try to know what computers do on your local network.
Appendix: Glossary Default Gateway (Access point): Every non-access point IP device needs to configure a default gateway’s IP address. When the device sends out an IP packet, if the destination is not on the same network, the device has to send the packet to its default gateway, which will then send it out towards the destination. DHCP: Dynamic Host Configuration Protocol. This protocol automatically gives every computer on your home network an IP address.
11111111.11111111.11111111.00000000. Therefore sometimes a network mask can also be described simply as “x” number of leading 1 is. When both are represented side by side in their binary forms, all bits in the IP address that corresponding to 1 in the network mask become part of the IP network address, and the remaining bits correspond to the host ID. For example, if the IP address for a device is, in its binary form, 11011001.10110000.10010000.00000111, and if its network mask is, 11111111.11111111.
Application Protocol Port Number Telnet TCP 23 FTP TCP 21 SMTP TCP 25 POP3 TCP 110 H.323 TCP 1720 SNMP UCP 161 SNMP Trap UDP 162 HTTP TCP 80 PPTP TCP 1723 PC Anywhere TCP 5631 PC Anywhere UDP 5632 PPPoE: Point-to-Point Protocol over Ethernet. Point-to-Point Protocol is a secure data transmission method originally created for dial-up connections. PPPoE relies on two widely accepted standards, Ethernet and the Point-to-Point Protocol.