i VigorAP 800 User’s Guide
VigorAP 800 User’s Guide ii
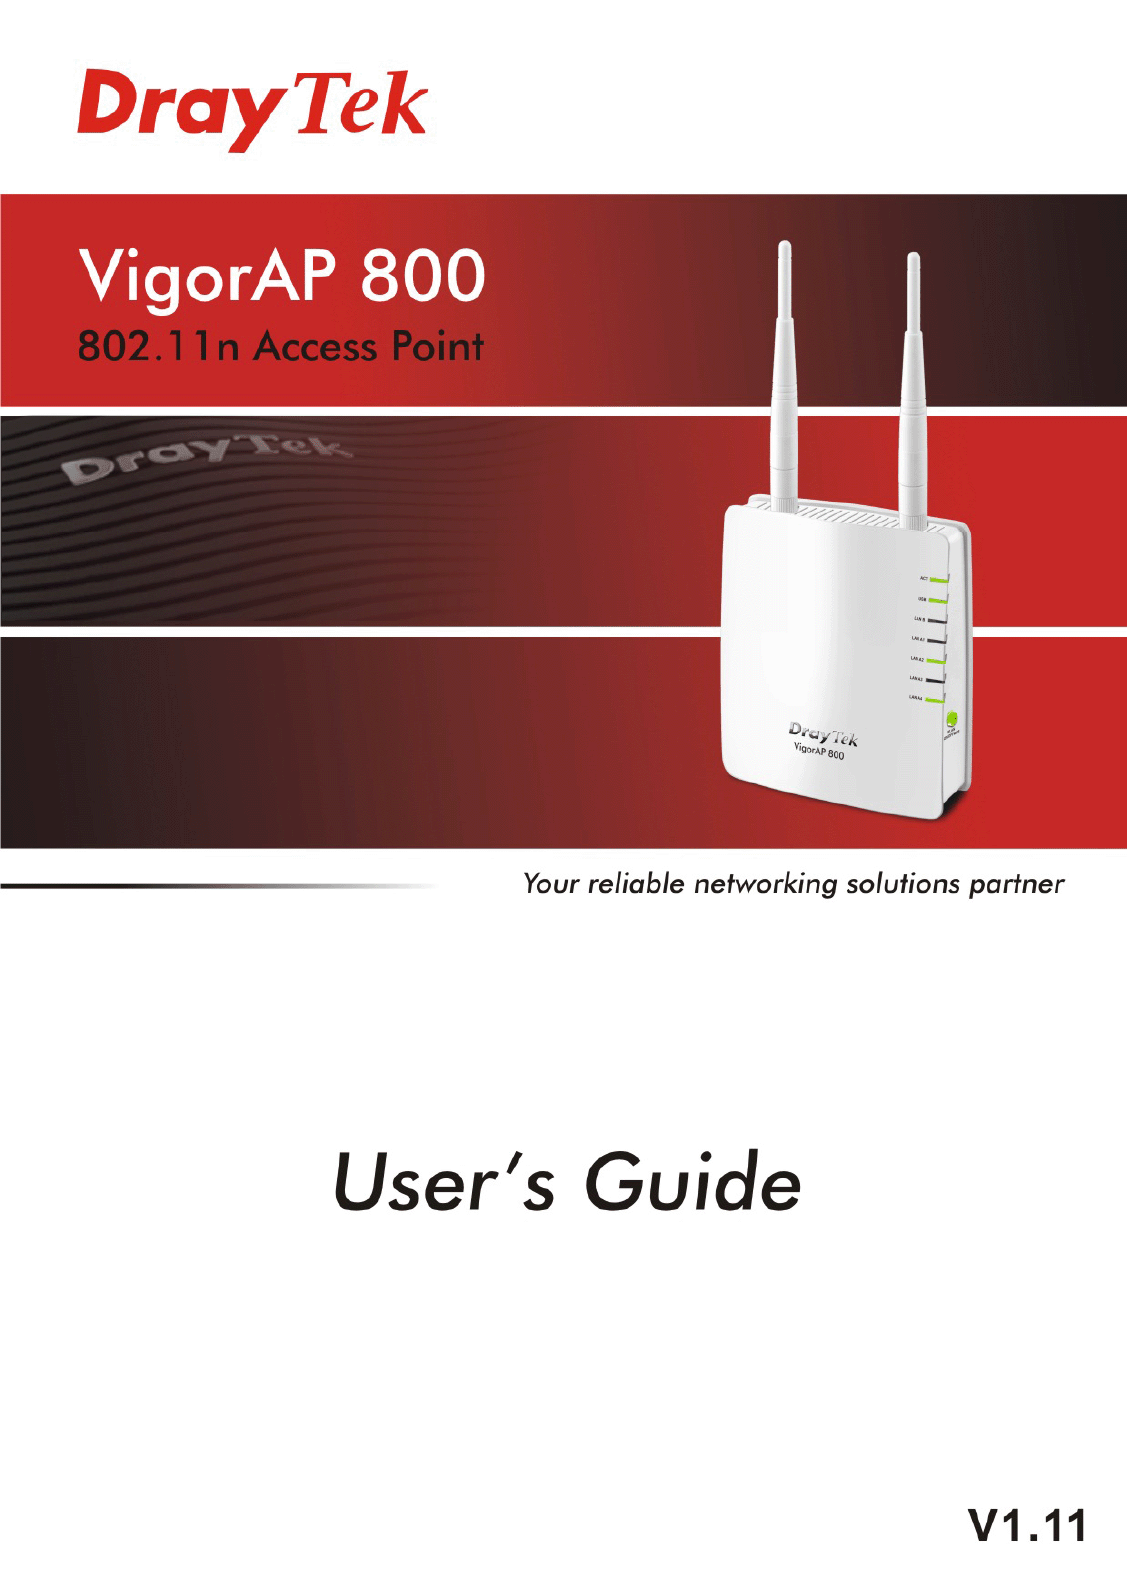
VigorAP 800 Wireless Access Point User’s Guide Version: 1.11 Firmware Version: V1.0.
Copyright Information Copyright Declarations Copyright 2011 All rights reserved. This publication contains information that is protected by copyright. No part may be reproduced, transmitted, transcribed, stored in a retrieval system, or translated into any language without written permission from the copyright holders. Trademarks The following trademarks are used in this document: z Microsoft is a registered trademark of Microsoft Corp.
European Community Declarations Manufacturer: Address: Product: DrayTek Corp. No. 26, Fu Shing Road, Hukou Township, Hsinchu Industrial Park, Hsinchu County, Taiwan 303 VigorAP 800 DrayTek Corp. declares that VigorAP 800 is in compliance with the following essential requirements and other relevant provisions of R&TTE Directive 1999/5/EEC.
VigorAP 800 User’s Guide vi
Table of Contents Preface .........................................................................................................1 1.1 Introduction ............................................................................................................................. 1 1.2 LED Indicators and Connectors .............................................................................................. 2 1.3 Hardware Installation ............................................................................
3.5.1 General Setup................................................................................................................. 40 3.5.2 Site Survey ..................................................................................................................... 45 3.5.3 Statistics.......................................................................................................................... 45 3.5.4 WPS (Wi-Fi Protected Setup)..............................................................
Trouble Shooting.....................................................................................103 5.1 Checking If the Hardware Status Is OK or Not.................................................................... 103 5.2 Checking If the Network Connection Settings on Your Computer Is OK or Not ................. 104 5.3 Pinging the Modem from Your Computer............................................................................ 106 5.4 Backing to Factory Default Setting If Necessary .............
Preface 1.1 Introduction Thank you for purchasing this VigorAP 800! With this high cost-efficiency VigorAP 800, computers and wireless devices which are compatible with 802.11n can connect to existing wired Ethernet network via this VigorAP 800, at the speed of 300Mbps. Easy install procedures allows any computer users to setup a network environment in very short time - within minutes, even inexperienced users.
1.2 LED Indicators and Connectors Before you use the Vigor modem, please get acquainted with the LED indicators and connectors first. LED ACT LAN B Status Off Blinking On Blinking On LAN A1 - A4 Off Blinking On USB WLAN (Green LED) on WLAN button WPS (Orange LED) on WLAN button WPS Button VigorAP 800 User’s Guide Off On Off Blinking Off Blinking (Orange) Explanation The system is not ready or is failed. The system is ready and can work normally. A USB device is connected and active.
Interface LAN B LAN A1 (PoE) A4 USB Description Connecter for xDSL / Cable modem or router. Connecter for xDSL / Cable modem or router. Connector for future use. Restore the default settings. Usage: Turn on VigorAP 800. Press the button and keep for more than 10 seconds. Then VigorAP 800 will restart with the factory default configuration. ON/OFF: Power switch. PWR: Connecter for a power adapter.
1.3 Hardware Installation This section will guide you to install the modem through hardware connection and configure the modem’s settings through web browser. Before starting to configure the modem, you have to connect your devices correctly. 1.3.1 Wired Connection for PC in LAN 1. Connect VigorAP 800 to ADSL modem, router, or switch/hub in your network through the LAN A port of the access point by Ethernet cable. 2. Connect a computer to other available LAN A port.
1.3.2 Wired Connection for Notebook in WLAN 1. Connect VigorAP 800 to ADSL modem or router in your network through the LAN A port of the access point by Ethernet cable. 2. Connect the A/C power adapter to the wall socket, and then connect it to the PWR connector of the access point. 3. Power on VigorAP 800. 4. Check all LEDs on the front panel. ACT LED should be steadily on, LAN LEDs should be on if the access point is correctly connected to the ADSL modem or router.
1.3.2 Wireless Connection VigorAP 800 can access Internet via an ADSL modem, router, or switch/hub in your network through wireless connection. 1. Connect VigorAP 800 to ADSL modem or router via wireless network. 2. Connect the A/C power adapter to the wall socket, and then connect it to the PWR connector of the access point. 3. Power on VigorAP 800. 4. Check all LEDs on the front panel.
1.3.3 POE Connection VigorAP 800 can gain the power from the connected switch, e.g., VigorSwitch P2260. PoE (Power over Ethernet) can break the install limitation caused by the fixed power supply. 1. Connect VigorAP 800 to a switch in your network through the LAN A1 port of the access point by Ethernet cable. 2. Connect a computer to LAN A2 – A4. Make sure the subnet IP address of the PC is the same as VigorAP 800 management IP, e.g., 192.168.1.X. 3. Power on VigorAP 800. 4.
This page is left blank.
Network Configuration After the network connection is built, the next step you should do is setup VigorAP 800 with proper network parameters, so it can work properly in your network environment. Before you can connect to the access point and start configuration procedures, your computer must be able to get an IP address automatically (use dynamic IP address).
Select Specify an IP address, then input the following settings in respective field and click OK when finish. IP address: 192.168.1.9 Subnet Mask: 255.255.255.
2.2 Windows 2000 IP Address Setup Click Start button (it should be located at lower-left corner of your computer), then click control panel. Double-click Network and Dial-up Connections icon, double click Local Area Connection, and Local Area Connection Properties window will appear. Select Internet Protocol (TCP/IP), then click Properties. Select Use the following IP address, then input the following settings in respective field and click OK when finish. IP address: 192.168.1.9 Subnet Mask: 255.255.255.
2.3 Windows XP IP Address Setup Click Start button (it should be located at lower-left corner of your computer), then click control panel. Double-click Network and Internet Connections icon, click Network Connections, and then double-click Local Area Connection, Local Area Connection Status window will appear, and then click Properties. Select Use the following IP address, then input the following settings in respective field and click OK when finish: IP address: 192.168.1.9 Subnet Mask: 255.255.255.0.
2.4 Windows Vista IP Address Setup Click Start button (it should be located at lower-left corner of your computer), then click control panel. Click View Network Status and Tasks, then click Manage Network Connections. Right-click Local Area Netwrok, then select ‘Properties’. Local Area Connection Properties window will appear, select Internet Protocol Version 4 (TCP / IPv4), and then click Properties.
2.5 Accessing to Web User Interface All functions and settings of this access point must be configured via web user interface. Please start your web browser (e.g., IE). 1. Make sure your PC connects to the VigorAP 800 correctly. Notice: You may either simply set up your computer to get IP dynamically from the modem or set up the IP address of the computer to be the same subnet as the default IP address of VigorAP 800 192.168.1.2.
2.6 Changing Password 1. Please change the password for the original security of the modem. 2. Go to System Maintenance page and choose Administrator Password. 3. Enter the new login password on the field of Password. Then click OK to continue. 4. Now, the password has been changed. Next time, use the new password to access the Web Configurator for this modem.
2.7 Quick Start Wizard Quick Start Wizard will guide you to configure 2.4G wireless setting, 5G wireless setting and other corresponding settings for Vigor Access Point step by step. 2.7.1 Configuring 2.4G Wireless Settings – General This page displays general settings for the operation mode selected. Operation Mode There are six operation modes for wireless connection. Settings for each mode are different.
connecting to LAN-A or LAN-B) in this environment. Multiple SSID - When Enable 2 Subnet is enabled, you can specify subnet interface (LAN-A or LAN-B) for each SSID by using the drop down menu. Channel Means the channel frequency of the wireless LAN. The default channel is 6. You may switch channel if the selected channel is under serious interference. If you have no idea of choosing the frequency, please select AutoSelect to let system determine for you. Extension Channel With 802.
Advanced Settings for Station-Infrastructure When you choose Station-Infrastructure, you will need to configure the following page to connect to one AP. Advanced Settings for AP Bridge-Point to Point When you choose AP Bridge-Point to Point, you will need to configure the following page.
Advanced Settings for AP Bridge-Point to Multi-Point When you choose AP Bridge-Point to Multi-Point, you will need to configure the following page. Advanced Settings for AP Bridge-WDS When you choose AP Bridge-WDS, you will need to configure the following page.
Advanced Settings for AP Bridge-Universal Repeater When you choose AP Bridge-Universal Repeater you will need to configure the following page. After finishing this web page configuration, please click Next to continue. 2.7.3 Configuring 5G Wireless Settings VigorAP 800 offers 5G wireless connection capability. You can setup 5G features in Quick Start Wizard first. Once the USB 5G wireless dongle connects to VigorAP 800, it can work immediately.
Extension Channel With 802.11n, there is one option to double the bandwidth per channel. The available extension channel options will be varied according to the Channel selected above. Station List Click this button to open the Station List dialog. It provides the knowledge of connecting wireless clients now along with its status code. After finishing this web page configuration, please click Next to continue. 2.7.
2.8 Online Status The online status shows the LAN status, Station Link Status for such device. Detailed explanation is shown below: LAN-A/LAN-B Status IP Address Displays the IP address of the LAN interface. TX Packets Displays the total transmitted packets at the LAN interface. RX Packets Displays the total number of received packets at the LAN interface. TX Bytes Displays the total transmitted size at the LAN interface. RX Bytes Displays the total number of received size at the LAN interface.
Web Configuration This chapter will guide users to execute advanced (full) configuration. As for other examples of application, please refer to chapter 5. 1. Open a web browser on your PC and type http://192.168.1.2. The window will ask for typing username and password. 2. Please type “admin/admin” on Username/Password for administration operation. Now, the Main Screen will appear. Be aware that “Admin mode” will be displayed on the bottom left side.
3.1 Operation Mode This page provides several available modes for you to choose for different conditions. Click any one of them and click OK. The system will configure the required settings automatically. AP This mode allows wireless clients to connect to access point and exchange data with the devices connected to the wired network. Station-Infrastructure Enable the Ethernet device such as TV and Game player connected to the VigorAP 800 to an access point.
Note: The Wireless LAN settings will be changed according to the Operation Mode selected here. For the detailed information, please refer to the section of Wireless LAN. 3.2 LAN Local Area Network (LAN) is a group of subnets regulated and ruled by modem. Click LAN to open the LAN settings page and choose General Setup. Note: Such page will be changed according to the Operation Mode selected. The following screen is obtained by choosing AP as the operation mode.
Start IP Address - Enter a value of the IP address pool for the DHCP server to start with when issuing IP addresses. If the 1st IP address of your modem is 192.168.1.2, the starting IP address must be 192.168.1.3 or greater, but smaller than 192.168.1.254. End IP Address Enter a value of the IP address pool for the DHCP server to end with when issuing IP addresses. Subnet Mask Type in an address code that determines the size of the network. (Default: 255.255.255.
WPS Introduction WPS (Wi-Fi Protected Setup) provides easy procedure to make network connection between wireless station and wireless access point (VigorAP 800) with the encryption of WPA and WPA2. It is the simplest way to build connection between wireless network clients and VigorAP 800. Users do not need to select any encryption mode and type any long encryption passphrase to setup a wireless client every time.
VigorAP 800 User’s Guide 28
3.4 Wireless LAN Settings for AP Mode When you choose AP as the operation mode, the Wireless LAN menu items will include General Setup, Security, Access Control, WPS, AP Discovery and Station List. Note: The Wireless LAN settings will be changed according to the Operation Mode selected in section 3.1. 3.4.1 General Setup By clicking the General Setup, a new web page will appear so that you could configure the SSID and the wireless channel. Please refer to the following figure for more information.
Enable Wireless LAN Check the box to enable wireless function. Mode At present, VigorAP 800 can connect to 11b only, 11g only, 11n only, Mixed (11b+11g) and Mixed (11b+11g+11n) stations simultaneously. Simply choose Mixed (11b+11g+11n) mode. Enable 2 Subnet (Simulate 2 APs) Check the box to enable the function for two independent subnets. Once you enable this function, LAN-A and LAN-B would be independent. Next, you can connect one router in LAN-A, and another router in LAN-B.
device with SSID 1. The MAC address of other SSIDs will change based on this MAC address. Channel Means the channel of frequency of the wireless LAN. The default channel is 6. You may switch channel if the selected channel is under serious interference. If you have no idea of choosing the frequency, please select AutoSelect to let system determine for you. Extension Channel With 802.11n, there is one option to double the bandwidth per channel.
WMM Capable To apply WMM parameters for wireless data transmission, please click the Enable radio button. Antenna VigorAP 800 can be attached with two antennas to have good data transmission via wireless connection. However, if you have only one antenna attached, please choose 1T1R. Tx Power The default setting is the maximum (100%). Lower down the value may degrade range and throughput of wireless. 3.4.
Mode There are several modes provided for you to choose. Disable - The encryption mechanism is turned off. WEP - Accepts only WEP clients and the encryption key should be entered in WEP Key. WPA/PSK or WPA2/PSK or Mixed (WPA+WPA2)/PSK Accepts only WPA clients and the encryption key should be entered in PSK. The WPA encrypts each frame transmitted from the radio using the key, which either PSK (Pre-Shared Key) entered manually in this field below or automatically negotiated via 802.1x authentication.
WPA/802.1x - The WPA encrypts each frame transmitted from the radio using the key, which either PSK (Pre-Shared Key) entered manually in this field below or automatically negotiated via 802.1x authentication. WPA2/802.1x - The WPA encrypts each frame transmitted from the radio using the key, which either PSK (Pre-Shared Key) entered manually in this field below or automatically negotiated via 802.1x authentication. WPA Algorithms Select TKIP, AES or TKIP/AES as the algorithm for WPA.
Enable - Enable the WEP Encryption. Such feature is available for WEP/802.1x mode. Click the link of RADIUS Server to access into the following page for more settings. Use internal RADIUS Server There is a RADIUS server built in VigorAP 800 which is used to authenticate the wireless client connecting to the access point. Check this box to use the internal RADIUS server for wireless security. Besides, if you want to use the external RADIUS server for authentication, do not check this box.
Policy Select to enable any one of the following policy or disable the policy. Choose Activate MAC address filter to type in the MAC addresses for other clients in the network manually. Choose Blocked WLAN from LAN will separate all the WLAN stations from LAN based on the MAC Address list. MAC Address Filter Display all MAC addresses that are edited before. Client’s MAC Address Manually enter the MAC address of wireless client. Add Add a new MAC address into the list.
3.4.4 WPS Open Wireless LAN>>WPS to configure the corresponding settings. Enable WPS Check this box to enable WPS setting. WPS Configured Display related system information for WPS. If the wireless security (encryption) function of VigorAP 800 is properly configured, you can see ‘Yes’ message here. WPS SSID Display current selected SSID. WPS Auth Mode Display current authentication mode of the VigorAP 800r. Only WPA2/PSK and WPA/PSK support WPS.
3.4.5 AP Discovery VigorAP 800 can scan all regulatory channels and find working APs in the neighborhood. Based on the scanning result, users will know which channel is clean for usage. Also, it can be used to facilitate finding an AP for a WDS link. Notice that during the scanning process (about 5 seconds), no client is allowed to connect to Vigor. This page is used to scan the existence of the APs on the wireless LAN. Please click Scan to discover all the connected APs.
3.4.6 Station List Station List provides the knowledge of connecting wireless clients now along with its status code. MAC Address Display the MAC Address for the connecting client. SSID Display the SSID that the wireless client connects to. Auth Display the authentication that the wireless client uses for connection with such AP. Encrypt Display the encryption mode used by the wireless client. Refresh Click this button to refresh the status of station list.
3.5 Wireless LAN Settings for Station-Infrastructure Mode When you choose Station-Infrastructure as the operation mode, the Wireless LAN menu items will include General Setup, Site Survey, Statistics and WPS. 3.5.1 General Setup By clicking the General Setup, a new web page will appear so that you could configure the wireless profile and choose proper mode. Please refer to the following figure for more information. Enable Wireless LAN Check the box to enable wireless function.
Delete Click this button to delete the selected wireless profile. Edit Click this button to modify the existing wireless profile. Connect Click this button to connect the wireless station to AP with the selected profile. Packet-OVERDRIVE This feature can enhance the performance in data transmission about 40%* more (by checking Tx Burst). It is active only when both sides of Access Point and Station (in wireless client) invoke this function at the same time.
Profile Name Type a name for the new profile. SSID Type the name for such access point that can be used for connection by the stations. Network Type Infrastructure - In this mode, you can connect the access point to Ethernet device such as TV and Game player to enable the Ethernet device as a wireless station and join to a wireless network through an access point or AP router. 802.11 Ad Hoc – An ad-hoc network is a network where wireless stations can communicate with peer to peer (P2P).
default value if you don’t know what it is, default value is 2346. Security Mode 802.11 standard defines two mechanisms for authentication of wireless LAN clients: Open Authentication and Shared Key Authentication. Choose one of the security modes from the drop down list. If you choose OPEN or SHARED, you have to type WEP information. OPEN – Open authentication is basically null authentication algorithm, which means that there is no verification of the user.
transfer performance. WEP Key Entry Method There are two types of key method: ASCII and Hex. When you select a key format, the number of characters of key will be displayed. For example, if you select 64-bit as key length, and Hex as key format, you’ll see the message at the right of Key Format is ‘Hex (10 characters) which means the length of WEP key is 10 characters.
3.5.2 Site Survey The page will list the access points nearby as VigorAP800 is set to Station mode. You can select one of the access points to associate. SSID Display the SSID name of the access point. BSSID Display the BSSID (MAC Address) of the access point. RSSI Display the signal strength of the access point. RSSI is the abbreviation of Receive Signal Strength Indication. Channel Display the channel number of the access point. Encryption Display the encryption setting of the access points.
Click Rest Counters if required. 3.5.4 WPS (Wi-Fi Protected Setup) Wi-Fi Protected Setup (WPS) is the simplest way to build connection between wireless network clients and the access point. You don’t have to select encryption mode and input a long encryption passphrase every time when you need to setup a wireless client. You only have to press a button on wireless client and the access point, and the WPS will do the setup for you.
Status Display the status of WPS access point. Refresh Click this button to refresh the AP site survey. Start PBC Click Start PBC to make a WPS connection within 2 minutes. PIN Start When using PinCode method, it is required to enter PIN Code (Personal Identification Number Code, 8-digit numbers) into Registrar. When the wireless station is Enrollee, the users can use Renew PIN to re-generate a new PIN code. Renew PIN Click this button to re-generate a new PIN code.
3.6 Wireless LAN Settings for AP Bridge-Point to Point/AP Bridge-Point to Multi-Point Mode When you choose AP Bridge-Point to Point or Point-to Multi-Point Mode as the operation mode, the Wireless LAN menu items will include General Setup, AP Discovery and WDS AP Status. AP Bridge-Point to Point allows VigorAP 800 to connect to another VigorAP 800 which uses the same mode. All wired Ethernet clients of both VigorAP 800s will be connected together.
Enable Wireless LAN Check the box to enable wireless function. Mode At present, VigorAP 800 can connect to 11b only, 11g only, 11n only, Mixed (11b+11g) and Mixed (11b+11g+11n) stations simultaneously. Simply choose Mixed (11b+11g+11n) mode. Channel Means the channel of frequency of the wireless LAN. The default channel is 11. You may switch channel if the selected channel is under serious interference.
should be setup to the same Phy mode for connecting with each other. Security Select WEP, TKIP or AES as the encryption algorithm. Type the key number if required. Peer Mac Address Type the peer MAC address for the access point that VigorAP 800 connects to. Packet-OVERDRIVE This feature can enhance the performance in data transmission about 40%* more (by checking Tx Burst). It is active only when both sides of Access Point and Station (in wireless client) invoke this function at the same time.
3.6.2 AP Discovery VigorAP 800 can scan all regulatory channels and find working APs in the neighborhood. Based on the scanning result, users will know which channel is clean for usage. Also, it can be used to facilitate finding an AP for a WDS link. Notice that during the scanning process (about 5 seconds), no client is allowed to connect to VigorAP 800. This page is used to scan the existence of the APs on the wireless LAN. Yet, only the AP which is in the same channel of VigorAP 800 can be found.
settings page. 3.6.3 WDS AP Status VigorAP 800 can display the status such as MAC address, physical mode, power save and bandwidth for the working AP connected with WDS. Click Refresh to get the newest information.
3.7 Wireless LAN Settings for AP Bridge-WDS Mode When you choose AP Bridge-WDS as the operation mode, the Wireless LAN menu items will include General Setup, Security, Access Control, WPS, AP Discovery and Station List. 3.7.1 General Setup By clicking the General Setup, a new web page will appear so that you could configure the Phy mode, security, Tx Burst and choose proper mode. Please refer to the following figure for more information.
Enable Wireless LAN Check the box to enable wireless function. Mode At present, VigorAP 800 can connect to 11b only, 11g only, 11n only, Mixed (11b+11g) and Mixed (11b+11g+11n) stations simultaneously. Simply choose Mixed (11b+11g+11n) mode.
Enable 2 Subnet (Simulate 2 APs) Check the box to enable the function for two independent subnets. Once you enable this function, LAN-A and LAN-B would be independent. Next, you can connect one router in LAN-A, and another router in LAN-B. Such mechanism can make you feeling that you have two independent AP/subnet functions in one VigorAP 800. If you disable this function, LAN-A and LAN-B ports are in the same domain.
Extension Channel With 802.11n, there is one option to double the bandwidth per channel. The available extension channel options will be varied according to the Channel selected above. Rate If you choose 11g Only, 11b Only or 11n Only, such feature will be available for you to set data transmission rate. Phy Mode There are three types of transmission rates developed by different techniques for Phy Mode. Data will be transmitted via communication channel. Subnet Choose LAN-A or LAN-B for each SSID.
WMM Capable To apply WMM parameters for wireless data transmission, please click the Enable radio button. Antenna VigorAP 800 can be attached with two antennas to have good data transmission via wireless connection. However, if you have only one antenna attached, please choose 1T1R. Tx Power The default setting is the maximum (100%). Lower down the value may degrade range and throughput of wireless.
3.7.2 Security This page allows you to set security with different modes for SSID 1, 2, 3 and 4 respectively. After configuring the correct settings, please click OK to save and invoke it. By clicking the Security Settings, a new web page will appear so that you could configure the settings. Mode There are several modes provided for you to choose. Disable - The encryption mechanism is turned off. WEP - Accepts only WEP clients and the encryption key should be entered in WEP Key.
authentication. It enables centralized remote access authentication for network management. The WPA encrypts each frame transmitted from the radio using the key, which either PSK (Pre-Shared Key) entered manually in this field below or automatically negotiated via 802.1x authentication. Select WPA, WPA2 or Auto as WPA mode. WPA/802.
available for WEP mode. 802.1x WEP Disable - Disable the WEP Encryption. Data sent to the AP will not be encrypted. Enable - Enable the WEP Encryption. Such feature is available for WEP/802.1x mode. Click the link of RADIUS Server to access into the following page for more settings. Use internal RADIUS Server There is a RADIUS server built in VigorAP 800 which is used to authenticate the wireless client connecting to the access point.
Policy Select to enable any one of the following policy or disable the policy. Choose Activate MAC address filter to type in the MAC addresses for other clients in the network manually. Choose Blocked WLAN from LAN will separate all the WLAN stations from LAN based on the MAC Address list. MAC Address Filter Display all MAC addresses that are edited before. Client’s MAC Address Manually enter the MAC address of wireless client. Add Add a new MAC address into the list.
3.7.4 WPS Open Wireless LAN>>WPS to configure the corresponding settings. Enable WPS Check this box to enable WPS setting. WPS Configured Display related system information for WPS. If the wireless security (encryption) function of VigorAP 800 is properly configured, you can see ‘Yes’ message here. WPS SSID Display current selected SSID. WPS Auth Mode Display current authentication mode of VigorAP 800. Only WPA2/PSK and WPA/PSK support WPS.
SSID Display the SSID of the AP scanned by VigorAP 800. BSSID Display the MAC address of the AP scanned by VigorAP 800. RSSI Display the signal strength of the access point. RSSI is the abbreviation of Receive Signal Strength Indication. Channel Display the wireless channel used for the AP that is scanned by VigorAP 800. Encryption Display the encryption mode for the scanned AP. Authentication Display the authentication type that the scanned AP applied.
3.7.6 WDS AP Status VigorAP 800 can display the status such as MAC address, physical mode, power save and bandwidth for the working AP connected with WDS. Click Refresh to get the newest information. 3.7.7 Station List Station List provides the knowledge of connecting wireless clients now along with its status code. MAC Address Display the MAC Address for the connecting client. SSID Display the SSID that the wireless client connects to.
3.8 Wireless LAN Settings for Universal Repeater Mode When you choose Universal Repeater as the operation mode, the Wireless LAN menu items will include General Setup, Security, WPS, AP Discovery, Universal Repeater and Station List. 3.8.1 General Setup By clicking the General Setup, a new web page will appear so that you could configure the SSID and the wireless channel. Please refer to the following figure for more information.
Enable Wireless LAN Check the box to enable wireless function. Mode At present, VigorAP 800 can connect to 11b only, 11g only, 11n only, Mixed (11b+11g) and Mixed (11b+11g+11n) stations simultaneously. Simply choose Mixed (11b+11g+11n) mode. Enable 2 Subnet (Simulate 2 APs) Check the box to enable the function for two independent subnets. Once you enable this function, LAN-A and LAN-B would be independent. Next, you can connect one router in LAN-A, and another router in LAN-B.
functions in one VigorAP 800. If you disable this function, LAN-A and LAN-B ports are in the same domain. You could only connect one router (no matter connecting to LAN-A or LAN-B) in this environment. Hide SSID Check it to prevent from wireless sniffing and make it harder for unauthorized clients or STAs to join your wireless LAN. Depending on the wireless utility, the user may only see the information except SSID or just cannot see any thing about VigorAP 800 while site surveying.
Extension Channel With 802.11n, there is one option to double the bandwidth per channel. The available extension channel options will be varied according to the Channel selected above. Rate If you choose 11g Only, 11b Only or 11n Only, such feature will be available for you to set data transmission rate. Packet-OVERDRIVE This feature can enhance the performance in data transmission about 40%* more (by checking Tx Burst).
WMM Capable To apply WMM parameters for wireless data transmission, please click the Enable radio button. Antenna VigorAP 800 can be attached with two antennas to have good data transmission via wireless connection. However, if you have only one antenna attached, please choose 1T1R. Tx Power The default setting is the maximum (100%). Lower down the value may degrade range and throughput of wireless. 3.8.
Disable - The encryption mechanism is turned off. WEP - Accepts only WEP clients and the encryption key should be entered in WEP Key. WPA/PSK or WPA2/PSK or Mixed (WPA+WPA2)/PSK Accepts only WPA clients and the encryption key should be entered in PSK. The WPA encrypts each frame transmitted from the radio using the key, which either PSK (Pre-Shared Key) entered manually in this field below or automatically negotiated via 802.1x authentication. WEP/802.
WPA2/802.1,WPA/802.1x, WPA/PSK or WPA2/PSK or Mixed (WPA+WPA2)/PSK mode. PMK Cache Period Set the expire time of WPA2 PMK (Pairwise master key) cache. PMK Cache manages the list from the BSSIDs in the associated SSID with which it has pre-authenticated. Such feature is available for WPA2/802.1 mode. Pre-Authentication Enables a station to authenticate to multiple APs for roaming securer and faster. With the pre-authentication procedure defined in IEEE 802.
IP Address Enter the IP address of external RADIUS server. Port The UDP port number that the external RADIUS server is using. The default value is 1812, based on RFC 2138. Shared Secret The external RADIUS server and client share a secret that is used to authenticate the messages sent between them. Both sides must be configured to use the same shared secret. Session Timeout Set the maximum time of service provided before re-authentication.
3.8.3 Access Control For additional security of wireless access, the Access Control facility allows you to restrict the network access right by controlling the wireless LAN MAC address of client. Only the valid MAC address that has been configured can access the wireless LAN interface. By clicking the Access Control, a new web page will appear, as depicted below, so that you could edit the clients' MAC addresses to control their access rights (deny or allow).
3.8.4 WPS Open Wireless LAN>>WPS to configure the corresponding settings. Enable WPS Check this box to enable WPS setting. WPS Configured Display related system information for WPS. If the wireless security (encryption) function of VigorAP 800 is properly configured, you can see ‘Yes’ message here. WPS SSID Display current selected SSID. WPS Auth Mode Display current authentication mode of VigorAP 800. Only WPA2/PSK and WPA/PSK support WPS.
3.8.5 AP Discovery VigorAP 800 can scan all regulatory channels and find working APs in the neighborhood. Based on the scanning result, users will know which channel is clean for usage. Also, it can be used to facilitate finding an AP for a WDS link. Notice that during the scanning process (about 5 seconds), no client is allowed to connect to Vigor. This page is used to scan the existence of the APs on the wireless LAN. Yet, only the AP which is in the same channel of VigorAP 800 can be found.
3.8.6 Universal Repeater The access point can act as a wireless repeater; it can be Station and AP at the same time. It can use Station function to connect to a Root AP and use AP function to serve all wireless stations within its coverage. Note: While using Universal Repeater mode, the access point will demodulate the received signal. Please check if this signal is noise for the operating network, then have the signal modulated and amplified again.
Open / Shared Mode Encryption Type Choose None to disable the WEP Encryption. Data sent to the AP will not be encrypted. To enable WEP encryption for data transmission, please choose WEP. WEP Keys Four keys can be entered here, but only one key can be selected at a time. The format of WEP Key is restricted to 5 ASCII characters or 10 hexadecimal values in 64-bit encryption level, or restricted to 13 ASCII characters or 26 hexadecimal values in 128-bit encryption level.
3.8.7 Station List Station List provides the knowledge of connecting wireless clients now along with its status code. MAC Address Display the MAC Address for the connecting client. SSID Display the SSID that the wireless client connects to. Auth Display the authentication that the wireless client uses for connection with such AP. Encrypt Display the encryption mode used by the wireless client. Refresh Click this button to refresh the status of station list.
3.9 Wireless LAN (5G) Settings for AP Mode When a 5G Dongle connects to VigorAP 800, only AP mode (the operation mode) is available for configuration. The AP mode allows wireless clients to connect to access point and exchange data with the devices connected to the wired network. If no 5G dongle connected to VigorAP 800, an error message will be displayed and no function in this menu can be activated. 3.9.
that you have two independent AP/subnet functions in one VigorAP 800. If you disable this function, LAN-A and LAN-B ports are in the same domain. You could only connect one router (no matter connecting to LAN-A or LAN-B) in this environment. Hide SSID Check it to prevent from wireless sniffing and make it harder for unauthorized clients or STAs to join your wireless LAN.
Mode There are several modes provided for you to choose. Disable - The encryption mechanism is turned off. WEP - Accepts only WEP clients and the encryption key should be entered in WEP Key. WPA/PSK or WPA2/PSK or Mixed (WPA+WPA2)/PSK Accepts only WPA clients and the encryption key should be entered in PSK. The WPA encrypts each frame transmitted from the radio using the key, which either PSK (Pre-Shared Key) entered manually in this field below or automatically negotiated via 802.1x authentication.
WPA/802.1x - The WPA encrypts each frame transmitted from the radio using the key, which either PSK (Pre-Shared Key) entered manually in this field below or automatically negotiated via 802.1x authentication. WPA2/802.1x - The WPA encrypts each frame transmitted from the radio using the key, which either PSK (Pre-Shared Key) entered manually in this field below or automatically negotiated via 802.1x authentication. WPA Algorithms Select TKIP, AES or TKIP/AES as the algorithm for WPA.
Enable - Enable the WEP Encryption. Such feature is available for WEP/802.1x mode. Click the link of RADIUS Server to access into the following page for more settings. Use internal RADIUS Server There is a RADIUS server built in VigorAP 800 which is used to authenticate the wireless client connecting to the access point. Check this box to use the internal RADIUS server for wireless security. Besides, if you want to use the external RADIUS server for authentication, do not check this box.
Policy Select to enable any one of the following policy or disable the policy. Choose Activate MAC address filter to type in the MAC addresses for other clients in the network manually. Choose Blocked WLAN from LAN will separate all the WLAN stations from LAN based on the MAC Address list. MAC Address Filter Display all MAC addresses that are edited before. Client’s MAC Address Manually enter the MAC address of wireless client. Add Add a new MAC address into the list.
SSID Display the SSID of the AP scanned by VigorAP 800. BSSID Display the MAC address of the AP scanned by VigorAP 800. RSSI Display the signal strength of the access point. RSSI is the abbreviation of Receive Signal Strength Indication. Channel Display the wireless channel used for the AP that is scanned by VigorAP 800. Encryption Display the encryption mode for the scanned AP. Authentication Display the authentication type that the scanned AP applied.
Add to Access Control Client’s MAC Address - For additional security of wireless access, the Access Control facility allows you to restrict the network access right by controlling the wireless LAN MAC address of client. Only the valid MAC address that has been configured can access the wireless LAN interface. Add Click this button to add current typed MAC address into Access Control.
3.10 RADIUS Server VigorAP 800 offers a built-in RADIUS server to authenticate the wireless client that tries to connect to VigorAP 800. The AP can accept the wireless connection authentication requested by wireless clients. Enable RADIUS Server Check it to enable the internal RADIUS server. Users Profile Username – Type a new name for the user profile. Password – Type a new password for such new user profile. Confirm Password – Retype the password to confirm it.
Cancel – Clear current settings for the client. Delete Selected – Delete the selected client(s). Delete All – Delete all of the clients. 3.11 System Maintenance For the system setup, there are several items that you have to know the way of configuration: Status, TR-069, Administrator Password, Configuration Backup, Syslog, Time setup, Reboot System, Firmware Upgrade. Below shows the menu items for System Maintenance. 3.11.1 System Status The System Status provides basic network settings of Vigor modem.
MAC Address Display the MAC address of the LAN Interface. IP Address Display the IP address of the LAN interface. IP Mask Display the subnet mask address of the LAN interface. Wireless------MAC Address Display the MAC address of the WAN Interface. SSID Display the SSID of the device. Channel Display the channel that the station used for connecting with such device. 3.11.2 TR-069 This device supports TR-069 standard.
On – Choose the interface (LAN-A or LAN-B) for VigorAP 800 connecting to ACS server. Port – Sometimes, port conflict might be occurred. To solve such problem, you might change port number for CPE. Periodic Inform Settings The default setting is Enable. Please set interval time or schedule time for the AP to send notification to CPE. Or click Disable to close the mechanism of notification. Interval Time – Type the value for the interval time setting. The unit is “second”.
3.11.4 Configuration Backup Backup the Configuration Follow the steps below to backup your configuration. 1. Go to System Maintenance >> Configuration Backup. The following windows will be popped-up, as shown below. 2. Click Backup button to get into the following dialog. Click Save button to open another dialog for saving configuration as a file. 3. In Save As dialog, the default filename is config.cfg. You could give it another name by yourself.
4. Click Save button, the configuration will download automatically to your computer as a file named config.cfg. The above example is using Windows platform for demonstrating examples. The Mac or Linux platform will appear different windows, but the backup function is still available. Note: Backup for Certification must be done independently. The Configuration Backup does not include information of Certificate. Restore Configuration 1. Go to System Maintenance >> Configuration Backup.
3.11.6 Firmware Upgrade Before upgrading your modem firmware, you need to install the Modem Tools. The Firmware Upgrade Utility is included in the tools. The following web page will guide you to upgrade firmware by using an example. Note that this example is running over Windows OS (Operating System). Download the newest firmware from DrayTek's web site or FTP site. The DrayTek web site is www.draytek.com (or local DrayTek's web site) and FTP site is ftp.draytek.com.
3.13 Support Area When you click the menu item under Support Area, you will be guided to visit www.draytek.com and open the corresponding pages directly. Click Support Area>>Application Note, the following web page will be displayed. Click Support Area>>FAQ, the following web page will be displayed.
Click Support Area>>Product Registration, the following web page will be displayed.
This page is left blank.
Application and Examples 4.1 Upgrade Firmware for Your Modem Before upgrading your device firmware, you need to install the Router Tools. The file RTSxxx.exe will be asked to copy onto your computer. Remember the place of storing the execution file. 1. Go to www.draytek.com. 2. Access into Support >> Downloads. Please find out Firmware menu and click it. Search the model you have and click on it to download the newly update firmware for your router. 3. Access into Support >> Downloads.
5. Double click on the icon of modem tool. The setup wizard will appear. 6. Follow the onscreen instructions to install the tool. Finally, click Finish to end the installation. 7. From the Start menu, open Programs and choose Modem Tools XXX >> Firmware Upgrade Utility. 8. Type in your modem IP, usually 192.168.1.2. 9. Click the button to the right side of Firmware file typing box. Locate the files that you download from the company web sites.
10. Click Send. 11. Now the firmware update is finished.
4.2 How to set different segments for different SSIDs in VigorAP 800 VigorAP 800 supports two network segments, LAN-A and LAN-B for different SSIDs. With such feature, the user can dispatch SSIDs with different network segments for reaching the target of managing wireless network. See the following figure. In the above figure, VigorAP 800 is used to control the wireless network connection. It can separate the wireless traffic between accessing internal server and the usage of video.
2. Open Wireless LAN >> General Setup. Choose the subnet LAN-A for SSID 1 and choose LAN-B for SSID 2. Specify the wireless channel. Then, click OK to save the configuration. 3. Open Wireless LAN >> Security Settings. Set the encryption method and set the password for SSID 1 and SSID 2 respectively.
4. Open LAN>General Setup to configure the settings for enabling DHCP server on LAN-A/LAN-B. If there is a DHCP server configured in the same network segment, skip this step. 5. After finishing the above settings, the wireless equipment connecting to VigorAP 800 with SSID 1 can get the IP address assigned by LAN-A 192.168.1.0/24 for accessing the internal server. The wireless equipment connecting to VigorAP 800 with SSID 2 can get the IP address assigned by LAN-B 192.168.2.
Trouble Shooting This section will guide you to solve abnormal situations if you cannot access into the Internet after installing the modem and finishing the web configuration. Please follow sections below to check your basic installation status stage by stage. z Checking if the hardware status is OK or not. z Checking if the network connection settings on your computer are OK or not. z Pinging the modem from your computer. z Checking if the ISP settings are OK or not.
5.2 Checking If the Network Connection Settings on Your Computer Is OK or Not Sometimes the link failure occurs due to the wrong network connection settings. After trying the above section, if the link is stilled failed, please do the steps listed below to make sure the network connection settings is OK. For Windows The example is based on Windows XP. As to the examples for other operation systems, please refer to the similar steps or find support notes in www.draytek.com. 1.
4. Select Obtain an IP address automatically and Obtain DNS server address automatically. For Mac Os 1. Double click on the current used Mac Os on the desktop. 2. Open the Application folder and get into Network. 3. On the Network screen, select Using DHCP from the drop down list of Configure IPv4.
5.3 Pinging the Modem from Your Computer The default gateway IP address of the modem is 192.168.1.2. For some reason, you might need to use “ping” command to check the link status of the modem. The most important thing is that the computer will receive a reply from 192.168.1.2. If not, please check the IP address of your computer. We suggest you setting the network connection as get IP automatically. (Please refer to the section 5.2) Please follow the steps below to ping the modem correctly. For Windows 1.
5.4 Backing to Factory Default Setting If Necessary Sometimes, a wrong connection can be improved by returning to the default settings. Try to reset the modem by software or hardware. Warning: After pressing factory default setting, you will loose all settings you did before. Make sure you have recorded all useful settings before you pressing. The password of factory default is null. Software Reset You can reset the modem to factory default via Web page.
After restore the factory default setting, you can configure the settings for the modem again to fit your personal request. 5.5 Contacting Your Dealer If the modem still cannot work correctly after trying many efforts, please contact your dealer for further help right away. For any questions, please feel free to send e-mail to support@draytek.com.