VigorPro 5510 Series Unified Security Firewall Quick Start Guide For Anti-Virus Anti-Intrusion Service Version: 1.0 Date: 2007/10/16 Please visit www.draytek.com to get the newly updated manual at any time.
Copyright Information Copyright Declarations Copyright 2007 All rights reserved. This publication contains information that is protected by copyright. No part may be reproduced, transmitted, transcribed, stored in a retrieval system, or translated into any language without written permission from the copyright holders. The scope of delivery and other details are subject to change without prior notice.
European Community Declarations Manufacturer: Address: Product: DrayTek Corp. No. 26, Fu Shing Road, HuKou County, HsinChu Industrial Park, Hsin-Chu, Taiwan 303 VigorPro 5510 DrayTek Corp. declares that VigorPro 5510 Series is in compliance with the following essential requirements and other relevant provisions of R&TTE Directive 1999/5/EEC.
Table of Contents 1. Introduction........................................................................................................... 1 1.1 Panel Explanation ...................................................................................................................... 2 1.1.1 For VigorPro 5510 .......................................................................................................... 2 1.1.2 For VigorPro 5510Gi....................................................................
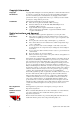
1. Introduction VigorPro 5510 Series is an all-in-one Anti-Virus and Anti-Intrusion security appliance for SOHO and branch office. VigorPro 5510 Series provides real-time network protection against viruses, worms and malicious programs via e-mail, FTP and web browser. The rule-based website content filtering blocks improper connection to internet in flexible way. With DrayTek’s DrayOS™ as kernel, VigorPro 5510 Series provides robust and stable VPN, firewall and routing functionality as well.
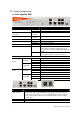
1.1 Panel Explanation 1.1.1 For VigorPro 5510 LED Status Explanation ACT (Activity) Blinking Off On (Yellow) On (Yellow) On On Blinking On On The router is powered on and running normally. The router is powered off. The anti-intrusion function is enabled. IDP (Intrusion Detection and Prevention) Virus DMZ USB Monitor CSM Off The anti-virus function is enabled. DMZ Host is specified in certain site. A USB device is connected and active. The data is transmitting. LAN traffic monitor is active.
LAN (1-4) USB Connecter for local networked devices. Connecter for a USB device. Connecter for a power cord with 100-240VAC (inlet). Power Switch. “1” is ON; “0” is OFF.
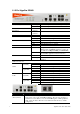
1.1.2 For VigorPro 5510Gi LED Status Explanation ACT (Activity) Blinking Off On (Yellow) On (Yellow) On On Blinking On Blinking Off On On The router is powered on and running normally. The router is powered off. The anti-intrusion function is enabled. IDP (Intrusion Detection and Prevention) Virus DMZ USB WLAN Monitor CSM Off On Blinking ISDN The anti-virus function is enabled. DMZ Host is specified in certain site. A USB device is connected and active. The data is transmitting.
ISDN WAN(1/2) LAN/Monitor LAN (1-4) USB Connecter for ISDN line. Connecter for remote networked devices. Connecter for local networked devices. Connecter for local networked devices. Connecter for a USB device. Connecter for a power cord with 100-240VAC (inlet). Power Switch. “1” is ON; “0” is OFF.
1.2 Package Content nQuick Start Guide oCD p Antenna for G models qRJ-45 Cable (Ethernet) r RJ-45 to RJ-45 Cable for i models s The type of the power cord depends on the country that the router will be installed: UK-type power cord EU-type power cord USA/Taiwan-type power cord AU/NZ-type power cord * The maximum power consumption is 12-15 Watt.
2. Installing Your Vigor Router This section will guide you to install the router through hardware connection and configure the router’s settings through web browser. Before starting to configure the router, you have to connect your devices correctly. 1. Connect a cable Modem/DSL Modem/Media Converter (depends on your requirement) to any WAN port of router with Ethernet cable (RJ-45). The WAN1/WAN2 LED (Left or Right) will light up according to the speed (100 or 10) of the device that it connected. 2.
This page is left blank for remark if necessary.
3. Configuring Web Pages The Quick Start Wizard is designed for you to easily set up your router for Internet access. You can directly access the Quick Start Wizard via Web Configurator. 1. Make sure your PC connects to the router correctly. Notice: You may either simply set up your computer to get IP dynamically from the router or set up the IP address of the computer to be the same subnet as the default IP address of Vigor router 192.168.1.1.
10 4. Enter the login password on the field of New Password and retype it on the field of Confirm Password. Then click Next to continue. 5. On the next page as shown below, please select the WAN interface that you use. Choose Auto negotiation as the physical type for your router. Then click Next for next step. 6. On the next page as shown below, please select the appropriate Internet access type according to the information from your ISP.
PPPoE: if you click PPPoE as the protocol, please manually enter the Username/Password provided by your ISP. Then click Next. PPTP: if you click PPTP, you will get the following page. Please type in all the information originally provided by your ISP. Then click Next for next step. Static IP: if you click Static IP, you will get the following page. Please type in all the information originally provided by your ISP. Then click Next for next step.
DHCP: if you click DHCP, you will get the following page. Please type in all the information originally provided by your ISP. Then click Next for next step. 7. 12 Now you can see the following screen. It indicates that the setup is complete. Different types of connection modes will have different summary. Click Finish and then restart the router. Afterward, you will enjoy surfing on the Internet.
4. Registration for the Router Now you can surf on Internet freely. It is time to continue the registration and activation of your router for using the functions of anti-intrusion, anti-virus and anti-spam. To use the anti-intrusion, anti-virus and anti-spam features of VigorPro series router, you have to create a new account, finish the registration for that account by using the router and complete the registration for the Vigor router.
14 2. Check to confirm that you accept the Agreement and click Accept. 3. Type your personal information in this page and then click Continue.
4. Choose proper selection for your computer and click Continue. 5. Now you have created an account successfully. 6. Check to see the confirmation email with the title of New Account Confirmation Letter from www.vigorpro.com.
16 7. Click the Activate my Account link to enable the account that you created. The following screen will be shown to verify the register process is finished. Please click Login. 8. When you see the following page, please type in the account and password (that you just created) in the fields of UserName and Password. Then type the code in the box of AuthCode according to the value displayed on the right side of it. 9. Now, click Login. Your account has been activated.
4.2 Creating and Activating an Account from Router Web Configurator You, also can created and register a new account from the web configurator of the VigorPro router. 1. Open a web browser on your PC and type http://192.168.1.1. A pop-up window will open to ask for username and password. Do not type any word on the window and click OK. 2. From the router’s web page, please open Defense Configuration >>Activation. You will see the following web page. 3.
18 4. A Re-login page will be shown on the screen. 5. Locate and click Create an account now link on the bottom of this page. You will access into the following page. Check the box below to confirm that you accept the Agreement and click Accept.
6. Type your personal information in this page and then click Continue. 7. Choose proper selection for your computer and click Continue.
8. Now you have created an account successfully. 9. Check to see the confirmation email with the title of New Account Confirmation Letter from www.vigorpro.com. 10. Click the Activate my Account link to enable the account that you created. The following screen will be shown to verify the register process is finished. Please click Login.
11. When you see the following page, please type in the account and password (that you just created) in the fields of UserName and Password. Then type the code in the box of AuthCode according to the value displayed on the right side of it. 12. Now, click Login. Your account has been activated. And the following page will be shown automatically. DrayTek will maintain a database of MAC address/serial number of shipped goods. Only products with shipping records can be registered.
4.3 Registering Your Vigor Router You have activated the new account for the router. Now, it is the time for you to register your vigor router. Open Defense Configuration >>Activation. Registering Vigor router should be done just for once. If the router has been registered previously, the system will not allow you to register the router again. After finishing the router registration, you can activate Anti-Virus and Anti-Intrusion. 22 1. Open a web browser on your PC and type http://192.168.1.1.
4. A Re-login page will be shown on the screen. Please type the account and password that you created previously. And click Login. 5. The following page will be displayed after you logging in VigorPro server. From this page, please click Add.
6. When the following page appears, please type in Nick Name (for the router) and choose the right purchase date from the popup calendar (it appears when you click on the box of Purchase Date). 7. After adding the basic information for the router, please click Submit. 8. Now, your router information has been added to the database. Click OK to leave this web page and return to My Product web page. Now, you have finished the procedure for registering your router.
4.4 Activating Anti-Virus/Anti-Intrusion Service After registering your vigor router, you have to follow the steps listed below to activate anti-virus/anti-intrusion service to obtain full security for your computer. 1. Open a web browser on your PC and type http://192.168.1.1. A pop-up window will open to ask for username and password. 2. From the router’s web page, please open Defense Configuration >>Activate. You will see the following web page. 3.
26 5. On the web page of My Product, you can find a list of the devices that you add with the above steps. Currently, you just have added VigorPro 5510. Please click the serial number link. 6. From the Device’s Service section, click the Trial button for AI-AV (Anti-Intrusion & Anti-Virus) service with provider DT-DT. Rename It allows you to change the account name. Delete It allows you to delete account name used currently.
Back 7. It allows you to return to the previous account. In the following page, check the box of “I have read and accept the above Agreement”. The system will find out the date for you to activate this version of service. Then, click Next. Note: DT-DT means you can acquire the anti-intrusion and anti-virus services from DrayTek Corporation. 8. When this page appears, click Register. 9.
10. Click Close. 11. Open Defense Configuration>>Activation page of the router’s web configurator. The start date and expire date for the license are shown in this page. 12. Click Activate to access into VigorPro website again. Open the following page. You will see the AI-AV (with provider DT-DT) has been activated and in use. Now, you have finished Anti-Intrusion/Anti-Virus configuration.
4.5 Backup and Upgrade Signature for Anti-Intrusion/Anti-Virus You can get the most updated signature from DrayTek’s server if the license key of anti-virus/anti-intrusion for the VigorPro 5510 is not expired. Before you upgrade the signature, please check the validation information either from WEB user interface of VigorPro 55100 or account information from www.vigorpro.com. 1. Open a web browser on your PC and type http://192.168.1.1. A pop-up window will open to ask for username and password. 2.
Time for Backup Before changing other license, it is suggested for you to backup the original signature first. To backup current signature information with the filename vigorpro.sig, click Backup. Time for Download After changing other license, it is suggested for you to download newly update signature for your router. To download newly update anti-intrusion and anti-virus from VigorPro website, please click Download Now!!!. Time for Import Backup files can be imported whenever you want.
If you do not check the Anti-Intrusion box and choose a proper profile for Anti-Virus, you still cannot use the Anti-Intrusion/Anti-Virus function even if you finished all the relational profiles configuration.
This page is left blank for remark if necessary.
5. Trouble Shooting This section will guide you to solve abnormal situations if you cannot access into the Internet after installing the router and finishing the web configuration. Please follow sections below to check your basic installation status stage by stage. ¾ Checking if the hardware status is OK or not. ¾ Checking if the network connection settings on your computer are OK or not. ¾ Pinging the router from your computer. ¾ Checking if the ISP settings are OK or not.
For Windows 34 The example is based on Windows XP. As to the examples for other operation systems, please refer to the similar steps or find support notes in www.draytek.com. 1. Go to Control Panel and then double-click on Network Connections. 2. Right-click on Local Area Connection and click on Properties. 3. Select Internet Protocol (TCP/IP) and then click Properties.
4. Select Obtain an IP address automatically and Obtain DNS server address automatically. For MacOs 1. Double click on the current used MacOs on the desktop. 2. Open the Application folder and get into Network. 3. On the Network screen, select Using DHCP from the drop down list of Configure IPv4.
5.3 Pinging the Router from Your Computer The default gateway IP address of the router is 192.168.1.1. For some reason, you might need to use “ping” command to check the link status of the router. The most important thing is that the computer will receive a reply from 192.168.1.1. If not, please check the IP address of your computer. We suggest you setting the network connection as get IP automatically. (Please refer to the section 5.2) Please follow the steps below to ping the router correctly.
5.4 Checking If the ISP Settings are OK or Not Click WAN>>Internet Access group and then check whether the ISP settings are set correctly. For PPPoE Users 1. Check if the Enable option for PPPoE Link is selected. 2. Check if Username and Password are entered with correct values that you got from your ISP.
For Static IP/DHCP Users 1. Check if the Enable option for Static or Dynamic IP is selected. 2. Check if IP Address, Subnet Mask and Gateway are set correctly (must identify with the values from your ISP) if you choose Specify an IP address. For PPTP Users 38 1. Check if the Enable option for PPTP Link is selected. And check the IP address for the PPTP Server. 2. Check if IP Address and Subnet Mask are set correctly (must identify with the values from your ISP) if you choose Specify an IP address.
5.5 Backing to Factory Default Setting If Necessary Sometimes, a wrong connection can be improved by returning to the default settings. Try to reset the router by software or hardware. Warning: After pressing factory default setting, you will loose all settings you did before. Make sure you have recorded all useful settings before you pressing. The password of factory default is null. Software Reset You can reset the router to factory default via Web page.
5.6 Contacting Your Dealer If the router still cannot work correctly after trying many efforts, please contact your dealer for further help right away. For any questions, please feel free to send e-mail to support@draytek.com.