
Owner manual


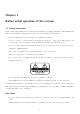
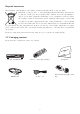


1.3.2 Rear view
Scart TV
Tuner B
S/PDIF
optical
Video
out
Audio
out
Tuner A
Ethernet
USB
Service
eSATA
Dream-Multimedia GmbH
~ 110/230V / 50/60Hz
+/- 15%
HDMI
Power OFF/ON
13/18V= / LNB IN
IN
OUT
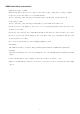
Dream-Multimedia GmbH
230 / 110 V
230V
L
R
Powerswitch
Power
connector
Voltage selector
230V / 110V
HDMI output
Network interface
S/PDIF
optical audio
Composite
video output
Service connector
eSATA connector
2 x USB 2.0
port
Antenna
output OUT
input IN
LNB input
Scart TV output
Analog audio terminal
(Cinch)
Powerswitch The main power switch shuts off power from your Dreambox.
!!! IMPORTANT !!! Before opening the device, always pull the power plug!
Power connector Plug the power cable into the main power socket. You must not connect the power plug
to anything other than a socket that supplies 110V/60Hz or 230V/50Hz.
Voltage selector 230V/110V Using this switch the Dreambox can be used in countries with 110V mains
power, as in the USA for example. Move the switch to the 110V position to acieve this.
!!! WARNING !!! Check that the switch is in the right position before switching on your Dreambox.
Otherwise irreversible damages might result.
eSATA connector You can connect an external SATA Hard disk.
Service connector The Service port is used to update the operating system. Please connect a mini-usb-to-
usb-cable here.
Scart TV output Connect your TV, projector or beamer to your Dreambox using a Scart cable.
Composite video output You can optionally connect your Dreambox to a TV using a RCA/Chinch cable.
(Signal is CVBS)
Analog audio terminal (Cinch) Connect your Dreambox with a RCA/Cinch cable to your HiFi-Amplifier
(e.g. AUX In or Tape In ports).
S/PDIF optical audio You can connect your Dreambox with an optical (Toslink) cable to your HiFi-
Amplifier or DSP. The AC3 signal is also available at this port in case the selected channel transmits
Dolby Digital signals.
HDMI output You can connect a TV to the HDMI out of your Dreambox if your TV has the right input.
5